Volleyball Stat! v3.5
Assists
Detailed Stats
Export / Import Data
Introduction
Game Play Screen
Non-Specific Score
Other Controls
Playing Floor
Files Screen
History Screen
Reports Screen
Screens
Score Screen
Settings Screen
There are two major sections in this documentation: first, a short introduction to the use of this program which is sufficient to allow start using this app; and second, a description of each screen and each button on each screen. If you are new to Volleyball Stat! a quick read through the introduction will get you started.
An Introduction to using Volleyball Stat!
This introduction is not a complete description of the app's capabilities, nor is it intended to be. Rather this is a brief walk through of the use of this app during a single match. This should be sufficient to get started.
To use Volleyball Stat!, the first thing you need to do is to enter the players of the team for which you will be recording stats (the "green" team). To do so:
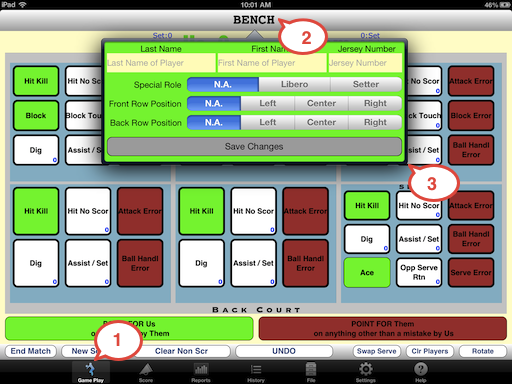
- Go to the Game Play screen by tapping on the far left icon in the black bar at the bottom of the screen -- item 1 in the image below.
- Tap twice quickly on the word BENCH at the top of the screen -- item 2.
- This will being up a popup window which appears in the image below as item 3. Prior to the double-tap on BENCH this popup window will not be on the screen.
- Enter information about the player. The only information required is the jersey number. The jersey number must be a positive integer (e.g., 2, 17, 9, 23). All of the other information in this popup is optional and is discussed in more detail below.
- Tap the Save Changes button. This will dismiss the popup window and add a button for the new player to the bench area. Tapping anywhere outside the player information window will dimmiss that window without recording any of the information.
- Repeat steps 2-5 as necessary to create buttons in the bench area for every player on the team.
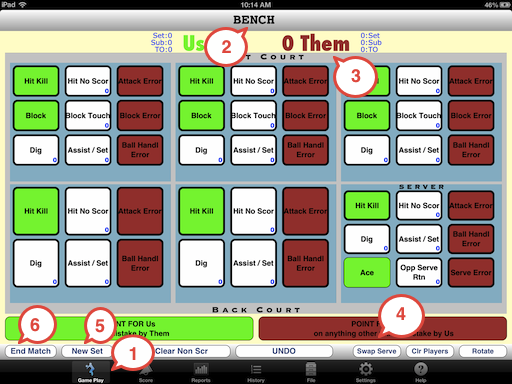
- Set team names: To set a team names, tap on the name of the team you want to change (for instance, in the above image, item 3, "Them"). This will bring up a popup box in which you can change the team name. The team name appearing in green is the team for which you will be recording stats. Changing the team name is described more below.
- Position the starting players on the court: To move a player from the bench to the playing floor, drag the player off of the bench and drop them onto the position they will be in at the start of the game. So doing will remove the player's name from the bench area and put it into the position on the playing floor.
- Set the team that has the first serve: Hit the "Swap Serve" button -- item 4 -- as needed. (In the image above, the green team is serving.)
- Player rotation
- Team serving
- Serve Made -- if the green team is serving, the person in the server's position is automatically credited with having made the serve
- Point played -- if the person is on the playing floor
- Assist -- if there is a person designated as a setter on the floor and the point ends in kill by the green team. The default assist can be overridden. (Designating a person as the setter is discussed further below.)
Screens and buttons in Volleyball Stat!
Volleyball Stat! has seven screens that are selectable using the tab bar that goes across the bottom of the window. The screens are (from left to right as they appear on the tab bar)- Game Play
- This is the screen on which stats are actually recorded. This is the screen you will be using the most.
- Score
- This screen shows the score of the current set in very large numbers.
- Reports
- This screen shows the accumulated stats in several tabular and graphical forms.
- History
- This screen shows, and in some cases allows the manipulation of, historical lists of items. Available lists are:
- Adjust. Make adjustments to recorded data
- Team Roster. Allows adding and removing players as well as editing existing players (all of which can be done from the bench area in the game play tab.). From here you can generate single player reports.
- Files
- The screen allows you to perform actions on the data. For example: saving, loading.
- Settings
- This screen allows you to customize some aspects of Volleyball Stat!.
- Help
- This screen shows instructions for using this app. You are probably looking at it now.
Game Play
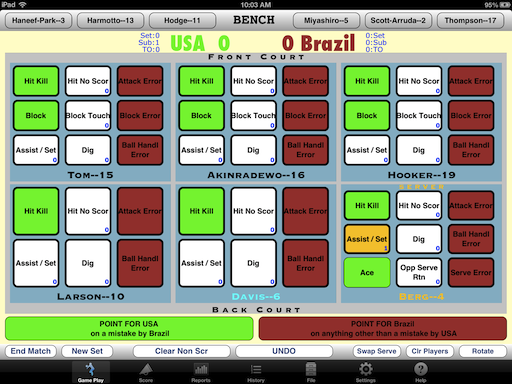
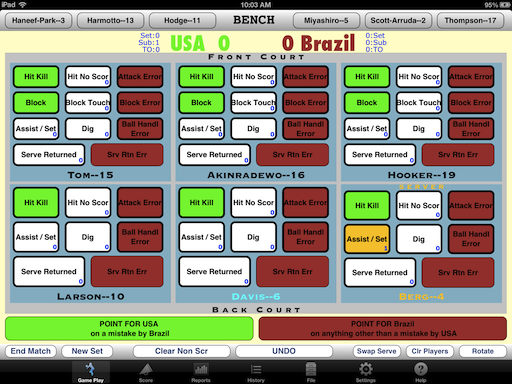
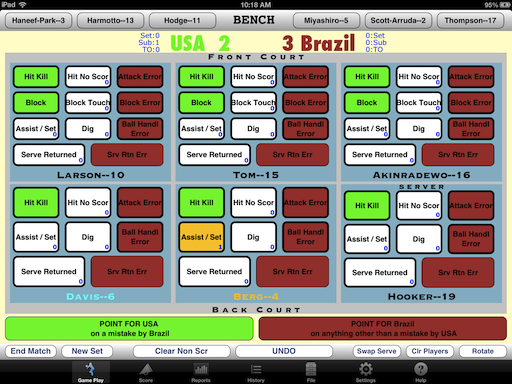
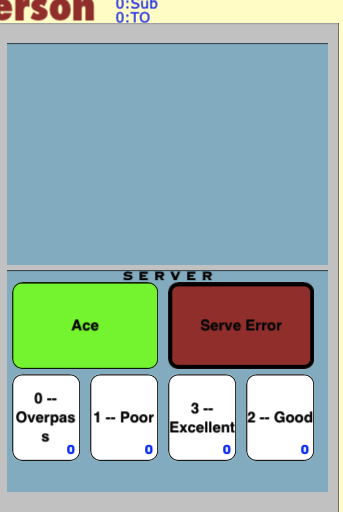
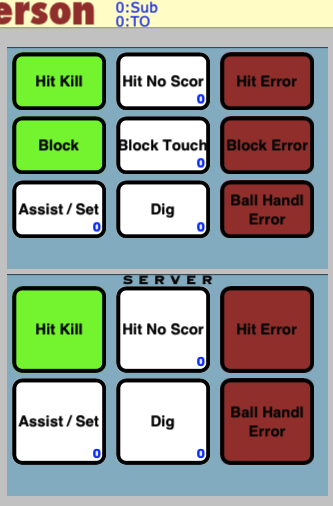
This is the screen used to collect stats. The default version of this screen will look very similar to one of the two following images which might have been taken just before the start of the Gold medal women's volleyball match at the 2012 Olympics. (The lineup for USA is probably incorrect.) Your player and team names will naturally differ. Customization using the settings tab can alter the labels on the buttons, whether or not those button appear, and the number and distribution of players on the floor.
| 
|
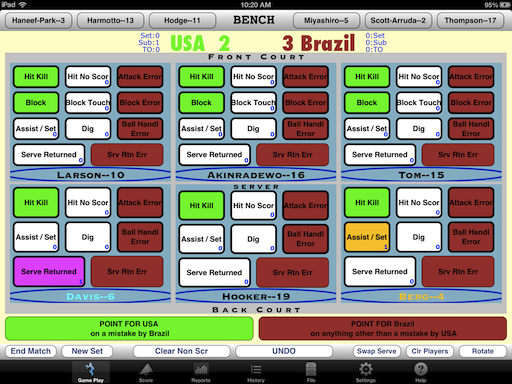
These two images differ only in terms of the team serving. In the left image USA is serving to Brazil; in the right USA is receiving serve from Brazil.
There are 5 major sections in the game play screen. From top to bottom they are:
- The bench
- The score
- The playing floor
- Non Specific Scoring
- Other controls
The Bench
The bench includes all players not currently playing; i.e., potential substitutes. Players sit in alphabetical order on the bench. From the bench you can: add players; delete players; change player information; and, most importantly, make substitutions.
There are two ways to substitute players.- Drag and Drop. Tap and hold on a player's name on the bench and drag that player from the bench to the position on the floor in which they will be playing (said alternately, onto the position occupied by the person for whom they are substituting). As you drag a player over a playing position, the background color of that position changes from blue to yellow. (The app does not enforce any rules concerning substitutions.) Lifting up your finger when the player is over a playing position causes the bench player to take that position. If there already is a player in that position, then the player who was there moves to the bench. Lifting up your finger over anything other than a playing position cancels the substitution.
- Select and select. Tap once on the bench player who is coming into the match. This will cause the background color of that player to change to yellow. Also, large yellow buttons saying sub out ... will appear overlying the playing positions on the court. Tap on the appropriate yellow button to finish the substitution. Tapping on the yellow button in the bench area cancels the substitution.
 |
 |
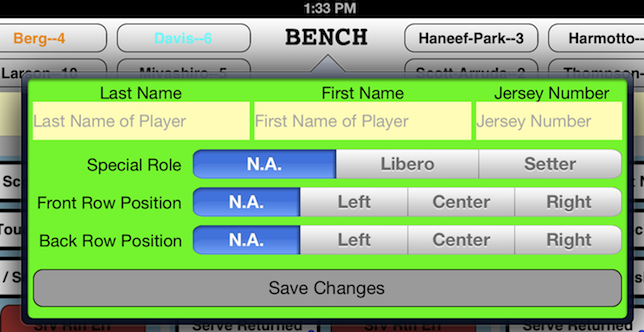
- Last Name: The player' surname. e.g., Doe. Last name is only a suggestion, you can put anything or nothing here.
- First Name: The player's given name. e.g., John. First name is only a suggestion, you can put anything or nothing here.
- Jersey Number: The number on the player's shirt. This must be entered, must be an positive integer and must be unique. If you use the roster from a match recorded from before v3.0 of this app then this field will be blank; the app will accept it. However, if you edit the player information you will be required to enter the jersey number.
- Special Role This option has 3 choices: "Libero", "Setter" or "N.A.". Use "N.A." if the player is neither a setter nor a libero. The program uses setter and libero designations as follows:
- Libero
-
Designating a player as a libero causes their name to appear in cyan (bright blue). Also, if the player rotates to a front row position, then the position background changes to bright blue to indicate that the libero probably should not be there. (The color change is only meant as a warning. The app takes no enforcement action.) In the full screen images above, you can see that "Davis" is the libero because of the color of her name.
Beyond these simple color changes, if a player is designated as libero, then substitutions involving that player are not counted in the substitution count that appears in the score area.
- Setter
- Designating a player as a setter has two effects. First, their name always appears in orange. Second, at the beginning of each point, the setter is given a "default" assist. This default assist is used to automatically give the setter an assist if the point ends in a kill by the green team and no one else is explicitly noted as having made an assist. In the full-screen images above, you can see that the player "Berg" has been given a default assist because the background of the assist button is orange. If this were a normal assist the background would be lilac. If a different player should get the assist, just tap the assist button for that player. There is no need to clear the default assist; when another player is given an assist the default assist is cleared automatically. If there are two player designated as setter on the playing floor, the default assist is given to the setter in the back row.
- Front Row Position: May be left, center, right or "N.A." Use "N.A." if the team does not have fixed positions across the front row or if the player never plays in the front row. If each of the players on the front row have a position assigned and the positions are unique, then immediately after the first "white" button is hit, the players will move to that position. This can make it easier to record stats because players will be in consistent places. If you do not want players to switch places in the app screen, the set all the players positions to "N.A.".
- Back Row Position: Back row position is exactly analogous to front row position.
| 
|
With three exceptions, players on the bench have a clear background with their IDs in black text. The exceptions are:
- When the player has been selected for substitution by tapping once as described above. In this case the button background is yellow.
- When the player is the team's libero. In this case, the name is written in cyan (bright blue).
- When the player is a setter. In the case the name is written in pale orange.
Volleyball Stat! does not enforce any rules about substitutions. The only time that the program informs you that something is odd is when the person designated as the libero rotates to the front court. In this case, the text of the player's position changes to having a cyan background.
As of v3.5 the bench can be configured to be hidden. This saves some space on the screen which makes the data recording buttons slightly larger and therefore easier to hit. To enable hiding, see the behaviors on the Settings tab.The Score
This section shows the names of the two teams and the score of the current set. The team name appearing on the left is the team whose players are on the bench and is the team for which you are recording stats. The default color for this team is green. The team name appearing on the right is the opposition. The default color for this team is red.
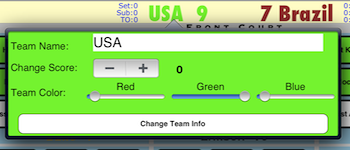
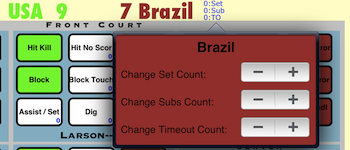
Also in the score area are a group of small blue numbers that appear towards the edges of the screen from the team names. From top to bottom these numbers are: the number of sets won in the current match ("Set"), the number of substitutions used in the current set ("Sub") and the number of timeouts used in the current set ("TO"). The number of sets won by both teams and the number of substitutions made by the green team are all automatically tracked by the app; the other stats must be manually changed, as described next.To change the name of a team, the score for that team or the team color, tap on the team's name. This brings up a small popup window, shown below left, in which you can make these changes. This score change ability is present because it can be convenient to make your recording of the score identical the official score without having to use some combination of undo and the non-specific score buttons. For example, you might get distracted and miss a couple of points; the match set might not begin with a 0-0 score; or you might start recording stats part way through a set. You are limited to changing the score of a team by plus or minus 10 points. (If you need to change the score by more than 10 points: do a 10 point change; save that change; then repeat as needed.) When changing the team color, the background color of the popup window changes as you move the color sliders so you can see the color you will get. Note that changes to the team color also changes the colors of the buttons in the game play area. So, changing the color of the team for which you are recording stats from green to yellow would also change all of the green buttons to yellow. Hit Return on the keyboard (if it is visible) or tap the Change Team Info button commit the changes made on this screen; tap anywhere outside the popup box to cancel any changes.
To change any of the stats in blue in the score area, tap on those stats. This will bring up a popup like the one shown below right. Use the controls in this window to increment (or decrement) any of these stats. This window automatically closes after a single increment or decrement. You will probably never need to increment or decrement either set counter or the sub counter for the green team as these are automatically maintained by the app. However, mistakes happen and the controls are here to help you fix those mistakes. The information in the blue stats is not used anywhere else in the app, and like most things there are no rules surrounding its use. So, if you want to use the TO counter for something totally different than timeouts, you can.
| 
|
The playing floor
The playing floor consists of a large grey background with six light blue rectangles. Each blue rectangle contains a set of green, white and red buttons. The six blue rectangles correspond to positions on the playing floor is a 6v6 volleyball match. (6v6 is the default; this can be changed on the Settings tab.) Visually, this would put you above and behind the court. To help keep track of the court positions Front Count and Back Court appear in small letters on the grey background. In even smaller letters on one of the backcourt positions is the word server. Carrying the court metaphor forward, the score reporting area is in the net and the BENCH is placed squarely in the opposition's front row.
The playing floor is, by far, the largest section of this screen. This is appropriate; most of the stats keeping is done using the buttons in this area.
Colors
In each position on the playing floor is a set of green, red and white buttons above the ID of the player in that position. Player IDs usually appear in black text at the bottom of the position background. Exceptions are as follows:- The player is a libero and is in the back row. In this case, the color of the ID is cyan (bright blue).
- The player is the libero and is in the front row. In this case, the color of the name is black, but the background color for the playing position is cyan. This is intentionally annoying, liberos should not be in the front row.
- The player is a setter. In this case the color of the ID is pale orange.
In all areas, green buttons result in immediately recording a point for the team on the left of the score panel whose name is in green (this is the team whose players are shown as on the floor). Red buttons result in immediately recording a point for the team on the right of the score panel and whose team name is in red. Tapping on any green or red button causes the button to briefly change to yellow. This simply helps you see what you have done. Following the pattern of the score panel, by default green buttons appear on the left side of a playing position while red buttons appear on the right.
White buttons do not result in points, rather they record actions that helped the team; for example digs and assists. White buttons most often appear in the center of button rows; in the default setup they are always to the right of green buttons and to the left of red buttons.
If there is a setter on the floor, then then that player is given a default assist at the start of each point. This default gives the assist button a pale orange background. If there is a kill and nothing is changed, then the setter will automatically get an assist recorded. (Points recorded in any way other than kills will not record a default assist. Also, the setter will not get a default assist if they get the kill.) If someone else should get the assist, clicking on the assist button for that other person will clear the default assist. If there is a kill but no one should get an assist, then tap twice quickly on the assist button to clear the default. If there is no setter on the floor, then no default assist will be assigned (this is the behavior of v2.0 and before). If there are two setters on the floor, the default assist will go to the setter in the back row.
By default, the buttons at each player position are arranged in rows where each row represents a class of actions. From top to bottom these actions are:
- Attacking
- Blocking (This row only appears for playing positions that are allowed to block. By default, this is the front row.)
- Defending
- Serving or Serve Returning (Serving buttons only appear for the player in the server position if the team is serving. Serve Return buttons only appear if the team is returning serve.)
Since the white buttons do not get recorded immediately, they can be easily undone before the point is recorded. There are two ways to do so. First, undo all white button stats for the point by tapping the button labeled Clear Non Scr. Second remove a single mistake by "double tapping" on the button with the mistaken entry. This decrements by one the count of the number of taps on that button. (White button stats can also be undone after recording a point as described here). Finally, leaving the game play screen, then returning to it clears all of the data in the white buttons.
Green and red buttons should be the last thing hit when recording the action for a point because they record all stats, increment the appropriate score, rotate players (if needed) and reset the white buttons to their "white" state. For instance, if the point consisted of an service return by a player, an assist and a kill, then the buttons for the assist and service return should be hit before hitting the button for the kill. (As discussed previous, the assist button may not need to be hit if the setter had the assist.)
Prior to v3.0 there was a white button for "shared block". This button has been removed. Shared blocks can still be recorded as described below in the detailed statistics section.
Definitions of each of the buttons in the playing floor panel.
| Button Color | General Description | Default Button Label | Definition |
|---|---|---|---|
| Green | An action that immediately scores a point for the "green" team. (The team whose name is written in green on the left of the score section.) | Hit Kill | An attack that results in a point |
| Block | A block that results in a point. This button only appears for front court players. Prior to v3.0, there was a "shared block" button next to the "Block" button. That functionality has been moved inside this button. See detailed blocking statistics in the details statistics section below. | ||
| Ace | A serve that result in a point. Only appears in the server position when the team is serving | Red | An action that immediately scores a point for the "red" team. (The team whose name is written in red on the right of the score section.) | Hit Error | A hit that immediately results in a point for the other team. |
| Block Error | A blocking error. This is most commonly touching the net while blocking | ||
| Ball Handl Error | A ball handling error. This is most commonly a double contact but may be any error that occurs at times other than blocking, attacking, or returning serve. | ||
| Serve Error | A serve that is either out or into the net. Only appears in the server position when the green team is serving | ||
| Srv Rtn Err | A service return that is done so poorly that in results in a point for the other team. If you were recording stats for the "red" team, this would be recorded as an ace. Only appears when the green team is returning serve. | ||
| White | An action that is worth recording but does not immediately result in a point. | Hit No Scor | An attack that sends the ball to the other team and does not result in scoring a point. |
| Block Touch | The player touched the ball when blocking. The block did not result in a point. (New in v3.1.) | ||
| Assist / Set | A pass that results in a hit that scores a point. Most kills are preceded by assists. | ||
| Dig | The initial contact on an opposition attack. | ||
| Serve Returned | The player returned a serve. Only appears when the green team is returning serve. | ||
| Opp Serve Rtn | Brings up a popup that allows you to rate the quality of the opponent's service return. This stat is useful as an indicator of how hard a person's serve is to return. This may give a better feel for the serve quality than simply number of aces and number of errors. Only appears in the server position when the green team is serving. | ||
| Serve Made | There is no button to record a serve being made. This is recorded automatically for the person in the server position when the green team is serving |
Detailed Statistics
Most of the buttons described above allow the collection of detailed stats in addition to the stats described above. Buttons that have a detailed stats option have a thick black border. (In the default setup, only "Ace" and "Serve Rtn Err" do not have underlying detail stats.) To access the detailed stats recording, tap and hold on a button. This will bring up a popup window in which details can be recorded. Buttons that have detail popups available are indicated by a heavy black border. Conversely, buttons that do not have a detail popup have a thin border. The details recorded on the popups can be viewed on the reports tab, in either the "details" or "error" reports. These reports are described in the Reports section below."Hit Kill" and "Hit No Score"
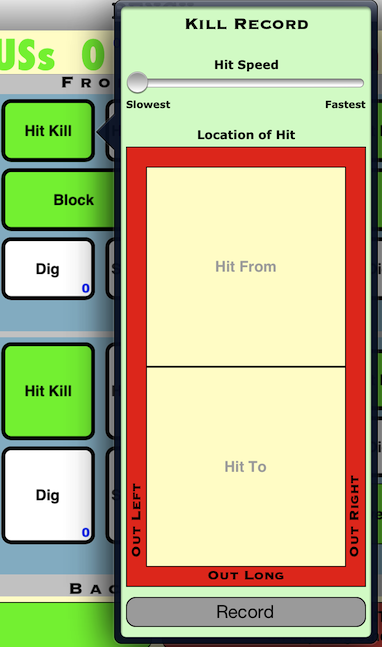
| This detail allows you to record, for each attack, the speed and location of that attack. To set speed, adjust the position of the slider near the top of the screen. Unless the slider is moved, speed will not be recorded. To set the position of the hit, tap in the beige "Hit From" and "Hit To" areas. Tapping in each area sets the position of the hit which is indicated by a blue dot. Tapping again in an area moves the dot. When you are happy with location and speed, hit the record button at the bottom of the popup. There is no requirement to enter all of this information. For instance, you may only record the speed of hits. The default behavior of the underlying buttons is to record an attack with no speed or location information. Note, hitting Record on this popup will behave exactly like the underlying button, except that it will record the extra information you just entered. If you dismiss the popup without hitting Record, it is like you never hit the underlying button. |
Attack Kill

|
This detail button is not, by default, in the game play screen. Rather, you must configure its presence on the Settings tab. This provides a different way recording information about a kill. Rather than speed and location, this focuses on why the attack resulted in a point. The following reasons are available:
|
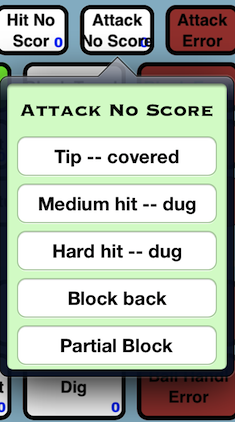
Attack No Score
|
This detail button is not, by default, in the game play screen. Rather, you must configure its presence on the Settings tab. This provides a different way recording information about an attack in much the mode of the "Attack Kill" button. Rather than speed and location, this focuses on why the attack did not succeed. The following reasons are available:
|
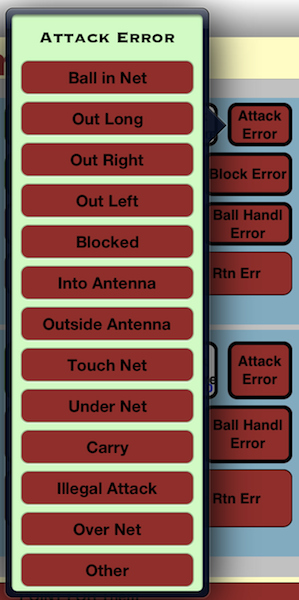
Hit Error
|
This screen allows you to record the specific error that resulted in the loss of a point on an attack. Pick the item that applies and tap once. Doing so will record that an attack error occurred and the specific type of error. All of the errors other than Blocked and Other correspond exactly to a call by a referee. The following reasons are available:
|
Block
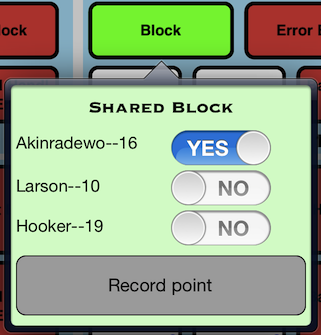
| The detail popup that appears after a long touch on the block button appears at left. This popup is used to share a block across two or more players. This popup replaces the Shared block button that appeared prior to v3.0. To use this function, tap and hold the block button for any one of the players who participated in the block. This popup will appear. On the popup will be all of the players that can legally block with a yes / no switch. The switch for player whose button was hit to open the popup will be set to YES and cannot be set to NO. Change the switch to YES for players participating in the block. Then hit the Record point button. The default behavior of the underlying button is to record a solo block. If you do not set the switches for any other players to YES, the app will record a solo block. As with all detail popups, dismissing the popup is equivalent to never having hit the underlying button. |
Block Touch
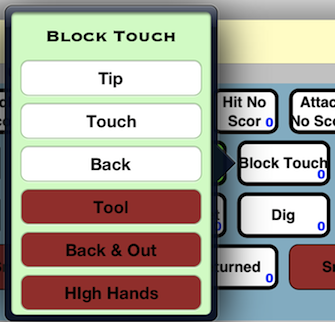
|
This screen allows you to record the result of a blocking attempt that did not result in a block but in which the blocker did touch the ball. The following options are available
|
Error Block
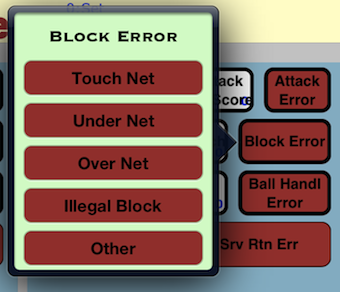
| This screen allows you to record the specific error that resulted in the loss of a point while blocking. Pick the item that applies and tap once. Doing so will record that a blocking error occurred and the specific type of error. All of these errors other than Other correspond to a call by a referee. Other exactly the same as the default behavior of the error block button. The default behavior of the underlying Error Block button is to record a blocking error without any comment about the type of error. There is no record button, tapping on an error type automatically records this information. As with all detail popups, dismissing the popup is equivalent to never having hit the underlying button. |
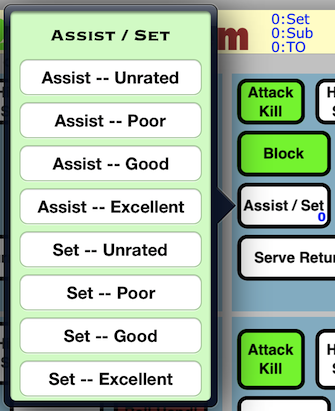
Set / Assist
|
This screen allows you to record the quality of a set and whether or not that set resulted in a kill (i.e., the set yielded an assist).
The default behavior of the underlying button is to record an assist with no quality rating. This is exactly equivalent to the top button on the detail screen. It is possible to change the default behavior of this button using the see the behaviors on the Settings tab. Specifically, rather than always recording an assist on every tap of the button, you can have the app examine the play while recording the point. Only one assist will be recorded, and that only if the point ends in a kill. The assist will be given to the last tap of this button. All prior taps will be recorded a "set" rather than an assist.
As with all detail popups, dismissing the popup is equivalent to never having hit the underlying button.
If you prefer the detail screen for v3.0.x, that is still available but not by default. You must configure its presence on the Settings tab. |
Dig
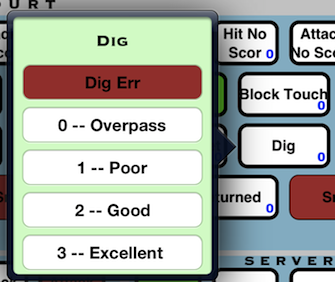
|
This screen allows you to record the quality of a dig. Pick the item that applies and tap once. Doing so will record that a dig occurred and how good the dig was.
The default behavior of the underlying button is to record a dig with no quality assessment.
Note the the top button in the screen is red. This indicates that hitting it immediately records a point for the red team, as well as recording the the red team point resulted from a poor dig. (In v3.0.x, an equivalent button was in the "ball handl err" detail. The button is still there is v3.1, it is just here as well.) |
Ball Handl Error
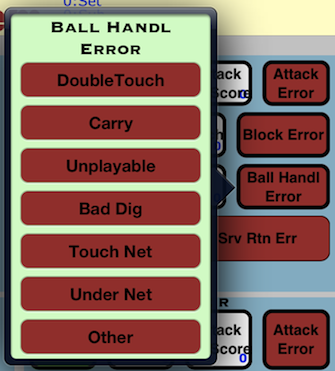
|
This screen allows you to record the specific error that resulted in the loss of a point while handling the ball; typically on the first or second hit. The error options are:
|
Oppt Serve Rtn
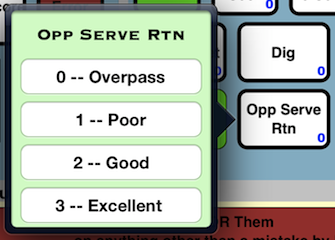
| This screen allows you to record the quality of the opposition's serve return. (As discussed above, this is used in this app as a metric for the quality of the serve.) Pick the item that applies and tap once. Doing so will record the quality of the opponents serve return. The default behavior of this button is to record that a serve was made without any indication of how well it was handled. It is possible to configure the "Ace" button to appear in this detail popup screen. Were you to do so, you would probably want to change "Ace" to something like "Failed" so that the words describe the opposition's handling of the serve rather than the serve itself. We do not recommend making this change. |
Serve Error
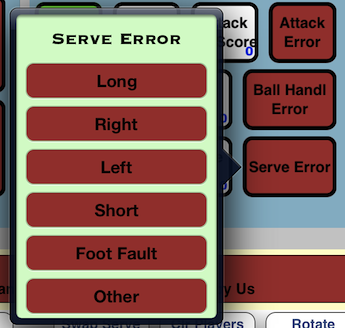
| This screen allows you to record the specific error that resulted in the loss of a point on a serve. Pick the item that applies and tap once. Doing so will record that a serve error occurred and the specific type of error. The default behavior of the underlying button is to record a serve error without any type attribution. Other is exactly the same as the default. |
Serve Returned
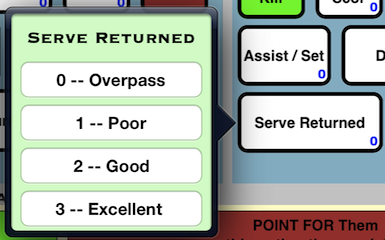
| This screen allows you to record the quality of a service return. Pick the item that applies and tap once. Doing so will record that the person return a serve and how good the return was. This detail popup replaces the three "Srv Rtn #" buttons. The default behavior of the underlying button is to record service return without a quality assessment. Using the Button Configuration system on the settings screen, it is possible to make all of these buttons appear on their own. As a result, you could record the return quality in a single tap. We debated which approach should be the default, and ended up selecting the one that put fewer buttons on the screen. |
Non Specific Scoring
Just below the playing floor section are two large buttons -- one red and one green. These buttons are for scoring that is not covered by the scoring buttons in the playing floor section. Examples of actions that would result in using these buttons are:- A kill by the opponents, other than those that might have been recorded on the "block touch" detail screen.
- An ace by the opponents that did not result from a service return error.
- A mistake by the opponents -- for example a hit into the net
- A service error by the opponents
Other Buttons
There are seven white buttons at the bottom of the screen. These buttons are not directly related to scoring or the general run of play. From left to right the buttons are:
- End Match --
Record a match as complete. Hitting this button is exactly equivalent to doing the following:
- Hit new set
- Go to file tab
- Hit save data
- Go to Reports tab
- New Set -- Record the current set as complete. This removes all the players from the floor, clears the substitution lists and makes an automatic backup file. (This can be used to recover data if operator error results in erasing data unintentionally.) It also changes the small blue numbers in the score area; resetting the timeout and substitution counts and incrementing the appropriate set counter.
- Clear Non Scr -- returns all of the white buttons to the "white" state without saving. This cannot be undone.
- Undo Point -- Erase everything about the last point scored. Warning, you cannot undo this operation; once the point is erased it is gone for good.
- Swap Serve -- changes the serving team. This is particularly useful at the start of sets to change the team that is serving. Also, although the program keeps track of scoring and the resulting change in team serving, it is possible for the program to get out of sync with the actual play (for instance, because the stats recorder got distracted and missed some points). Since the buttons are different depending on the serving team, it is important to have the serving team correct.
- Clear Players -- return all of the players to the bench. Sometimes this is useful when you get totally confused
- Rotate! -- Rotate the players on the floor. Usually this is unnecessary as the program rotates players automatically. However, mistakes can be made and this button can help in recovery.
Score
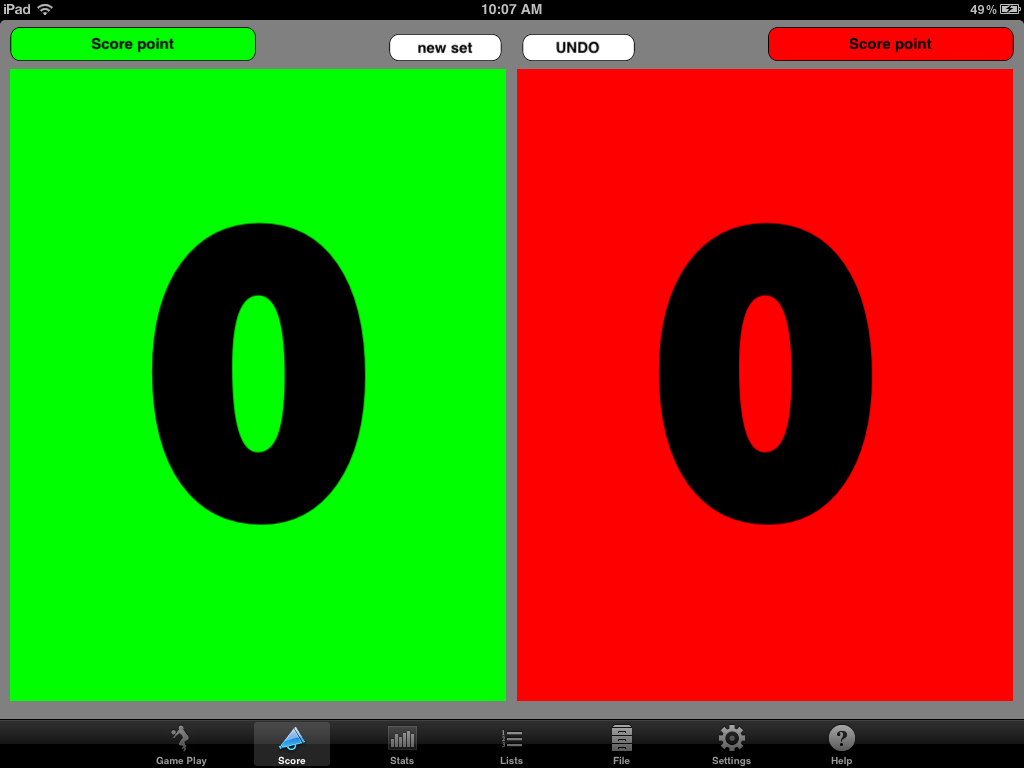
The "score" screen (shown above) is displayed when the "Score" tab is selected. The screen mostly exists for those matches in which you do not want to collect stats but do want to keep track of the score (perhaps because the official score is not visible). It is also useful when you want to show other people the score.
This screen has only the score of the current set and four buttons, one to increment the score of each team; one to move on to a new set; and, finally, one to undo the previous point. When the score is changed from this screen, no stats are recorded and players do not rotate in the game play screen.
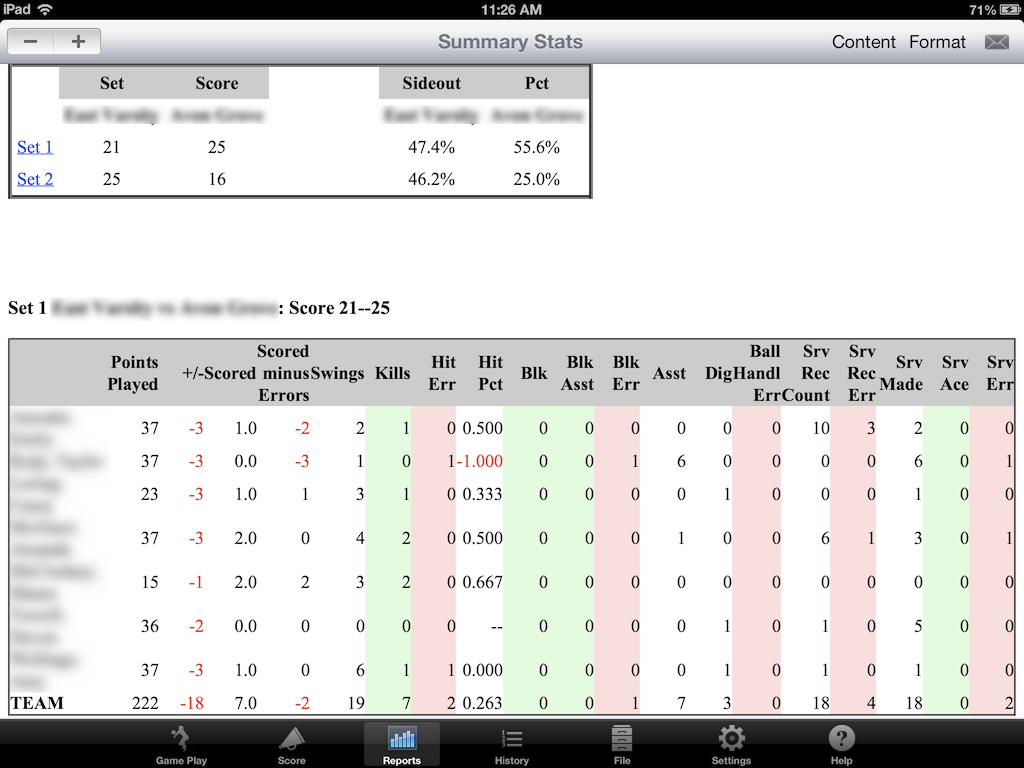
Stats Presentation
|
Report choices
Tapping on the "Content" button opens a popup window allowing you to choose the style of the content of the report to be viewed. The content choices are:- Team Summary
- This is the report shown above. It is the most commonly used report.
- PlayByPlay
- This is intended to be a reasonably readable report showing every piece of data collected for a match. This report can be rather lengthy.
- Rotation
- Contains tables and graphs showing the effectiveness of each rotation. A "rotation" group is defined by which player is in which position on the court. So, in a 6 person game, if there are no substitutions there would be at most six rotation groups.
In a rotation group, players are listed from left to right and front to back. For example, suppose that the player alignment looks like
front court A S D Z X C back court - Details
- Presents, in graphs and tables, the information collected in the detailed stats popup screens in the Game Play tab.
- Errors
- Contains tables showing all of the errors recorded in detail popups on the Game Play tab.
- Subs
- Shows who subbed for who during each set. Prior to v3.2 this information was only available on the history tab, or in the play-by-play report.
The default summary table formats are:
- Raw Data
- This format is used in the old method of sending data between instance of this app. It is not very user friendly, but if you want to get information to a spreadsheet, this is a format to consider.
- Max Preps
- This format has exactly the data that gets sent to MaxPreps. This is another format to consider if you are looking to export data to a spreadsheet.
- Wide
- Contains a lot of the data that users tend to look at. This format is best viewed on ful sizes iPads in landscape mode.
- Wide Colorful
- The same columns as wide, but color code some of the columns to make it easier to follow. This is the default table format.
- College
- This table format follows, as closely as possible, the one used by many US colleges when reporting match stats.
- Narrow
- Contains a subset of the columns in the "Wide" format. This makes it easier to see than "wide" on smaller devices or in portrait mode.
- Effectiveness
- This is intended to be used during matches to give a very fast view of who is doing what well -- or poorly.
- All Raw
- This table is not intended to be viewed within the app because it is too wide to be easily read. The report is so wide because it includes almost every statistic that can be collected using this app. (Only the hit speed and location stats are not in this table.) The expectation is that this report would be exported from the app in CSV format and then imported into a spreadsheet for analysis there.
- Sending email requires that your iPad be configured to send email using the default email app. Other email apps may work, but we have not tested any. Choices for sending email include:
- Send this data in this format as html -- This sends the data exactly as it appears on the screen. This is usually the best way to send stats to friends or teammates.
- Send this data in this format as CSV attachment -- Sends exactly the data on the screen, but reformatted as a "comma separated value" attachment. This style of attachment can be easily imported into spreadsheets. This option is only available when viewing data in the "Team Summary" format.
- Send data as a MaxPreps attachment -- This creates an email with an attached file in the exact format required for upload to maxpreps.com. Unlike the two previous options that use exactly what is currently being view, the MaxPreps attachment is a single table akin to the match summary table. At this time the process for submitting to Max Preps is rather cumbersome; this is largely due to restrictions by MaxPreps. The process is: get the maxpreps file to yourself or some other person who can submit to Max Preps on a computer (not an iPad). You can do this using either email or a cloud storage). Then log into maxpreps.com and submit the file. (These directions are included in the body of the email.) Note that the data file submitted to Max Preps must be cumulative for all matches in the season. So, you would need to load and append data (on the file page) so that the table contains data for the entire season. (See instructions for the append button on the file screen for how to do this.) Also be aware that Max Preps wants only the jersey number as the identifier for each person. Jersey numbers were not tracked prior to v3.0 of this app. So if you want to submit to Max Preps you may have to edit the file prior to submitting. This option is only available when viewing data in the "Team Summary" format.
- Send all data formatted for import into VB Stat! (v3.1 or later) -- This format sends all of the data collected. Versions earlier than v3.1 will not know how to import this data. (For technophiles, the data is compressed, JSON format.) Using this option, you can exchange 100% of the data you collected. Import from email is easy, in the default email reader just tap on the icon for the attached data file then select "Open in volleyball stat". Import does not work from the GMail email reader (v2.71828).
- Send email VB Stat! support -- This is not so much about sharing stats as it is about contacting the development team. Please do not hesitate to contact us for any reason.
- To Other Apps
- This option allows you to export your data to other apps on your device. We most commonly use this option to put information onto cloud storage either to back it up or to make it available on other computers. For cloud storage we prefer and have a lot of experience with Dropbox. We have done limited testing with other cloud storage apps (Box, Google Drive, ...); they all seem to work in iPad only mode. We have had issues with using Google Drive when transferring data from iPad to Android. Specifically, the files show up but we have been unable to convince Google Drive to start the Volleyball Stat app on android. (Google Drive on iPad will open files saved to Google Drive from either iPad or Android. Google Drive on Android will open files saved on Android.)
If there is no app installed that knows how to handle a particular data format, you will get a message to that effect.
If a cloud storage app is installed, then it will be available for all export options.
The export options are:
- HTML -- Browsers This will offer opening the page in a browser.
- CSV -- Spreadsheets This will offer opening the data in a spreadsheet app (e.g. Numbers). This option is only available when viewing data in the "Team Summary" format.
- PDF This will offer to show a PDF of the data in a PDF viewer (e.g., iBooks).
- MaxPreps (Summary Table only) This option is only available when viewing data in the "Team Summary" format.
- Data (all data in memory) The only meaningful option for exporting all the data in memory is cloud storage (e.g. Dropbox). From cloud storage the data can then be imported into the app on any iPad or Android table on which the app is installed. (We are aware of an issue in which imports do not happen when data is saved to Google Drive on the iPad and then an attempt is made to import that data on Android.) Generally, all that is needed to import from cloud storage is to select the data to import in the cloud storage app then indicate that it should be imported into Volleyball Stat. Each cloud storage app has slightly different procedures for making this indication.
- This uses the standard iPad AirPrint system.
History
Selecting the "History" tab
allows you to maintain and view lists of items including: play-by-play and players on the team. The different
lists are accessed by selecting the appropriate item in the set of buttons at the right of
the navigation bar at the top of the screen.
Team Members
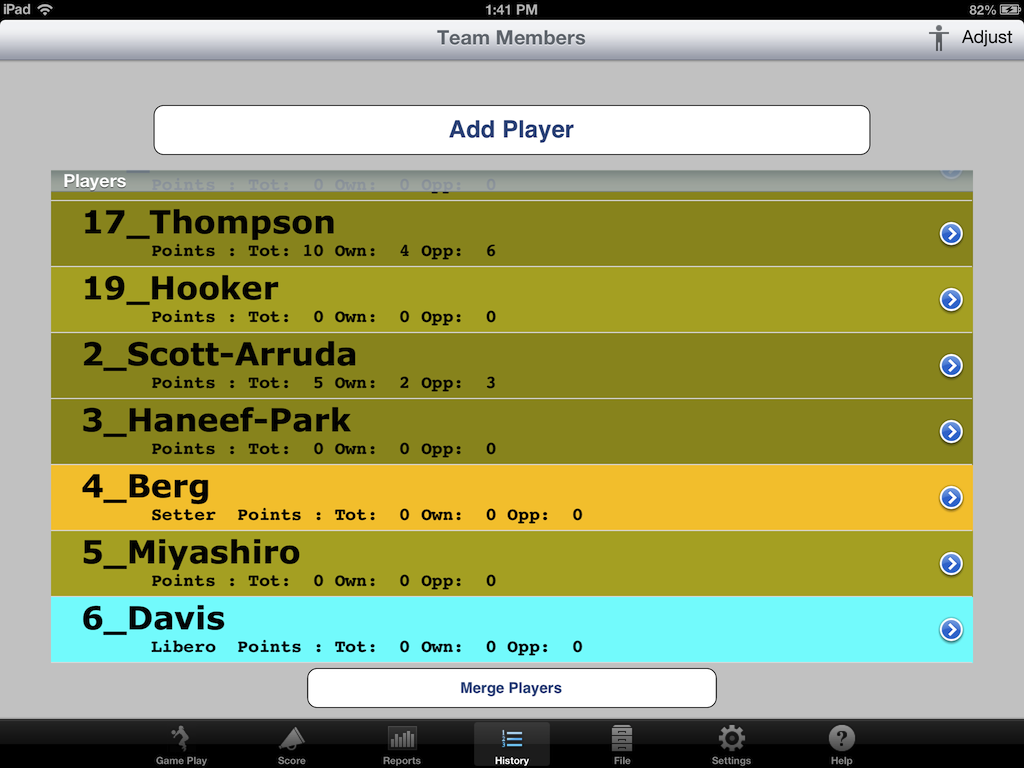
Using this list, you can do all of the player actions that are available from the Bench in the Game Play tab. This view of the roster provides several features unavailable from the game play tab. These features include:
- Review the stats for a single player.
- Edit player attributes while they are on the playing floor.
- Merge players.
- Olive -- the player is currently on the floor
- Dark Olive -- the player NOT on the floor (alternately the player is on the bench).
- Cyan -- the player is the libero and is on the floor
- Dark Cyan -- the player is the libero and is NOT on the floor
- Lighter Orange -- the player is a setter and is on the floor
- Darker Orange -- the player is a setter and is NOT on the floor
Adding a player
To add a player, tap the "Add Player" button. This will bring up a popup window identical to the one obtained by double clicking on "Bench" in the Game Play tab.
Deleting a player
To delete a player, tap on the name in the list of player names. This will bring up a popup window that is usually identical to the one obtained by double clicking on the player's name in the Game Play tab. The only time it differs is when the player is currently on the playing floor. In this case, the player may not be deleted, so the delete button does not appear. If the player is not on the playing floor, then tapping on the delete button brings up a dialog box asking that you confirm the deletion.
Change Special Role
To make a player the libero, setter, or neither tap on the player's name in the list. This will bring up a popup window identical to the one obtained by double clicking on the player's name in the Game Play tab. Then change the selection next to "Special Role" to the appropriate value.As with many things, Volleyball Stat! does not enforce any constraint on liberos other than that a player can not be both a libero and setter. Hence it is possible (but unadvisable) to label everyone as a libero.
Change the name of a player
To change the first name, last name or jersey number of a player tap on the player's name in the roster list. This will bring up a popup window identical to the one obtained by double clicking on the player's name in the Game Play tab. Note that the roster is kept in alphabetical order, so changing a players name may change their location in the roster.
Occasionally the keyboard of the iPad hides buttons in the player edit window. To get the buttons back, dismiss the keyboard.The name is important when merging data from multiple matches. If names match exactly, they will be added together in the "match summary" table on the stats screen.
Stats for only one player
To view stats for a single player, tap on the blue arrow on the right side of the player row. This will bring up a table similar to the one shown below. The table format can be changed by tapping on the binoculars and selecting from the list that appears. The choices are the same as those on the reports tab. To return to the Team Members view, tap on the back button in the upper left of the screen.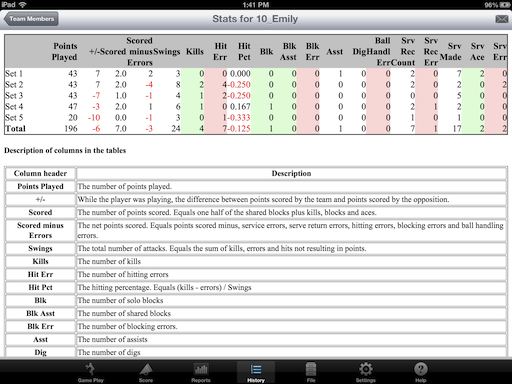
Merging Players
Sometimes when you merge multiple matches together, the process that is supposed to match up players across matches fails. Typically a failure occurs because the names do not exactly match. The result of this is that a single player appears more that once in the table that summarizes all of the sets. This is, at least, annoying.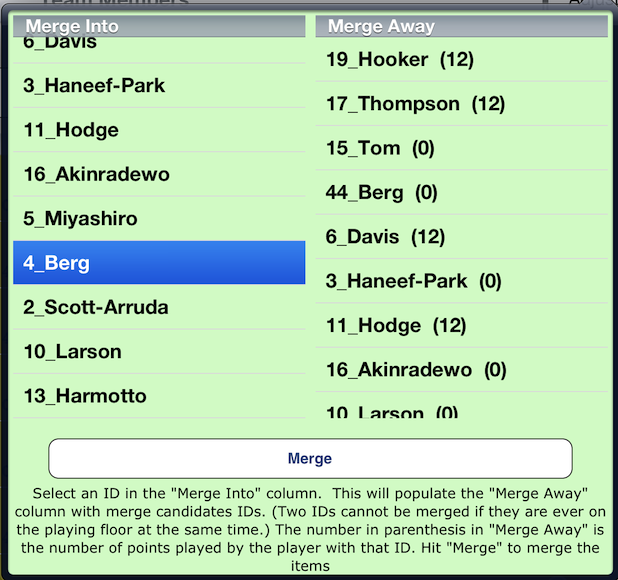
When you notice such a problem come to this screen and tap on the "merge players" button. This will raise a popup window similar to the one shown above. Initially only the left list will be populated. As the directions at the bottom of the popup suggest, the first step is to select an ID in the left "merge into" column. Doing so populates the right "merge away" column with every player ID that can be merged with the one just selected. Select one in the right column then tap on the "merge" button.
Libero Substitutions
As of v3.2 this list have been moved to the reports tab. See the list by selecting "Subs" as the content type.Substitutions
As of v3.2 this list have been moved to the reports tab. See the list by selecting "Subs" as the content type.Adjust
|
|
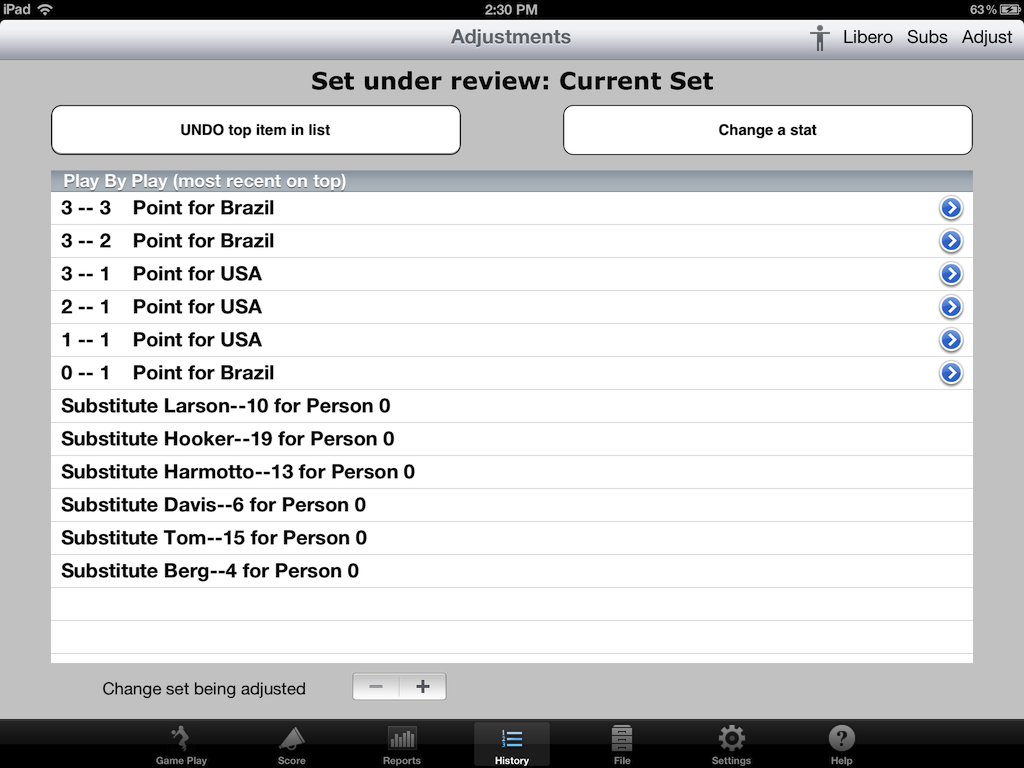
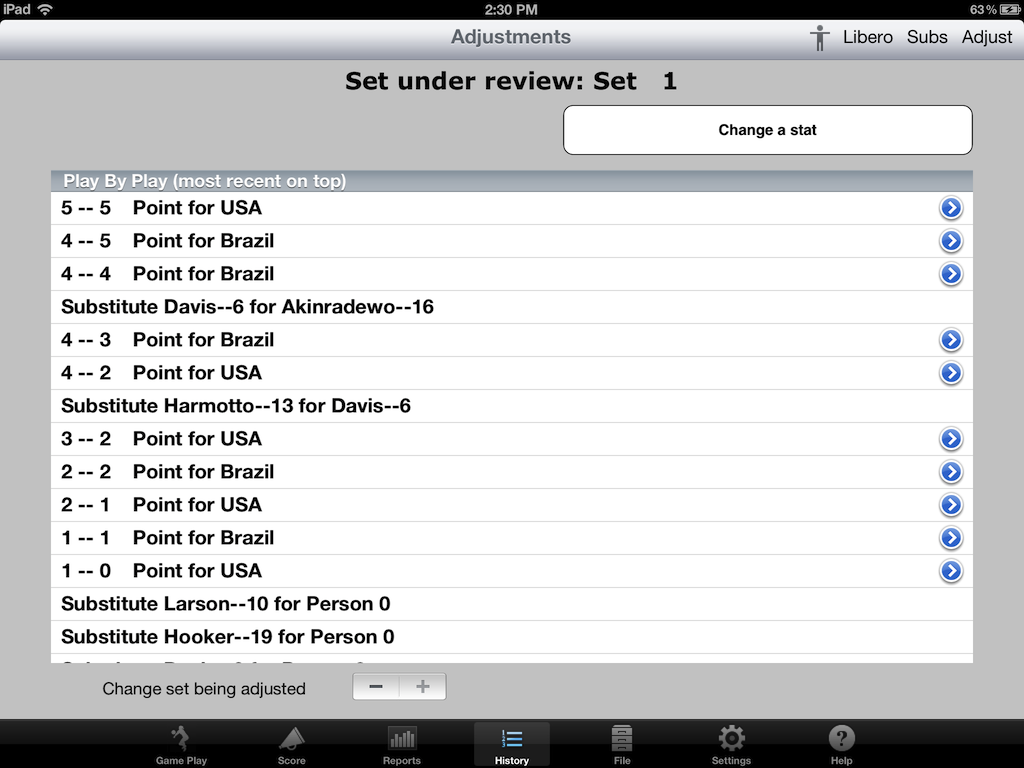
This list shows all of the actions recorded for the current set and previous sets. The goal of this display is to make it possible to see and adjust the recorded stats. The two above images show this list in two modes: on the left is a listing for the current set, on the right for a completed set. Working from the top down, this view has the following options:
- "Undo top item in list" -- this is only available for the current set. Hitting this button is exactly equivalent to hitting the undo button on the Game Play tab. The only reason to undo from here is that you can see exactly what is being undone.
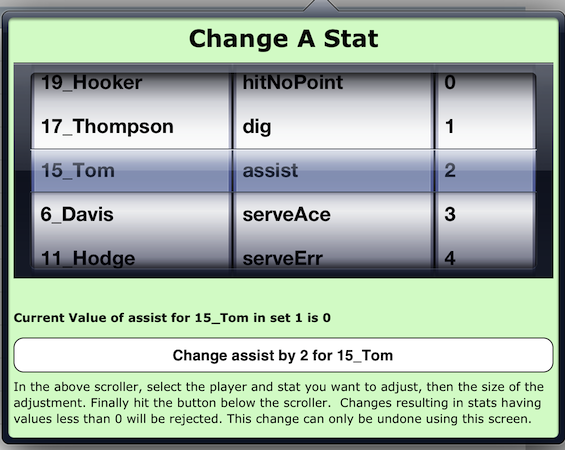
- "Change a stat" -- allows you to, whenever it is convenient adjust any stat for any player in the displayed set. To do so, select the person, the stat to be changed and the amount to change the stat by then hit the Change ... button. Change amount is limited to 5, so if you need to make a big change use this screen multiple times. Changes that would result in a stat having a negative value are rejected.
In addition to undoing points, you can review the information recorded for a point by hitting the blue arrow on the right side of the row. Doing so will bring up a new list similar to the one shown below.
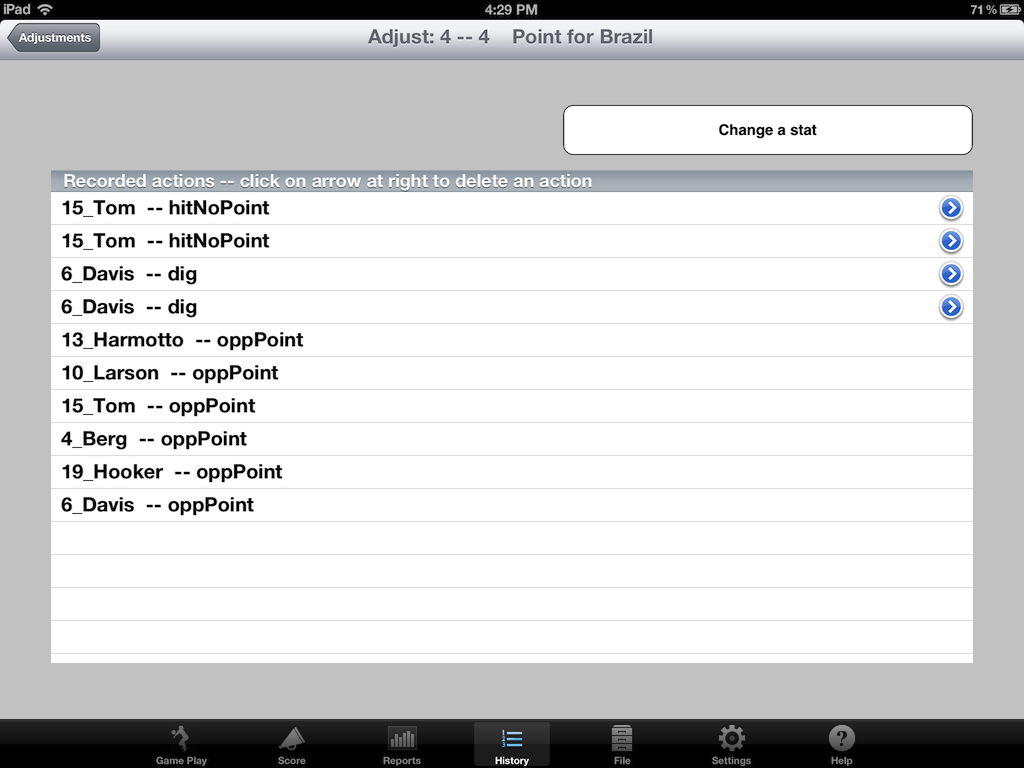
This listing above contains all of the information recorded for a point. Each line in this list is a data item containing two parts: a player ID and the information recorded. For instance the the top line says that Tom had a hit that did not result in a point. Looking further, we can see the players who played the point and that the point was won by the opposition. Items that are removable are marked with a blue arrow on the right side of the row. Generally, removable items correspond to the "white" buttons in the game play screen.
To return to the main list hit the back button in the upper left.
File and Data Operations
This screen allows you to load old data, save current data, etc. The image below shows this screen in the wide (landscape) layout. The controls are the same in the narrow (portrait) layout; they are just placed slightly differently.
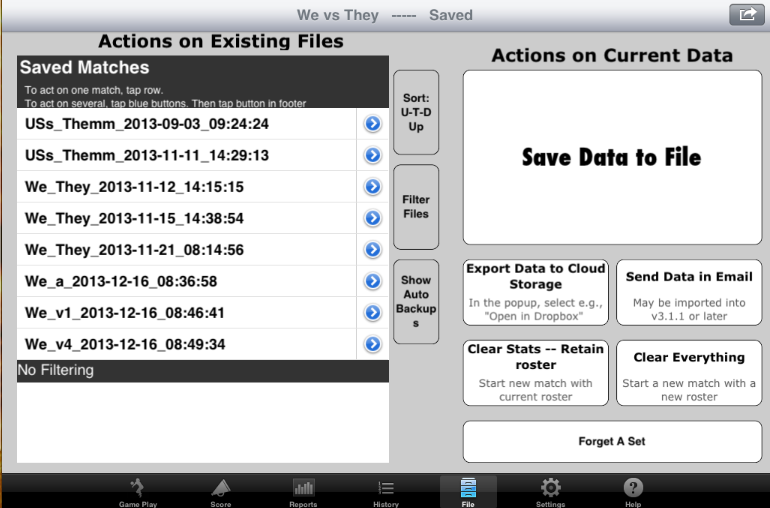
The items on this screen fall into two general categories: those that act on existing files and those that act on the current data
Actions on Existing Files
There are two types of files stored in the system: files created on this screen (or created automatically by the End Match button in the game play screen) and files created as automatic backups. Files created on this screen (using the Save Data to File button described below) have a name with three parts separated by underscores: the name of each team and the date / time at which the data was saved.
Auto backup files are created when you leave the Game Play tab after recording some points and at the end of each set. Auto backup files have the names zzauto0, ... zzauto19. zzauto0 is the most recent automatic backup, zzauto19 is the oldest. The data and time that the autoback was created also appears with the name. The goal of the auto backup files is to save data at some key times in case the current data is lost. When retrieving data from the auto backups, it is safest to start by loading the oldest file (zzauto19) and review it using the stats screen. If it is too old, move one newer, etc.
The "actions on existing files" area is dominated by a list which shows all of the data files you created on your iPad. (By default the automated backup files are hidden.) Immediately to the right of the list of saved matches are three buttons that control the files that appear and the order in which they are displayed. The lowest of these buttons controls whether or not the automatic backup files are shown. By default they are not.
The upper button controls how items are sorted in the file listing. By default the sort order is "recorded team name (Us) - 'U', Opponent team name (Them -- 'T'), then date ('D'). Clicking on the button gives you a list of choices for sort order. Changing the sort order can be very helpful when retrieving stats. For example, to find all the stats for the most recent tournament, choose a sort order in which Date is first and the order is down. This will cause the most recent data to be at the top of the listing of stored matches. Note that while the order in which files will change; the name of the file in the list will not. The center button (to the right of the file listing) allows you to filter the files that appear in the file listing. As shown in the image below filtering can be done on the name of either team or on the date the match was played. The status of the filter is shown at the bottom of the list. The default is that the files are unfiltered. Filtering is particularly useful if you use the app to track stats for more than one team. In this case, the first step to using the app would normally be to set the filter for the team you are currently working with. To clear filtering: tap the "filter files" button then in the popup tap on the topmost button, "No Filtering".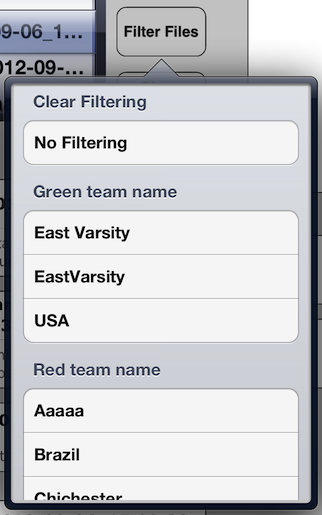
There are two options for working with existing files; one at a time or in a bunch. (Prior to v3.5 you could only work with one file at a time). To work with one file at a time just tap on its name. To work with a bunch, tap on the blue button to the right of the name. This will change the row to yellow indicating that this file has been added to the bunch. Tap again, and the file is removed from the bunch and the row changes back to white. Working with bunches is strictly for user convenience; anything you can do with a bunch you can also do one at a time.
There are four actions you can take on when you select a single existing file by tapping on its name. Tapping on a file name brings up a popup widow with these actions as options. To take an action, tap on the button. Tap anywhere outside the popup window to take no action. The actions are:- Load
- Loads a file into memory. Loading will replace all of the data in memory. So, only choose this button when you mean it.
When you load a previous match the title at the top of the screen with change to say "Loaded FILENAME".
- Load ONLY roster
- This is most useful when getting ready for a match. At that time you would normally need to enter all the player names. By hitting this button you will have exactly what you need to start a match. Namely, all the players and almost nothing else. It is good idea to set player names in this way because it guarantees that names are identical between matches. This is important because player data is summarized by matching names. Hence, when you append two matches together if the player names match exactly, then the final summary will make more sense. As with the standard "load" button, this will replace all data in memory. Hitting this button is exactly the same as hitting the "load" button followed by the "clear stats" button (also on this screen).
When you load only the roster from a previous match the title at the top of the screen with change to say "Loaded only roster from FILENAME".
- Append to Existing Data
- Appends the results of a match to the data that is already in memory. This is mostly useful to get an overview for a tournament (or season) of how players are doing using the stats view.
To create a single report for the entire season, you can do the following. First, using one of the buttons next to the file list, choose to sort the files using "Date-Us-Them Up". Select the first match of the season. Hit the "load" button. Select the next match and hit the "append" button. Continue selecting matches and hitting append until you reach the last match. This will get all the data for the season into memory. Go to the stats screen to review it.
When you append the data from a previous match the title at the top of the screen with change to say "Appended FILENAME".
- Delete
- File deletion is permanent. There is no method for recovering files that you did not mean to delete.
When you delete the data for a match the title at the top of the screen with change to say "Deleted FILENAME". Also, the match will disappear from the file listing.
- Load and Append All
- This "loads" the first file you selected, then appends all of the other files in the order that you selected the files. (See the descriptions of Load and Append just above.)
- Delete All
- Delete every selected file. The app will ask for confirmation about each individual deletion.
Actions on Current Data
There are six actions that you can take on the active data, each of which has a button in the screen. They are:
- Save Data to File
- This saves the data in the format understood by this program so that it can be reloaded at a later date. Saved files are automatically backed up to iTunes or iCloud depending on how your iPad is configured. You can save at any time and if there are any changes those changes will be saved. If a score changes, the saving will create a new saved instance. (You can see that in the file listing when a new file appears. If the core does not change, then save will overwrite the old file, retaining the date. That way, if you are only changing people's names, you retain the date of the match.
- Export Current Data to Cloud Storage.
- Choosing this option is exactly equivalent to selecting "To Other Apps / Data (all data in memory)" from the reports tab.
Tapping on this button starts the process for exporting the data to a cloud storage site (e.g. Dropbox). To export to cloud storage so you must have a cloud storage app installed. For example, to export to Dropbox:
- Tap on this button
- Tap on "Open in dropbox" in the window that appears
- Send Data in Email
- Choosing this option is exactly equivalent to selecting "EMail / Send all data formatted for input into VB Stat! (v3.1 or later)" from the reports tab.
- Clear Stats -- Retain Roster
- This removes all the current data from memory except the people. This can be useful when getting ready for a match if the player roster for the new match is identical to the roster for the match currently in memory. (Note that the Load ONLY roster is exactly equivalent to Load.. followed by hitting this button.
- Clear Everything
- This button does exactly what you would expect; both the stats and the roster of the match in memory are erased.
- Forget a Set
- Tapping this button brings up a popup window on which you can select a set to drop from memory. To do so, follow the on-screen directions. Forgetting affects only the data in memory, stored data is not changed.
iTunes File Sharing
In addition to exporting data via email and via dropbox, the app (as of v3.1) supports file transfers using iTunes on a computer to which the iPad is tethered. Files can be copied down to the main computer or brought back up to the iPad. This is the quickest backup option as you can backup or restore multiple match records at the same time. However, it does require that the iPad be connected to a computer. A detailed description of iTunes File sharing is beyond the scope of the help for this app. Many excellent descriptions of this process are available on the internet. The file format of these files is the form that iPads use when writing dictionary objects to files.Configuring Volleyball Stat!
The settings tab allows you to customize aspects the aspects of this app. Discussed in more detail below, the changes are:- Buttons in the game play view -- change the location, appearance, label, etc of the buttons in the playing positions in the Game Pay tab.
- The alignment of players in the game play view -- change the number and location of playing positions in the Game play tab.
- Team Summary Table columns -- change the column headers in the "Team Summary" tables (and whether or not the columns are used).
- Behavioral Rules -- modify the look / feel of some aspects of the app. This only affects the Game Play tab.
- Ads -- Banner ads appear at the top of screens not related to scoring. Pay a small fee and turn off the ads.
Buttons in Game Play view
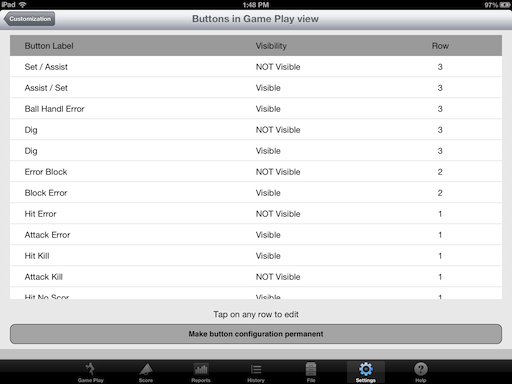
This section allows you to configure the buttons in the game play view. Described in more detail below, following can be configured: the label, the row, the column, and whether or not the button appears. In addition, if the button has a list of choices underneath it, then those "children" can be similarly configured. Also, children can be configured to appear on their own in the interface. Hence, almost all of the detail stats that, by default, require a long tap followed by a selection in the popup window can be configured to be recorded using a single tap. Taking this ability to the illogical extreme, each playing position can be configured to have about 70 buttons. At the other illogical extreme, playing positions can be configured to have no buttons at all.
The button configuration view has one row for each configurable top-level button. Each row has three three columns of data describing that button: the current button label, whether or not that button is currently visible, and the row in which the button is currently placed. Using this information, you should be able to uniquely identify the button that you want to change. Notice that, by default, there are some buttons NOT visible. These buttons provide alternate ways of recording data. Experiment and decide which you prefer. Also note that the buttons for "Ace" and "Srv Rtn Err" are not in this list. This is because "Ace" is defined as a child button of "Opp Serve Rtn" and "Srv Rtn Err" is a child of "Serve Returned".
Settings on this screen are automatically applied to the Game Play view. If you have a collection of settings that you want to preserve, then hit the "Make Button Configuration Permanent" button. So doing will cause these settings to be loaded and used each time you restart this app. Note that you cannot change how the app uses the data. So, while you can change button labels, you should do so cautiously. If you are not an English (speaker) reader, one particularly useful change would be to change the labels on all of the buttons to be in your favorite language. That way, much of what appears on the most used screen would be easy to read.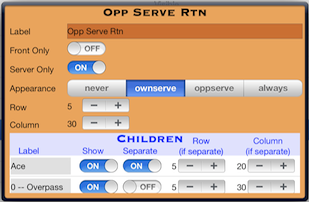
- Label
- The text appearing in the button.
- Front only
- Whether or not this button should only appear in front row positions. In the Player Alignment configuration this is given by the "May Block" switch. The values are:
- "On": this button will only appear in the the front row.
- "Off": this button will appear in every position
- Server only
- Whether or not this button should only appear in the server position. In the Player Alignment configuration this is given by the "Is Server" switch. The values are:
- "On": this button will only appear in the the server position.
- "Off": this button will appear in every position.
- Appearance
- When the button appears, if it is allowed to appear by the "Server only" and "Front only" settings. The values are:
- "never": This button does not appear in the interface. This overrides the "Server only" and Front only" settings
- "ownserve": This button only appears when the green team is serving.
- "oppserve": This button only appears when the red team is serving.
- "always": this button appears at all times.
- Row
- This is a number in the range 1-10 indicating where, vertically, the button should appear. These values give a relative position only. That is, a button defined to be in row 8 will appear below a button in row 7 and above a button in row 9 (and in the same row as other row 8 buttons). Rows that have no buttons are skipped when the buttons are put in place. So, if there are no buttons defined to be in rows 6, 7, 8, and 9 then putting a button in row 10 will have exactly the same effect as putting it in row 6.
- Column
- Column is a number in the range 1-100 indicating where, horizontally, a button should be placed. Lower numbers are to the left of higher numbers. Like row numbers, column numbers are used to define the relative positions of buttons in a row. So, a button in column 1 will always appear to the left of a button in column 30. If there are no buttons with column numbers between 1 and 30, then these buttons will be side-by-side. Column numbers are only used within a row, so column 34 in row 3 should not be taken to imply that the button will line up directly beneath column 34 in row 2.
- Label
- The text appearing in the button
- Show
- Should this child appear at all.
- Separate
- Should this child button appear as its own button in the interface. In the image above, the value of this setting from "Ace" is "ON", which indicates that it will appear as its own button. This is the default for "Ace".
- Row
- If the child is defined to appear separately, this defines the row in which the button will appear. Row is used exactly as above
- Column
- If the child is defined to appear separately, this defines the column in which the button will appear. Column is used exactly as above.
|
|
Player Alignment
This screen, shown below, allows you to configure the number and distribution of players in the match. By default, the app is configured to track a standard six person volleyball team. Using this screen, you can set the number of players and the rotation pattern.
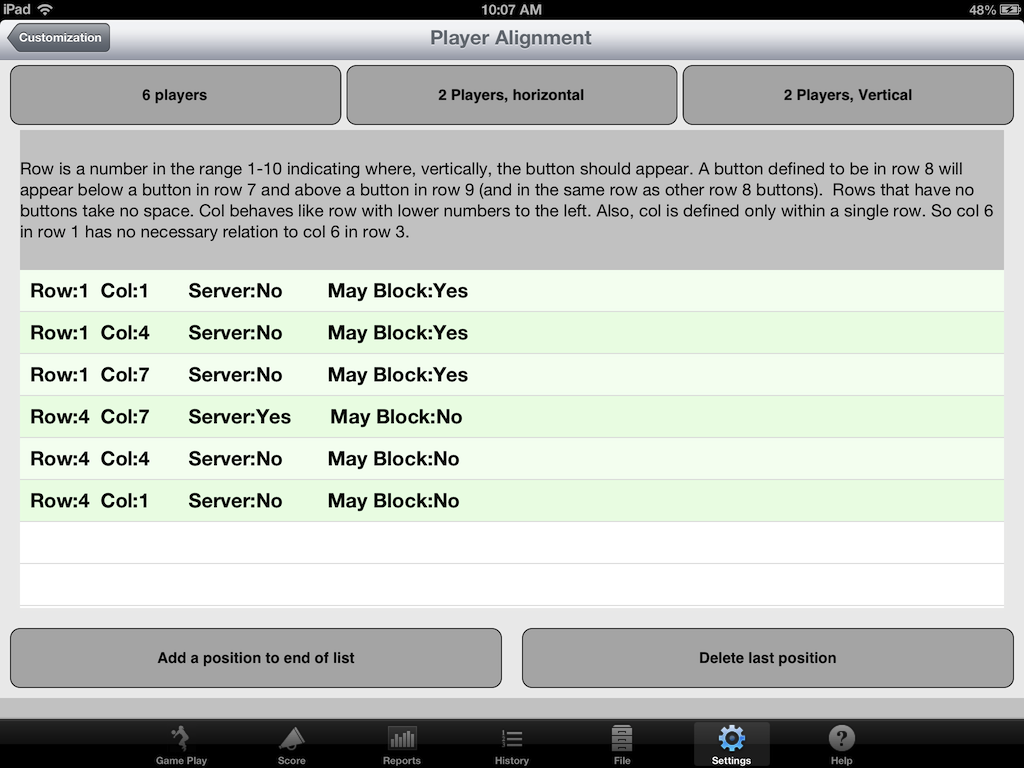
The rotation pattern is defined by the vertical order in which the positions appear on this screen. That is, the top position rotates to the next position, and so on to the botton of the list. The bottom position rotates back up to the top.
Row and column are used in much the same way as row and column are used in the the button alignment. Specifically, lower row numbers appear closer to the net. Higher numbers are towards the back. Row numbers that do not appear are just skipped, so row 1 may be immediately in front of row 10 if there are no playing positions defined in rows 2-9. Columns define left to right position within a row. As with button positioning, columns are only relative positions in a row. So, column 4 in row 1 has no necessary relation to column 4 in row 2. If playing positions have the same row and column, the app will make an arbitrary decision about the right to left order in which they appear.
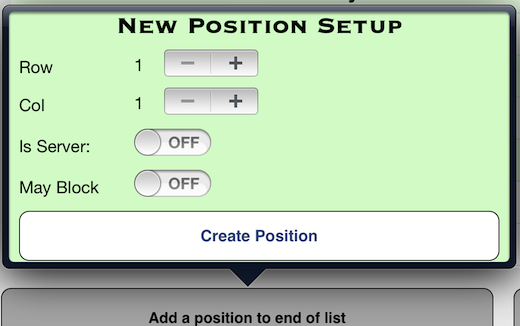
To add a playing position tap the "Add position at end of list" button. This will bring up a popup window similar to the one shown below. As discussed in the button configuration section, the "May Block" selection controls whether buttons for blocking appear in the playing position and how the background is colored for the libero. Any position may be defined to be the server, but there can be only one server. So if you define a new position as the server, then the position that was previously defined to be the server will automatically no longer be the server.
 |
Team Summary Table Columns
This screen allows you to configure the columns and their headers for Team Summary tables. From this screen you can do anything from making minor changes to existing tables to creating your own table with unique columns. The basic process is to select the table you want to change, make the changes, then save your changes as a new table format. That format will appear on the reports tab when you next go there.If you are not an English (speaker) reader, one particularly useful -- and simple -- change would be to change the column headers to be in your language. If you make similar changes to button labels, then the most important aspects of the app will be in your language. (We intend to further extend customization options to support non-English users. Feel free to suggest places that you would like to be able make language changes.)
When you tap on the "Team Summary Table Columns" row on the customize sheet you are taken a screen showing the names of existing table formats. Initially this will be just the provided tables, but if you have made changes before, these will appear also. Choose the table format you wish to start from by tapping on the name.
When you select a table format as a starting point, a screen showing the columns in the table will appear. At the top of this screen is a text box and a "Save Table" button. If the table is one that you created previously, then a "Delete Table" button will be here also. When you have made changes that you like, be sure to enter a name of the new table and then hit the "Save Table" button. When saving you cannot over-write any of the provided tables; you can overwrite tables that you created.
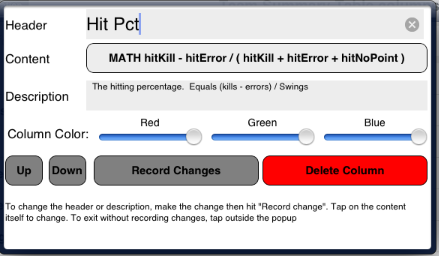
Below the "Save Table" button is a listing of the columns in the table. The topmost row corresponds to the leftmost column. Moving down on this screen is equivalent to moving to the right across a table. Column headers are shown; columns may have blank headers. Column headers can include well-formatted HTML e.g., "Two Row<br/>Header". Be cautious with HTML, we do not check your entry in any way. Invalid HTML can cause tables to appear poorly.
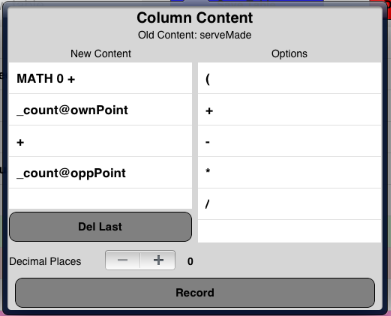
To add a column tap on the "Add A Column" button at the bottom of the screen. This will create a new column at the far right of the table (the bottom of the list). The column is initialized with the header "New Column" and contains the player name. The location and content of the column can be changed, as described next. To make changes to an existing column, tap on its header. This brings up a popup window similar to the one shown below, left. Using this popup window you can change: the text in the header or description, the background color, the content, and the location of the column. You can also simply delete the column. The background color of this window is the background color of the column; the color changes as you move the color sliders; just as in the popup for setting the team name. Changes to the header, description and color are recorded when you hit any of the buttons on this popup (other than "Delete Column"). The location is changed by hitting either the "Up" or "Down" buttons. Note that the location buttons move the column a single position and dismiss the popup. So, to move a column three places you would need to bring up the popup three times. When you hit any of the buttons on this popup, (or the "record" button in the window described below) the current state of the table will be saved under the name "zzTemp". This is done to help ensure that you do not loose your work because you forgot to save. You should be in the habit of always using save and explicitly naming your tables. (We added this auto-save because we frequently forgot to save while testing this feature.) To change the content of a column, tap on the content. Doing so closes the standard column popup (after recording changes to the header, description, and color) and opens a new popup for specifying the content of the column. Using the content creator you can reproduce any column in any of the standard reports -- and lots of other things too. However, this tool creates expressions that can be slightly different from the pre-made reports. Expressions generated by the content creator work only on data that includes play-by-play information. Generally this means that the data must have been collected using v3.0 or later. (v3.0 was released in early October 2012.) If there is no play-by-play information -- i.e., the play-by-play report is blank -- then new columns will almost always contain simply zeros. This problem only affects expressions created by here, the expressions in the provided tables almost always work on data collected by all versions of the app. At the center of this window are two columns. On the left is "New Content"; this column contains the new specification of the column content. "New Content" is initially empty; the app does not support copying the old specification into the new one. On the right is "Options"; this columns contains the currently available options for building a content specification. Immediately below the "New Content" list is a button "Del Last". This just deletes the last item in the "New Content" column. Above these columns is the old content specification. This is provided for your reference. At the bottom of the window is a "save" button. If you close this window (by tapping anywhere outside of it) without saving, then the work done in this window will be lost. Just above the "Save" button is a tool for setting the number of decimal places shown with numbers. This is initially invisible, it appears only when a mathematical expression is being entered. To set the content of a column, choose an option from the left list by tapping on the option. Usually this copies the option selected to the right list, and then refills the options list with a new set of options. When the content is in a savable state, the "Save" button will be enabled, otherwise tapping on "Save" will do nothing. The initial set of choices for the content of a column are:- VALUE -- tap on this and the options column is replaced by a list of names of all of the statistics that can be gathered by the app. Choose the one you want from the very long list. After choosing the desired stat, the options list is replaced by the stat name preceded by either "_count@" or "_sum@". Not surprisingly, the former will report the number of times the stat was recorded while the latter is the sum of the values recorded. For most stats (e.g., kills) the value recorded is 1 so count and sum are identical. For rating stats (like serve return quality) the value recorded is not 1. (You can see the values recoded in the play-by-play report and on the History tab. In both locations, when a value is not shown, the value is 1.)
- MATH -- This starts a mathematical expression. Anything other than simple count or sum of a statistic will start here. Note "MATH 0 +" will appear in the "New Content" column. This is normal; the "0 +" just gets mathematical expressions started correctly.
- NAME -- the name of the player
- JERSEY NUMBER -- the number of the play
- DIV - a thin vertical line.
 |
 |
- We typically take a couple of attempts before we get formulas correct. So we make a lot of tables that get used only once or twice before we delete or overwrite them.
- Use pencil and paper; it helps.
- Try not to forget to set the number of decimal places you want to show. We forget this frequently and are annoyed every time.
- If you use this tool and find it helpful, let us know. We will continue to work on improvements and expansion. For example, as it you cannot calculate the percentage of serves rated "poor".
- Please let us know about formulas you would like to be able to write, but cannot so that we can direct the enhancements.
Behavioral Rules
Behavioral rules give you the ability to change the way the app works. Depending on how you use the app, these changes may help or hinder. Hence, the rules are set so that the app behaves exactly as it did in previous versions (prior to v3.5) and exactly as described above in this document.You can test whether or not you like the rule by simply changing its switch and returning to the Game Play tab. Make your rule choices permanent by hitting the "Make behavior configuration permanent" at the bottom of the screen. Each of the rules is discussed in the sections below. (The order here may not follow the app.) Section headers have short versions of the rule, complete text is immediately below the header.
One service return
| Record at most one service return per point |
The default behavior of the app is to allow any "white" button to be hit any number of times. This rule changes the behavior of the app for buttons related to return of serve. Specifically, if switched to ON, then the app will record only one return of serve per point. Taps on service return related buttons once one has been hit will be ignored. Note that "Ace" and "Serve Error" are both considered as service return information. So, if this rule is enabled then you would not be allowed to indicate that the service return was poor and that there was an ace.
Hide buttons related to service after return
| After the service return, do not show buttons related to service return |
The default behavior of the app is that all stat collecting buttons remain on the screen at all times. This rule changes that behavior. Specifically, when switched ON, buttons related to service return are shown only until the first white button is tapped. After that, these buttons are hidden until the point is over (Unless the count of the number of taps of white button returns to zero, in which case the buttons will reappear. For instance, hitting the "Clear Non Scr" button would do this.)
This rule exists for two reasons. First, turning it on will tend to simplify the interface by reducing the number of buttons on the screen. Second, by reducing the number of buttons, each of the remaining buttons can be larger, making data entry less error prone.
If you enable this rule, see the discussion of the next rule also.
Hide buttons NOT related to service prior to return
| At the start of each point, show only buttons directly related to serves |
The default behavior of the app is that all stat collecting buttons remain on the screen at all times. This rule changes that behavior. Specifically, when switched ON, all buttons NOT related to service return are hidden until a service return is recorded.
This rule exists for two reasons. First, turning it on will tend to simplify the interface by reducing the number of buttons on the screen. Second, by reducing the number of buttons, each of the remaining buttons can be larger, making data entry less error prone.
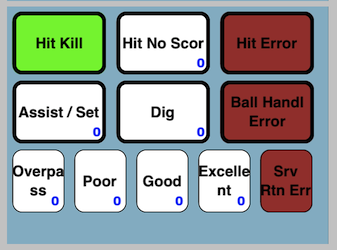
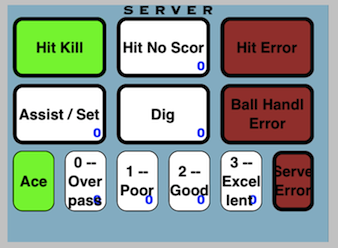
We almost always use this, and the previous rule, in combination with button customization. Specifically, we turn on both of these rules then set up the buttons so that the serve return rating buttons that normally appear in a popup are on the screen ("Separate" is set to "on" for all of the children of both "Opp Serve Return" and "Serve Returned"). Looking at the positions of the server and the person in front of the server only, the following button sets result from this customization.
 |  |  |
| Start of point "Green" serving | Start of point "Red" serving | After service return |
One assist per point
| When there are multiple hits of the set/assist button, only the final hit is counted as an assist, and then only if the point ended with a kill |
This rule ensures that at most one assist is recorded per point. The idea here is to make it easy to record sets and assists. Simply hit the set/assist button. At the end of the point, the app will code all but the final time this button was hit as a set. Then the final hit will be recorded as an assist only if the point ended in a kill. Note that this rule does not enforce the idea that there should not be more sets that attacks.
Players may move
| When all players have defined positions and those positions are unique in the front or back row, players move to those positions after the serve. |
This is the default behavior of the app. If you do not want players to move, then set this switch to OFF. Note that players only move when all of the players in a row have unique positions. So, this rule could also be achieved by simply not setting the positions for players. Still, if positions are set and you do not want player movement, this makes it easy to enable or disable movement.
Bench hiding
| Allow hiding/showing of the bench. The bench will be hidden -- or shown -- by tapping on a \"B\" at the far left of the score line. The bench will always be on screen when returning to the Game Play tab. |
This rule is OFF by default. Turning this rule ON does not hide the bench. Rather it makes the letter "B" appear in light gray at the far left side of the score line in the Game Play tab. Tapping on the "B" will show, or hide, the bench.
This rule exists on the "bigger is better" theory of button sizes. By hiding the bench, it frees up that space for the statistic recording buttons. Hence, each button can be a little bigger. In addition, hiding the bench reduces the clutter on the game play screen.
When the bench is hidden, to make a substitution you would need to unhide the bench first. You might find that the time to hide/show the bench is not worth the slightly larger buttons, but we generally find this feature worth the effort.
Changes to Volleyball Stat!
Version 3.5.0 -- released late December 2013
This version adds two major new features (and lots of minor new features) while leaving the default data recording screens unchanged. The following new features have been added- Behavioral rules. These rules allow the user to customize some of the behaviors of the screen on which stats are recorded. (See the Settings Tab.)
- The team summary reports can be heavily customized. Headers and content can be changed, new columns added and new report formats created. (See the Settings Tab.)
- Significant expansion of the ways in which the data can be shared (on the Reports tab)
- Batch file processing; this makes it easier to bring multiple matches into active memory (on the File tab).
- Fixed problem with loading data recorded prior to v3.0. Loading such data would cause the app to crash.
- Fixed column totals. In some cases (e.g., points played), the team total should not have been the sum of the player values.
- Make the "Clear All" button on the File tab actually clear everything.
- When files were imported from Android, if there were players who only were on the roster in the current set, then those players were not imported onto iPad.
- Hit speed was not properly recorded.
- "Set, not assist" was not properly recorded in some cases.
Version 3.2.0 -- released September 2013
This version is principally intended to bring the iPad version of this app into alignment with the Android version. Doing so required making the following changes:- Email data import extended to handle data from sent from Android.
- Changes to the organization of the reports tab. No reports were lost, the ways reports were selected was just changed.
- Move the Libero and Sub listings from the Undo tab to the reports tab.
- Added the ability to send email with the current data to the File tab. This had been on the File tab in v2.x; it is there again.
- Revised, simplified and extended the capabilities of the Player Alignment screen.
- A system for "forgetting" a set. This can useful, for instance, when you have accidentally hit the "new set" button a couple of times. The old "load, excluding first set" system remains in place, this provides a far more flexible alternative.
- A report, "all raw". This report is intended mostly for people who export their data to a spreadsheet. The report includes almost every piece of data collectable using the app.
- A "merge players" button on the "team members" screen of the undo tab. This button is most useful when merging matches because occasionally players that should be seen as the same are not. For instance, this can happen due to misspellings. This button brings up a screen on which you can identify independent player records for a single person.
- An offer to copy starters from the previous set to the new set after hitting the "new set" button. This simply saves time in many cases.
- Sub counts on the game play screen became unreadable when there were more than 10 subs.
- Data could not be imported when reading email through Safari.
- CSV formatting of reports other than the "team summary" were offered but did not work. CSV formatting is now only offered on team summary reports.
- The "index" button on the help page did not bring up the index. The button now works.
- In the rotation report, cumulative totals would only appear if there was an active set. Cumulative totals now appear every time this report is viewed.
- When viewing data collected prior to v3 some reports could show negative numbers.
Version 3.1.1 -- released April 2013
- Fixed a problem with email of reports in PDF format. The PDF was unreadable.
- Fixed a problem with MaxPreps reports; they were empty.
- Fixed a problem with sending csv reports of single sets.
- Fixed a formatting problem with screen for configuring button properties.
Version 3.1 -- released April 2013
- Tracking of timeouts, and substitution count on Game Play tab
- Configurable team colors
- Configured back row positions
- Added new detail stats and new reports for those stats
- Moved the selection of summary report format to the reports screen
- Added one set at a time viewing of summary reports
- Introduced new format for emailing data between instances of the app. The new format replicates all data.
- Significantly extended configuration options for data recording buttons.
- Added index to help
- Sharing of data between instances of the app via dropbox or iTunes file sharing.
- Changed the look of the file tab to make it easier to find data when there are many files.
- Bug fixes -- the most significant issue addressed involves not allowing a '/' in the team name as this resulted in a failure when saving data.
Version 3.0.2 -- released November 2012
This update is only a bug fix for issues in v3.0 and 3.0.1. Bugs fixed include:- Various speling errors
- Wildly incorrect set number in the rotation report
- Confusing order of sets when merging data.
- Difficult to attribute sets to opponents in the summary report. This was mostly an issue after merging data.
- Autosave did not work.
- Difficult to use autosave files in the files tab. Dates were added to autosave names.
- Screen could rotate oddly when dragging a person off of the bench.
- After double tap on BENCH in game play screen, buttons always switched to serving mode.
- In Raw Data report, the ServeRcvScore column always reported 0.
- MaxPreps import. One of the columns had the wrong header so its import into maxpreps failed.
- Cannot edit then save data that originated in v2.1
- The orientation of the Game Play screen could get out of sync with the iPad.
- Serve Receive grades recorded in v2.1 were not visible anywhere in v3. They now appear in the details reports.
- "overpass" added to serve receive quality options.
Version 3.0.1 -- released October 2012
This update is only a bug fix for issues in v3.0. Bugs fixed:- Save twice. In 3.0, a second attempt to save data resulted in an error that made the save unsuccessful. Data can now be saved an unlimited number of times.
- Button configuration. the Game Play interface in 3.0 did not respect the configuration settings that said to not display buttons.
- Incorrect graphs in some reports. The system for displaying reports would occasionally cache graphs. So, although the underlying graph had changed, the cached graph was displayed, resulting in incorrect information.
- Corrected a label on graphs in rotation report.
Version 3.0 -- released October 2012
This update has three major parts:- iOS6 compatibility: v2.1 randomly, and frequently crashed in iOS6;
- Stability improvements: v2.1 occasionally ran into problems, especially with undo:
- New features. Some of the highlights of the new features:
- Customizable player alignments with team sizes from two to nine players.
- Detailed statistics can be collected for virtually all stats collected in earlier versions. For example, rather than simply recording a kill, you can now record the speed and location of each kill.
- Two new reports with graphical and tabular data for displaying the newly collected detailed statistics.
- Play-by-Play reports. In previous versions, play-by-play info was only used by the undo function so its display was tailored to that task. Play-by-play now has its own report.
- Rotation reporting. Graphical and tabular display of the points won and lost for each rotation.
- Enhanced editing of recorded data.
Version 2.1 -- released April 2012
This is primarily a bug fix release. It also contains a several small user-suggested improvements.- Bugs Fixed
- Setting the team name and changing the team score at the same time could double the score change.
- Some email systems stripped the csv attachment when sending email.
- Extended documentation in places where users reported confusion.
- The calculation of the "Net Scored" column in some tables was incorrect.
- Libero designation was not preserved across sets in some cases.
- On rare occasions, pulling the first player from the bench to the cased the app to die.
- Enhancements
- Moved all sending of email to a popup window.
- Revised the file screen to address user suggestions about loading old rosters.
- Added the ability to make roster revisions on the Game Play screen by double clicking on items in the Bench.
- Added numbers to the lower right corners of the white buttons on the Game Play screen
- Added setter designations for players and default assists.
- Added export of files formatted for submission to maxpreps.com
- In "College Table" format, changed "points played" column to "sets played" to more closely follow NCAA.
Version 2.0 -- released February 2012
- Added buttons for recording Ball Handling Errors and Block Errors to the Game Play view.
- Added customization of buttons to enable users to set button labels and whether or not the buttons appear in the Game Play view.
- Revised the stats presentation to have several table formats
- Added the ability to send HTML tables
- Added the ability to import CSV files collected in other instances of this app.
- Changed "undo" screen to "play by play", thereby allowing review of the action in individual points.
- Added tables for individual results.
- Added explanations of columns to HTML stats presentations.
Version 1.1 -- released October 2011
This version has the following changes from version 1.0
- Improved stability of the program. Version 1.0 occasionally died.
- Introduced a new "score" tab that shows the current score of the set in very large numbers.
- Added serve receive scoring and removed the "serve return error" button.
- Rearranged slightly the stats recording buttons in the game play tab.
- Add usage descriptions to the documentation.
- Revised the stats table to show the new serve return scoring and also show the number of digs.
- Changed the player data revision system to allow changing the player's name.
- Added "undo" and "clear non scr" buttons to the game play tab. /li>
- White informational stat buttons now change color to show how many times each button has been hit during a point.
Version 1.0 -- released August 2011
The initial version.