Volleyball Stat! v4.0
Assists
Detailed Stats
Export / Import Data
Introduction
Game Play Screen
Score on Opponent Actions
Other Controls
Playing Floor
Files Screen
Adjust Screen
Reports Screen
Screens
Score Screen
There are two major sections in this documentation: first, a short introduction to the use of this program which is sufficient to allow start using this app; and second, a description of each screen and each button on each screen. In addition, there are two minor sections: a description of the differences between this app in android and on iPad; and a list of changes between versions.
Throughout this document, "green" is used to designate the team for whom you are recording stats and "red" is used to designate the opposition. Also, team colors and names, button colors and labels and a lot of other things are customizable. This document is always written assuming the default configuration.
Dashed underlined text indicates that this term in defined in the Term Definitions.
External Resources
This help file is stored on your device so it is always available. The following resources are also available if you are on-line:- This document http://volleyballstat.towell4.us/helpdocs/android/current/help3.html
- Step-by-step procedures http://volleyballstat.towell4.us/stepbystep.html
- Buttons http://volleyballstat.towell4.us/buttons
- Summary Reports http://volleyballstat.towell4.us/summaryreports
- Colors http://volleyballstat.towell4.us/colors
- Language http://volleyballstat.towell4.us/languages
- Known Issues http://volleyballstat.towell4.us/helpdocs/android/issues.html
An Introduction to using Volleyball Stat!
This introduction is not a complete description of the app's capabilities, nor is it intended to be. Rather this is a brief walk through of the use of this app during a single match. This should be sufficient to get started.
To use Volleyball Stat!, the first thing you need to do is to enter the players of the team for which you will be recording stats (the "green" team). To do so:
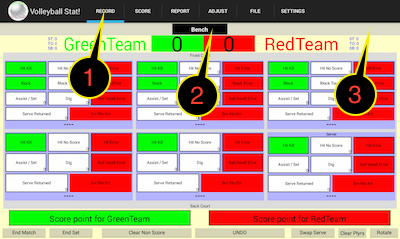
- Go to the Record (this may appear as "RCD") screen by tapping this word at the far left of the black bar at the top of the screen -- item 1 in the left image below. By default, the app starts on this screen.
- Tap on Bench at the top of the screen -- item 2.
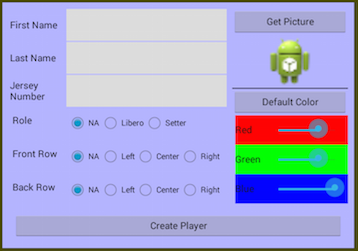
- This will being up a popup window which appears in the right image below.
- Enter information about the player. The only information required is the jersey number. The jersey number must be a positive integer (e.g., 2, 17, 9, 23) and must be unique among the players on the team. All of the other information is optional and is discussed in more detail below.
- Tap the Create Player button at the bottom of the popup. This will dismiss the popup window and add a button for the new player to the bench area -- item 3.
- Repeat steps 2-5 as necessary to create buttons in the bench area for every player on the team.
| 
|
If you have used Volleyball Stat! before and want to use the same roster of players as in a previously saved match that can be easily done. The step-by-step section just below gives procedures.
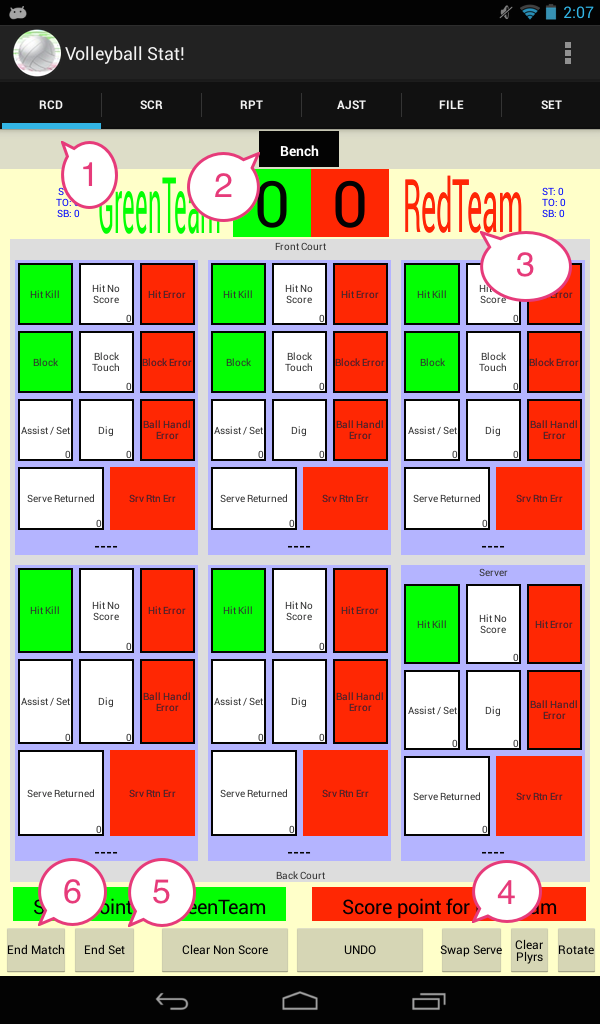
Once all of the players are added stay on the Record screen (or go there by tapping on Record at the top of the screen -- item 1 in the image below).
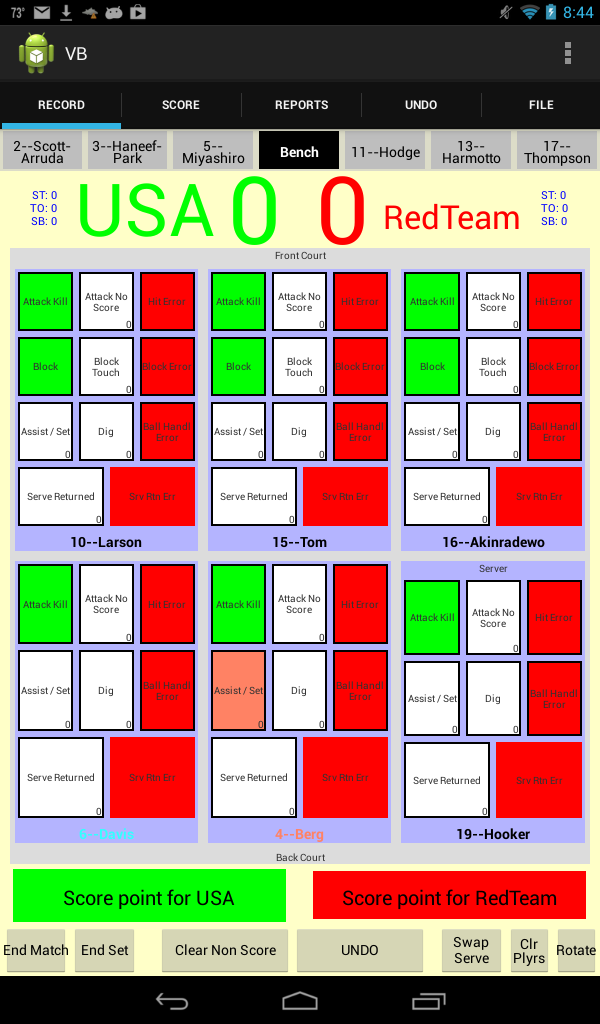
The Record screen is intentionally set up to look like one half of a volleyball court. The playing floor for the team for which you are recording stats (the green team) is represented by the large gray rectangle in the center of the screen. By default, on that grey background are six blue rectangles; one for each playing position. These blue rectangles contain a set of buttons to record stats for the person playing in that position. To help identify the positions, the words Front Court and Back Court appear on the grey background and the word server appears on one of the playing positions. Carrying the court metaphor forward, team names -- item 3 -- are where the net would be and the Bench -- item 2 -- is placed squarely in the opposition's front row.
After entering the roster you still need to do three things before the match starts:
- Set team names: To set a team's name, tap on the name of the team you want to change (for instance, in the above image, item 3, "RedTeam"). This will bring up a popup box in which you can change the team name. The team name appearing in green is the team for which you will be recording stats.
- Position the starting players on the court: To move a player from the bench to the playing floor, tap once on the player's name. This will cause the background of the player's name to turn yellow. In addition, each playing position will become yellow and have a button with the text "Sub out ..." (Initially, each button will say "Sub out ----", where "----" indicates that no one is currently occupying that position.) Tap on the position to which you want to move the player. If you do not want to move the player, tap on the player a second time.
- Set the team that has the first serve: Hit the "Swap Serve" button -- item 4 -- as needed. (In the image above, the red team is serving.)
With everything set, recording stats during the run of play is straightforward. The following stats are recorded automatically:
- Player rotation
- Team serving
- Serve Made -- if the green team is serving, the person in the server's position is automatically credited with having made the serve
- Point played -- if the person is on the playing floor
- Assist -- if there is a person designated as a setter on the floor and the point ends in kill by the green team. The default assist is automatically overridden by hitting the assist button for anyone else. (Designating a person as the setter is discussed further below.)
Described in more detail in the Detail Statistics section, buttons with black borders have an additional behavior. They can always simply be tapped to record a statistic. But, if you long tap (i.e., tap and and hold for a second) a popup screen will appear that allows recording more details about that statistic. For instance, a long tap on the block button brings up a window that allows sharing a block between several people. If you find that you often use a stat requiring a long tap followed by selection you might consider customizing the interface to make buttons appear on their own on the record screen. This can be easily done using the Buttons screen in the Settings.
At the end of each set, hit the End Set button in the bottom left -- item 5. This records all of the stats for the set that just ended and increments appropriately the match score and returns to zero the timeout and sub counts. It also returns all players to the bench and gives you the option of starting the next set with exactly the same starting lineup used in the set just completed.
At the end of a match, hit the End Match button in the bottom left -- item 6. This button increments the set and saves the match to a file. These actions can be done using a combination of other buttons; this button is simply here for convenience.
Finally, you can review and share match stats at any time using the Reports tab. You can email the stats you have collected to the rest of the team by tapping the "share" button (in the upper right). In the resulting popup select the type of email you want to send. Report contents and format can be changed using the "content" and "format" buttons, also in the upper right. Viewing and sharing reports is described further below.
Popup Windows
This app uses a lot of popup windows. We try to follow these conventions about popups:- Information entered into a popup is not recorded outside the popup until the popup is closed by a definite user action. (Typically this would be tapping on a button, for example "commit".)
- Popups can be dismissed by tapping anywhere outside the bounds of the popup.
- When there is a keyboard on the screen, the keyboard can be dismissed by tapping anywhere in the background of the popup. (Occasionally the keyboard can hide parts of a popup.)
Step-by-Step procedures
The follow are very brief, step by step procedures for some common tasks. These procedures are also available at http://volleyballstat.towell4.us/stepbystep.html. This link contains other step-by-step procedures that are not included below. Also, this list will be periodically updated in response to user questions.Set up a match from nothing
- Go to the "record" tab by tapping on "record" in the black bar across the top of the screen
- Enter Players: repeat for each player
- Tap on "Bench"
- Enter personal information. The only required information is "Jersey Number".
- Tap on Create Player
- Set name of team for which you are recording stats
- Tap on "Green Team"
- Change the name (and color, if desired)
- Tap on "Commit"
- Set name of the opposition team
- Tap on "Red Team"
- Change the name (and color, if desired)
- Tap on "Commit"
- Set starting lineup of players
For each player in the starting lineup- Tap on the player
- Tap on their starting position
- Set the team that is serving first.
If needed, tap on the "Swap serve" button (in the bottom left of the screen).
Set up a match using the roster from a previous match
- Go to the "File" tab
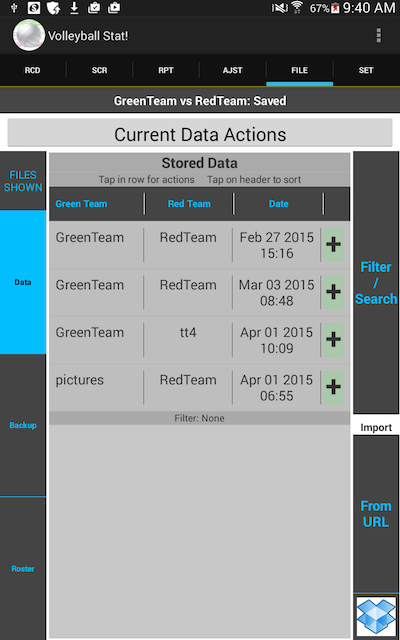
- Tap on "Current Data Actions"
Tap on "clear all" in the resulting popup - Tap on the match that has the roster most like the one you want to use. (Each match stores a copy of the roster used in that match.)
- Select "Load only roster" in the resulting popup
- Go to the "record" tab by tapping on "record" in the black bar across the top of the screen
- Continue from step 3 of the step-by-step for starting a match from nothing.
Set up a match using the same roster as the last match you recorded
- Go to the "File" tab
- Tap on "Current Data Actions"
Tap on "clear all, except roster" in the resulting popup - Continue from step 3 of the step-by-step for starting a match from nothing.
Set up a match using an explicitly saved roster
- Go to the "File" tab
- Tap on "Current Data Actions"
Tap on "clear all" in the resulting popup - Tap on "roster" (lower left).
- Tap on the roster in which you are interested
Tap on "Load only roster" in the resulting popup - Go to the "record" tab by tapping on "record" in the black bar across the top of the screen
- Continue from step 3 of the step-by-step for starting a match from nothing.
End a match
- Go to the "record" tab
- Tap on "End Match" (in the bottom left). This will automatically save the match data to a file
- Go the "report" tab and look over the data
- Go to the "record" tab
- Tap on "End Set" (in the lower left) then answer "yes" and "no" to the questions
- Go to the "File" tab
- Tap on "Current Data Actions"
Select "Save" in the resulting popup - Go the "report" tab and look over the data
Review an entire season of data for a team
- Go to the "File" tab
- Tap on "Current Data Actions"
Tap on "clear all" in the resulting popup - Tap on "Date" in the black bar above the list of stored matches. This will sort the matches by date.
- (Optional) Tap on "Filter" and set the name of the team to be filtered for.
- Tap on the "+" on the right side of the first match of the season. The "+" will change to 1, and the row will change to yellow.
- For each of the remaining matches, tap on the '+'.
- Tap in any yellow row
Select "Load then append" - Go the "report" tab
- Tap on "Content" (upper right)
Select "Summary -- Team" in the resulting list
Other procedures
Other step-by-step procedures are enumerated elsewhere in the help.Screens and buttons in Volleyball Stat!
Volleyball Stat! has five screens that are selectable using the tab bar that goes across the top of the window. In addition, help related screens are accessed using the 3 vertical dots icon in the upper right. The screens are (from left to right as they appear on the tab bar):- Record
- This is the screen on which stats are actually recorded. This is the screen you will be using the most.
- Score
- This screen shows the score of the current set in very large numbers.
- Reports
- This screen shows the accumulated stats in several forms.
- Adjust
- This screen shows, and in most cases allows the manipulation of, recorded data.
- Files
- The screen allows you to perform actions on the data. For example: saving, loading.
- Settings
- This screen allows you to change a lot of things about the app. (Prior to v3.5.0 the settings were accessed from the options menu then selecting "Settings".) The settings panel allow you to adjust:
- Players. This is principally useful in that you can adjust the information while players are on the court. It is also a little easier to see the players in this listing than on the bench.
- Buttons. This allows you to configure the stat recording buttons on the "record" tab. For example, most of the buttons accessed by long taps can be promoted to appear independently on the record screen.
- Positions. This allows you to configure the number of players on the court, what each player is allowed to do (block or serve) and the rotation order. For example, set up a 4 person game rather than the default 6.
- Summary Reports. This allows you set up team summary reports that contain exactly the information you are interested in showing. Minimally, this allow you to change the column headers of a report, thereby allowing non-english users to generate reports in their preferred language.
- Behaviors. Allows users to change the behavior of the app in a number of ways. For instance, the bench can be hidden by default. This increases the amount of room available to the main data recording area, allowing for slightly bigger buttons.
- Backups. Configure when automatic backups are created and for how long they are retained.
- Colors. Configure most of the colors on the record tab
- Language. Configure most of the strings on tabs other than Settings. Labels for the stat recording buttons on the record tab are configured using "buttons" rather than "language".
- Options Menu
- The options menu can be accessed either by tapping on a "3 dots" icon in the upper right of the screen or by tapping on the "menu" button which is to the left of the large physical button at the bottom of the screen.
- Term Definitions
- This attempts to provide a single place to find definitions for terms used in the app. Feel free to email us with suggestions about missing terms or corrections for the definitions.
We used the following sources for term definitions:
- http://fs.ncaa.org/Docs/stats/VB_Forms/vb%20hints08.pdf
This and the next site were the source for all "NCAA" addenda to the terms. - http://www.naia.org/fls/27900/1NAIA/resources/sid/Rule%20Books/VBStats.pdf?DB_OEM_ID=27900
- http://leaguelineup.com/evansvillerivercityvolleyball/files/VolleyballStatDefinitions.pdf
- http://huttrapids.wordpress.com/how-to-play/terminology/
- http://fs.ncaa.org/Docs/stats/VB_Forms/vb%20hints08.pdf
- Help
- You are probably looking at the help now. It attempts to describe everything that you can do with the app.
- Bug Reports, Questions
- Email the developers.
- About
- The version number of the app. Sometimes it is useful to know.
Record
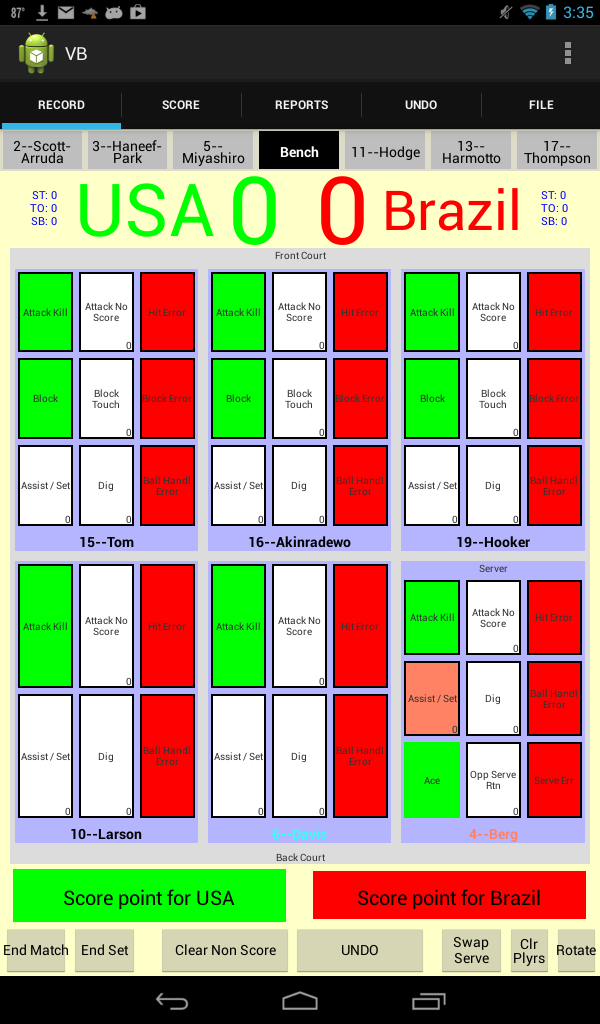
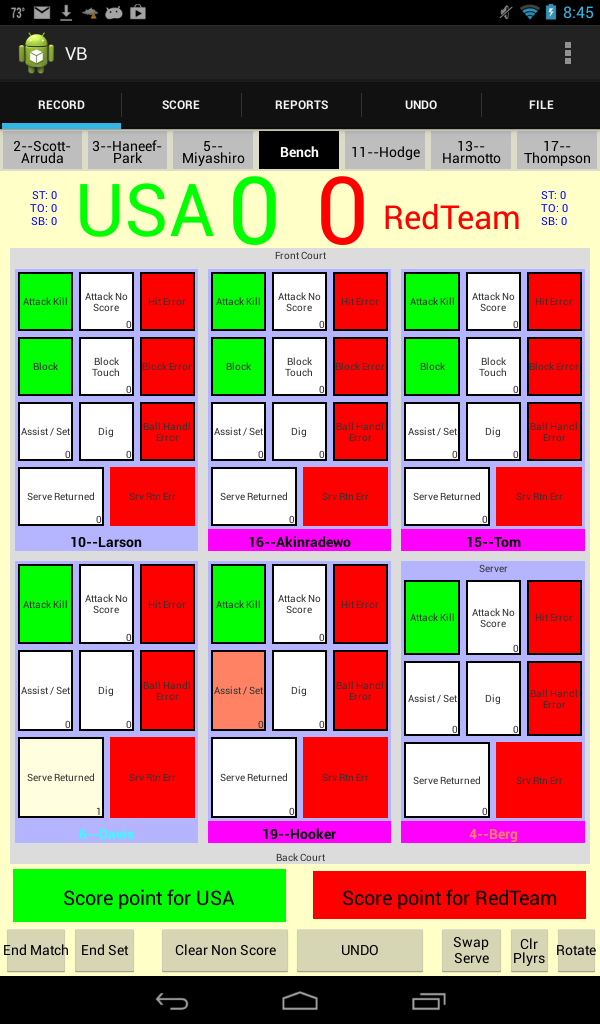
This is the screen used to collect stats. The default version of this screen will look very similar to one of the two following images which might have been taken just before the start of the Gold medal women's volleyball match at the 2012 Olympics. (The lineup for USA is probably incorrect.) Your player and team names will naturally differ. The settings screens can alter the labels on the buttons, whether or not those button appear, and the number and distribution of players on the floor.
| 
|
These two images differ only in terms of the team serving. In the left image USA is serving to Brazil; in the right USA is receiving serve from Brazil.
By default there are 5 sections in the game play screen. From top to bottom they are:
- The bench (This can be configured to be hidden using behaviors)
- The score
- The playing floor
- Scoring on opponent action
- Other controls (This can be configured to be hidden using behaviors)
The Bench
The bench includes all players not currently playing; i.e., potential substitutes. Players sit in numeric order on the bench. From the bench you can: add players; delete players; change player information; and, most importantly, make substitutions.
There are two ways to substitute players:
- Drag and Drop. Tap and hold on a player's name on the bench and drag that player from the bench to the position on the floor in which they will be playing (said alternately, onto the position occupied by the person for whom they are substituting). As you drag a player over a playing position, the background color of that position changes from blue to yellow. (The app does not enforce any rules concerning substitutions.) Lifting up your finger when the player is over a playing position causes the bench player to take that position. If there already is a player in that position, then the player who was there moves to the bench. Lifting up your finger over anything other than a playing position cancels the substitution.
- Select and select. Tap once on the bench player who is coming into the match. This will cause the background color of that player to change to yellow. Also, large yellow buttons saying Sub Out ... will appear overlying the playing positions on the court. Tap on the appropriate yellow button to finish the substitution. Tapping on the yellow button in the bench area cancels the substitution.
|
 |
To add a player to the bench, tap on the word Bench. This will bring up a popup window (shown above, left) in which you can enter player information. The information on this screen is:
- Last Name: The player' surname. e.g., Doe. Last name is only a suggestion, you can put anything or nothing here.
- First Name: The player's given name. e.g., John. First name is only a suggestion, you can put anything or nothing here.
- Jersey Number: The number on the player's shirt. This must be entered, must be an positive integer and must be unique. If you use the roster from a match recorded from before v3.0 of this app (on iPad) then this field will be blank; the app will accept it. However, if you edit the player information you will be required to enter the jersey number.
- Special Role: This option has 3 choices: "Libero", "Setter" or "N.A.". Use "N.A." if the player is neither a setter nor a libero. The program uses setter and libero designations as follows:
- Libero
-
Designating a player as a libero causes their name to appear in cyan (bright blue). Also, if the player rotates to a front row position, then the position background changes to bright blue to indicate that the libero probably should not be there. (The color change is only meant as a warning. The app takes no enforcement action.) In the full screen images above, you can see that "Davis" is the libero because of the color of her name.
Beyond these simple color changes, if a player is designated as libero, then substitutions involving that player are not counted in the substitution count that appears in the score area. Finally, in the reports tab, movements of the libero have their own report that is distinct from the other substitutions.
- Setter
- Designating a player as a setter has two effects. First, their name always appears in orange. Second, at the beginning of each point, the setter is given a "default" assist. This default assist is used to automatically give the setter an assist if the point ends in a kill by the green team and no one else is explicitly noted as having made an assist. In the full-screen images above, you can see that the player "Berg" has been given a default assist because the background of the assist button is orange. If this were a normal assist the background would be pale yellow. If a different player should get the assist, just tap the assist button for that player. There is no need to clear the default assist; when another player is given an assist the default assist is cleared automatically. If there are two players designated as setter on the playing floor, the default assist is given to the setter in the back row.
- Front Row Position: May be left, center, right or "N.A." Use "N.A." if the team does not have fixed positions across the front row or if the player never plays in the front row. If each of the players on the front row have a position assigned and the positions are unique, then immediately after the first "white" button is hit, the players will move to that position. This can make it easier to record stats because players will be in consistent places. If you do not want players to switch places in the app screen, the set all the players positions to "N.A.".
- Back Row Position: Back row position is exactly analogous to front row position.
- Get Picture: All players initially have a small Android character as their picture. Tapping on the get picture button allows you to put in a picture of your choice. The picture must be stored on the device which you use for recording stats. Generally this is easy if you have a camera on the device and a little harder -- but still possible -- if not. Because pictures use local storage on a device, if you move stats recording to another device, the picture will be lost (all of the other roster information is retained).
Tapping on the "Get Picture" button will take you through steps to pick a picture. After picking, the picture will appear underneath "Get Picture" and will replace the android character (or the previous picture). Currently the picture is only used on the record screen in each playing position, and only if you configure the position to show pictures (see Settings / Buttons ).
- Background Color To help you quick find players, you can set each player to have a unique background color. This can be helpful, but can also be nauseating. If you change the color, you can easily change it back to the default using the "Default Color" button.
| 
|
When you are happy with the player's information, tap the Create Player button. If there is no player with the number already in the roster then doing so will add the player to the bench. If there already is a player with that number when you tap on the "create player" button, the background of the popup window will turn to the color of the "red" team. In addition, a small warning will appear below the jersey number saying that the number is already in use. If you do not want to add a player, simply tap anywhere outside of the popup. If you do not tap on the Create Player button, then all changes made will be lost.
To delete a player, or change information about the player, tap and hold for about one second on the button in the bench area for the player. This will bring up a popup window (shown above, right) that is almost identical to the one for adding a player. The only difference is the addition of the Delete Player button and the Create Player changes to Change Player. As with adding, tapping anywhere outside of the popup cancels the change operation. You can also add/delete/change players in the settings section.
With three exceptions, players on the bench have a dark gray background with their IDs in black text. The exceptions are:
- When the player has been selected for substitution by tapping once as described above. In this case the button background is yellow.
- When the player is the team's libero. In this case, the button has a cyan (bright blue) background.
- When the player is a setter. In the case the button has an orange background.
Volleyball Stat! does not enforce any rules about substitutions. As described in the "Score" section (next), the app automatically keeps count of the number of subs for the green team. But that information is only used as on-screen information. The only time that the program informs you that something is odd is when a libero rotates a position in which blocking is allowed (i.e., the front count). In this case, the text of the player's position changes to having a cyan background.
The Score
This section shows the names of the two teams and the score of the current set. The team name appearing on the left is the team whose players are on the bench and is the team for which you are recording stats. The default color for this team is green. The team name appearing on the right is the opposition. The default color for this team is red.
Also in the score area are a group of small blue numbers that appear towards the edges of the screen from the team names. From top to bottom these numbers are: the number of sets won in the current match ("ST"), the number of timeouts used in the current set ("TO") and the number of substitutions used in the current set ("SB"). The number of sets won by both teams and the number of substitutions made by the green team are all automatically tracked by the app; the other stats must be manually changed; as described below.
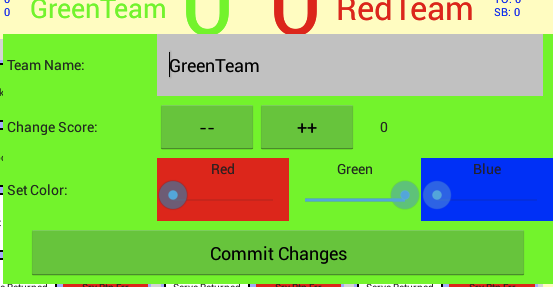
To change the name of a team, the score for that team, or the team color, tap on the team's name name. This brings up the popup window shown below left, in which you can make these changes. Team names are limited to 40 alphanumeric characters. If you try to type anything else, the typing will just be ignored. The 40 character limit is imposed when you hit the "commit changes". At that time team names longer than 40 characters will be truncated.
This screen includes a score change ability because it can be convenient to make your recording of the score identical the official score without having to use some combination of undo and the "score on opponent action" buttons. For example, you might get distracted and miss a couple of points; the match set might not begin with a 0-0 score; or you might start recording stats part way through a set. The only restriction on score changes is that you cannot change a score to be less than zero.
When changing the team color, the background color of the popup window changes as you move the color sliders so you can see the color you will get. Note that changes to the team color also changes the colors of the buttons in the game play area. So, changing the color of the team for which you are recording stats from green to yellow would also change all of the green buttons to yellow.
Tap the Commit Changes button save the changes made on this screen; tap anywhere outside the popup box to cancel any changes.
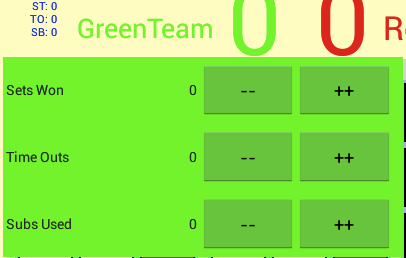
To change any of the stats in blue in the score area, tap on those stats. This will bring up a popup like the one shown below right. Use the controls in this window to increment (or decrement) any of these stats. This window automatically closes after a single increment or decrement. You will probably never need to increment or decrement either set counter or the sub counter for the green team as these are automatically maintained by the app. However, mistakes happen and the controls are here to help you fix those mistakes. The information in the blue stats is not used anywhere else in the app, and like most things there are no rules surrounding its use. So, if you want to use the TO counter for something other than timeouts, you can.
| 
|
The playing floor
The following discussion is of the default configuration of the app. Almost everything can be customized from the Settings tab
The playing floor consists of a large grey background with six light blue rectangles. Each blue rectangle contains a set of green, white and red buttons. The six blue rectangles correspond to positions on the playing floor is a 6v6 volleyball match. Visually, this would put you above and behind the court. To help keep track of the court positions Front Count and Back Court appear in small letters on the grey background. Also, on one of the backcourt positions is the word server. Carrying the court metaphor forward, the score reporting area is in the net and the Bench is placed squarely in the opposition's front row.
The playing floor is, by far, the largest section of this screen. This is appropriate; most of the stats keeping is done using the buttons in this area.
Colors
In each position on the playing floor is a set of green, red and white buttons above the ID of the player in that position. Player IDs usually appear in black text at the bottom of the position background. Exceptions are as follows:- The player is a libero and is in the back row. In this case, the color of the ID is cyan (bright blue).
- The player is the libero and is in the front row. In this case, the color of the name is black, but the background color for the entire playing position is cyan. This is intentionally annoying, liberos should not be in the front row.
- The player is a setter. In this case the color of the ID is pale orange.
- The player has moved to their "standard" playing position. In this case, the name appears on a magenta background.
In all areas, green buttons result in immediately recording a point for the team on the left of the score panel whose name is in green (this is the team whose players are shown as on the floor). Red buttons result in immediately recording a point for the team on the right of the score panel and whose team name is in red. Following the pattern of the score panel, green buttons appear on the left side of a playing position while red buttons appear on the right. (Button position can be configured.)
White buttons do not result in points, rather they record actions that occur during a point; for example digs and assists. White buttons most often appear in the center of button rows; they are always to the right of green buttons and to the left of red buttons.
If there is a setter on the floor, then then that player is given a default assist at the start of each point. This default gives the assist button a pale orange background. If there is a kill then the setter will automatically get an assist recorded. Points recorded in any way other than kills will not record a default assist. Also, the setter will not get a default assist if they get the kill or if someone else is explicitly given the assist. If there is a kill but no one should get an assist (e.g., because there was an overpass), then tap twice quickly on the assist button to clear the default assist. If there are two setters on the floor, the default assist will go to the setter in the back row.
Buttons at each player position are arranged in rows where each row represents a class of actions. From top to bottom these actions are:
- Attacking
- Blocking (This row only appears for playing positions that are allowed to block. By default, this is the front row.)
- Defending
- Serving or Serve Returning (Serving buttons only appear for the player in the server position if the team is serving. Serve Return buttons only appear if the team is returning serve.)
Since the white buttons do not get recorded immediately, they can be easily undone before the point is recorded. There are two ways to do so. First, undo all white button stats for the current point by tapping the button labeled Clear Non Score. Second remove a single mistake by "double tapping" on the button with the mistaken entry. This decrements by one the count of the number of taps on that button. (White button stats can also be undone after recording a point as described here).
Green and red buttons should be the last thing hit when recording the action for a point because they record all stats, increment the appropriate score, rotate players (if needed) and reset the white buttons to their "white" state. For instance, if the point consisted of a service return by a player, an assist and a kill, then the buttons for the assist and service return should be hit before hitting the button for the kill. (As discussed previously, the assist button need not be hit if the setter had the assist.)
Definitions of each of the buttons in the playing floor panel.
This table contains very brief descriptions of the intended use of each button on the playing floor.| Button Color | General Description | Default Button Label | Definition |
|---|---|---|---|
| Green | An action that immediately scores a point for the "green" team. (The team whose name is written in green on the left of the score section.) | Hit Kill | An attack that results in a point |
| Block | A block that results in a point. This button only appears for front court players. See detailed blocking statistics in the details statistics section below for shared blocks. | ||
| Ace | A serve that result in a point. Only appears in the server position when the team is serving | ||
| Red | An action that immediately scores a point for the "red" team. (The team whose name is written in red on the right of the score section.) | Hit Error | An attack that immediately results in a point for the other team. |
| block error | A blocking error. This is most commonly touching the net while blocking. | ||
| Ball Handl Error | A ball handling error. This is most commonly a double contact but may be any error that occurs at times other than blocking, attacking, or returning serve. | ||
| Serve Error | Only appears in the server position when the green team is serving. | ||
| Srv Rtn Err | A service return that is done so poorly that in results in a point for the other team. If you were recording stats for the "red" team, this would be recorded as an ace. Only appears when the green team is returning serve. | ||
| White | An action that is worth recording but does not immediately result in a point. | Hit No Score | An attack that sends the ball to the other team and does not result in scoring a point. |
| Block Touch | The player touched the ball when blocking. The block did not result in a point. (Not an official stat.) | ||
| Assist / Set | A pass that results in a hit that scores a point. Most kills are preceded by assists. | ||
| Dig | The initial contact on an opposition attack. | ||
| Serve Returned | The player returned a serve. Only appears when the green team is returning serve. | ||
| Opp Serve Rtn | Brings up a popup that allows you to rate the quality of the opponent's service return. This stat is useful as an indicator of how hard a person's serve is to return. This may give a better feel for the serve quality than simply number ofaces and number of errors. Only appears in the server position when the green team is serving. | ||
| Serve Made | There is no button to record a serve being made. This is recorded automatically for the person in the server position when the green team is serving |
There are many rules that could be written to control the white buttons. A few of the possible rules are implemented in the app. They can be turned on (or off) via the Behavior selection on the "Settings" tab.
Detailed Statistics
Most of the buttons described above allow the collection of detailed stats in addition to the stats described above. Buttons that have a detailed stats option have a thick black border. (In the default setup, only "Ace" and "Serve Rtn Err" do not have underlying detail stats.) To access the detailed stats recording, tap and hold on a button. This will bring up a popup window in which details can be recorded. Buttons that have detail popups available are indicated by a heavy black border. Conversely, buttons that do not have a detail popup have no border.Hit Kill
|
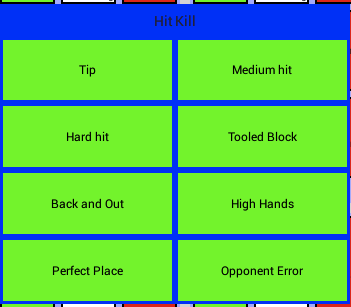
The details for the "Hit Kill" button focus on why the hit resulted in a point. The following reasons are available:
The default action of the underlying buttons is to record an kill with no rationale. |
Hit No Score
|
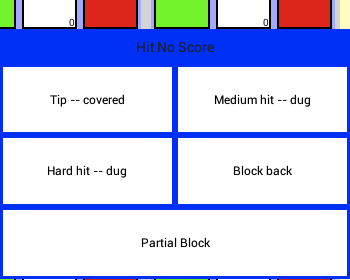
This detail button focuses on why the attack did not succeed. The following reasons are available:
The default action of the underlying buttons is to record an attack with no rationale for its not resulting in a score. |
Hit Error
|
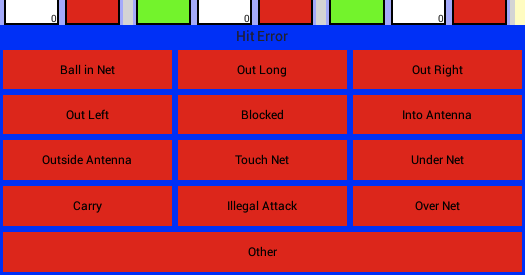
This screen allows you to record the specific error that resulted in the loss of a point on an attack. Pick the item that applies and tap once. Doing so will record that an attack error occurred and the specific type of error. All of the errors other than Blocked and Other correspond exactly to a call by a referee. The following reasons are available:
There is no Record button. Tapping on an error type automatically records this information. As with all detail popups, dismissing the popup is equivalent to never having hit the underlying button. |
block
|
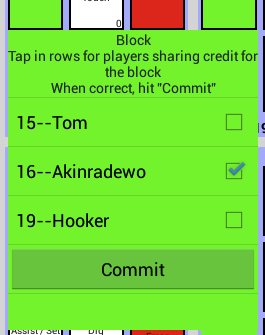
The detail popup that appears after a long touch on the block button appears at left. This popup is used to share a block across two or more players. To use this function, tap and hold the block button for any one of the players who participated in the block. This popup will appear. On the popup will be all of the players that can legally block with checkboxes. Tap on players names to select / deselect the checkboxes. When all of the players that participated in the block are checked, hit the "commit" button. According to the NCAA you should record a shared block if there was a block in which more than one blocker jumped. The block should be shared even if it clearly touched only one person.
The default action of the underlying button is to record a solo block. If you do not set checkmarks for any other players, the app will record a solo block when you hit the "commit" button. As with all detail popups, dismissing the popup is equivalent to never having hit the underlying button. |
Block Touch

|
This screen allows you to record the result of a blocking attempt that did not result in a point for the green team but in which the blocker did touch the ball. The following options are available
The default action of the underlying button is to record that a touch was made, but without any indication of the strength of the touch. Note that the three buttons on this detail screen are white and three are red. These behave exactly as red and white buttons in other places. Specifically, the red buttons result in immediately recording a point for the red team whereas the white buttons accumulate information about a point in progress. The red buttons are here because, although the action resulted in a point for the red team, these are not errors. |
Error Block
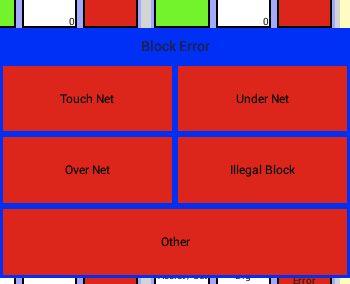
|
This screen allows you to record the specific error that resulted in the loss of a point while blocking. Pick the item that applies and tap once. Doing so will record that a blocking error occurred and the specific type of error. All of these errors other than Other correspond to a call by a referee.
Other exactly the same as the default action of the error block button.
The default action of the underlying Error Block button is to record a blocking error without any comment about the type of error. There is no record button, tapping on an error type automatically records this information. As with all detail popups, dismissing the popup is equivalent to never having hit the underlying button. |
Assist / Set
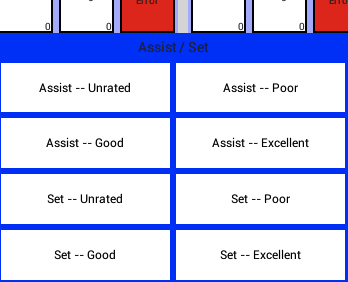
|
This screen allows you to record the quality of a set and whether or not that set resulted in a kill (i.e., the set yielded an assist).
The default action of the underlying button is to record an assist with no quality rating. This is exactly equivalent to the "Assist -- Unrated" on the detail popup. As with all detail popups, dismissing the popup is equivalent to never having hit the underlying button. |
dig
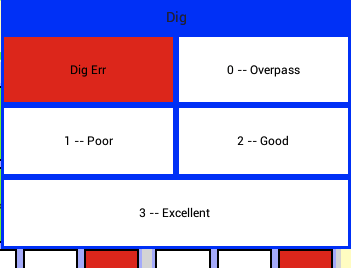
|
This screen allows you to record the quality of a dig. Pick the item that applies and tap once. Doing so will record that a dig occurred and how good the dig was.
The default action of the underlying button is to record a dig with no quality assessment. Note the the "dig Err" button is red. This indicates that hitting it immediately records a point for the red team, as well as recording the the red team point resulted from a poor dig. (There is an exactly equivalent button in the "Ball Handl Error" detail screen.) |
Ball Handl Error
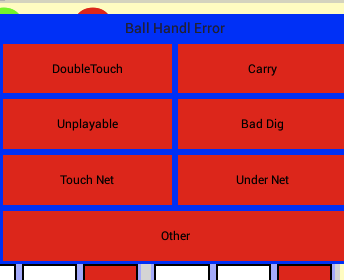
|
This screen allows you to record the specific error that resulted in the loss of a point while handling the ball; typically on the first or second hit. The error options are:
|
Oppt Serve Rtn
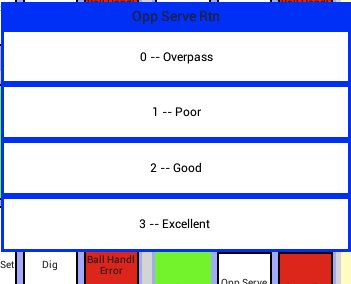
|
This screen allows you to record the quality of the opposition's serve return. (As discussed above, this is used in this app as a metric for the quality of the serve.) Pick the item that applies and tap once. Doing so will record the quality of the opponents serve return.
It is possible to configure the "Ace" button to appear in this detail popup screen using the Button Configuration system. Were you to do so, you would probably want to change "Ace" to something like "Failed" so that the words describe the opposition's handling of the serve rather than the serve itself. We do not recommend making this change; we simply note that you could do so. |
Serve Error
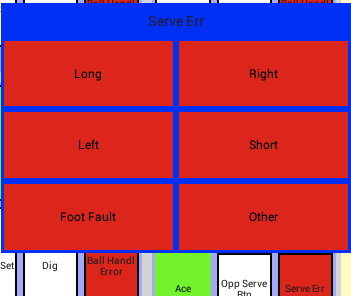
|
This screen allows you to record the specific error that resulted in the loss of a point on a serve. Pick the item that applies and tap once. Doing so will record that a serve error occurred and the specific type of error.
The default action of the underlying button is to record a serve error without any type attribution. Other is exactly the same as the default. |
Serve Returned
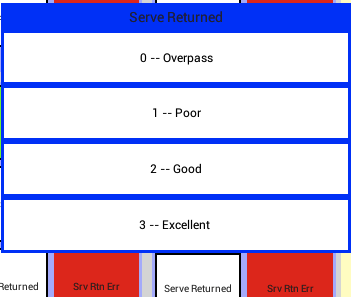
|
This screen allows you to record the quality of a service return. Pick the item that applies and tap once. Doing so will record that the person return a serve and how good the return was.
The default action of the underlying button is to record service return without a quality assessment. Using the Button Configuration system on the settings screen, it is possible to make all of these buttons appear on their own. As a result, you could record the return quality in a single tap. We debated which approach should be the default, and ended up selecting the one that put fewer buttons on the screen. |
Scoring on opponent action
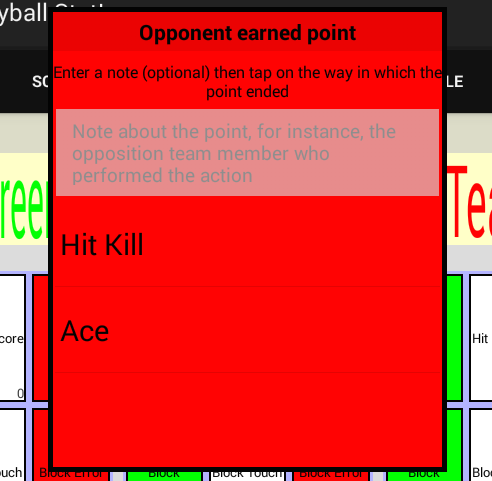
Just below the playing floor section are two large buttons -- one red and one green. These buttons are for scoring that is not covered by the scoring buttons in the playing floor section. Most typically, this is because the point ended as a result of actions that only involved the opposing team; for instance, a service error.
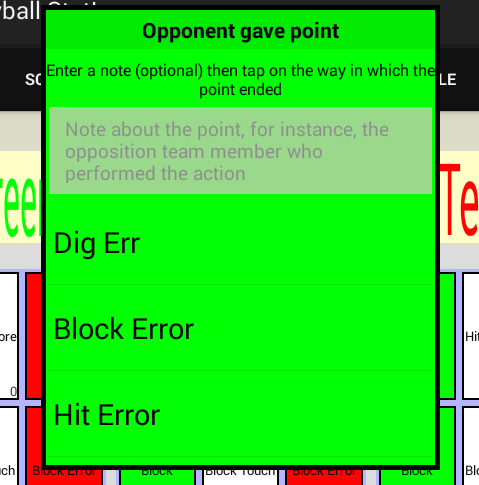
Like buttons in the playing positions you can tap on the button to simply record a score or you can long tap on the button to record what the opponent did. Long tap will bring up a popup window in which you can record the specific opponent action that resulted in the point as well as a note about the point. In the play-by-play report opponent actions will appear as being by a player with number -999. The note taking ability allows you to record a specific opposition player or any other interesting information
Score Point for Red Team
|
This should be used for points in which the red team earns a point without any interaction from the green team.
|
Score Point for Green Team
|
Almost always this is an opponent error. You can record the following specific errors
|
Other Buttons
There are seven light gray buttons at the bottom of the screen. These buttons are not directly related to scoring or the general run of play. From left to right the buttons are:
- End Match --
Record a match as complete. Hitting this button is exactly equivalent to doing the following:
- Hit new set
- Go to file tab
- Tap on Current Data Actions
- Select Save
- New Set -- Record the current set as complete. This removes all the players from the floor, clears the substitution lists. It also changes the small blue numbers in the score area; resetting the timeout and substitution counts and incrementing the appropriate set counter.
- Clear Non Scr -- returns all of the white buttons to the "white" state without saving. This cannot be undone.
- Undo -- Erase everything about the most recently recorded action. This is usually a point, but it can also be a substitution, etc. Warning, you cannot undo this operation; once the action is erased it is gone for good. If there is any question, you can always see exactly what will be undone on the Undo tab.
- Swap Serve -- changes the serving team. This is particularly useful at the start of sets to change the team that is serving. Also, although the program keeps track of scoring and the resulting change in team serving, it is possible for the program to get out of sync with the actual play (for instance, because the stats recorder got distracted and missed some points). Since the buttons are different depending on the serving team, it is important to have the serving team correct.
- Clear Players -- return all of the players to the bench. Sometimes this is useful when you get totally confused
- Rotate -- Rotate the players on the floor. Usually this is unnecessary as the program rotates players automatically. However, mistakes can be made and this button can help in recovery.
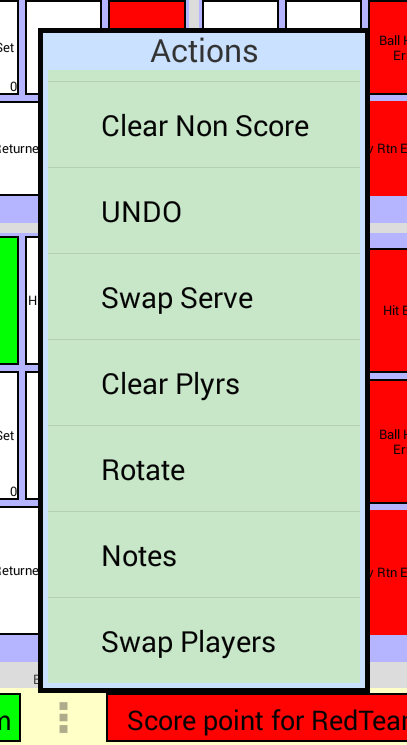
Alternative view of the "Other Buttons"
|
These seven buttons can be configured to be replaced by a single button that raises a popup. (See Settings>Behaviors to do this configuration). The single button appears as 3 vertical dots between the two buttons for recording scoring on actions by the opponent. It appears at the bottom of the image to the left.
There are several reasons you might want to opt for the single button. First it is less prone to unintentional taps. Second, it allows everything remaining on the screen to be slightly larger. Third, the popup (shown in the image to the left) offers two additional options. These are:
|
Score
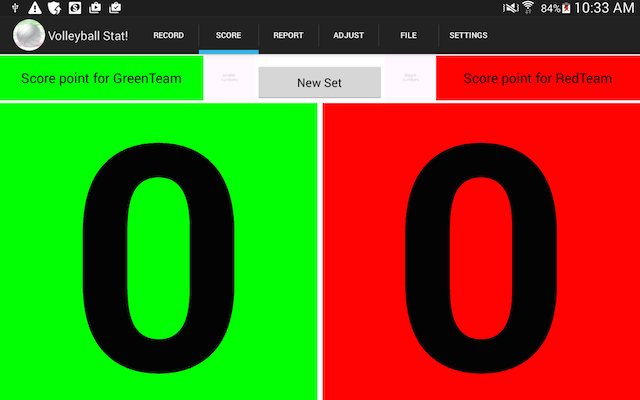
The "score" screen (shown above) is displayed when the "Score" tab is selected. The screen mostly exists for those matches in which you do not want to collect stats but do want to keep track of the score (perhaps because the official score is not visible). It is also useful when you want to show other people the score.
This screen has only the score of the current set and three buttons, one to increment the score of each team; and one to move on to a new set. If you make a mistake, go to the "Adjust" tab to make corrections. When the score is changed from this screen, no stats are recorded and players do not rotate in the game play screen.
On some screens the numbers may not appear because they are too large to fit in the space. On other screens numbers may appear a smaller than you prefer. To control the font size there are two almost invisible buttons in the white space to the right and left of the "new set" button. Tap on the left to reduce the font size. If the score is not visible, tap left repeatedly until the score appears. Tap on the right to increase font size. If you increase too much, the score will disappear.
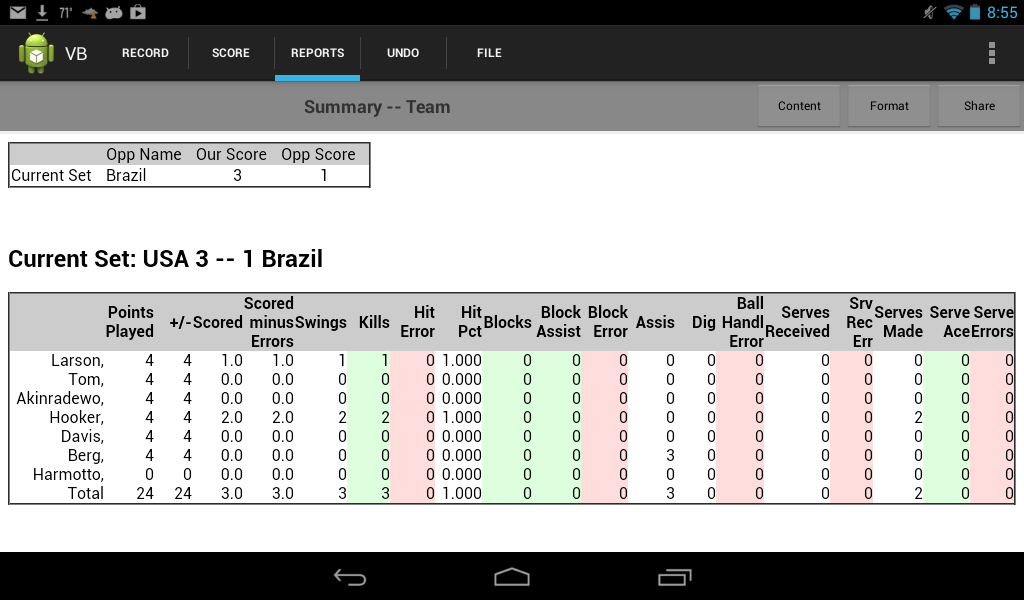
Stats Presentation
|
Match statistics can be reviewed by selecting the "Reports" tab. The default view of the stats is a play-by-play listing for the match. While play-by-play is the default, once you make a change, that change is remembered. So, when you leave and later come back to this screen the report you see will be an updated version of the report that you were viewing when you left.
Other views of the data can be selected using the "Content" button in the upper right. For example, the image above shows data, presumably very early in a match, using the "Summary -- Team" content selection. For each content selection, there are one or more formats in which the content can be presented. For example, the "Summary--Team" content choice has at least the following format options:
- Raw Data
- This format contains every data item collected on the "record" screen. It is not very user friendly, but if you want to get information to a spreadsheet, this is a format to consider. Currently this this the only report that shows some of the detail statistics.
- Max Preps
- This format has exactly the data that gets sent to MaxPreps. Use the following procedure to submit data to MaxPreps.
- Go to the file tab
- Filter the data files to contain only those for the team you want to submit.
- Sort the data file by date.
- "Load" the newest (or oldest) file.
- "Append" every other file.
- Go to the report tab.
- Select the "Summary-Team" content.
- Select the "MaxPreps" format.
- Select the "maxpreps" share.
- Either email the table to yourself or put it onto cloud storage (e.g., dropbox).
- Get the table into a file on a regular computer.
- Log into maxpreps.com and upload the file.
- Colorful
- This is the default table format. It presents data in an easy-to-read, color coded, table.
- College
- This table format follows, as closely as possible, the one used by many US colleges when reporting match stats.
- Effectiveness
- This report shows the average rating for every stat on which ratings can be collected. The concept of this report is be able to quickly see who has help the teams and in what way. On most devices, this report is best viewed in landscape mode.
Finally, each content / format pair has a set of ways in which the data can be shared. Tap on the "Share" button in the far upper right to distribute the data. Then pick the specific way of the data you want to share; for instance as html or csv. Html is the best choice if you want to show the data to other users. Conversely csv is the best choice if you want to import the data into a spreadsheet. Once you pick a format, a screen will appear allowing you to select how you want to share the data. If you have an email system configured on your device, then email will be an option. If you have installed a cloud storage app -- e.g., dropbox -- on your device, that will be an option. There may be other options depending on how your device is configured. Usually you will want either email or cloud storage. Tap on the sharing method you prefer then proceed as appropriate for the selected distribution method.
Adjust
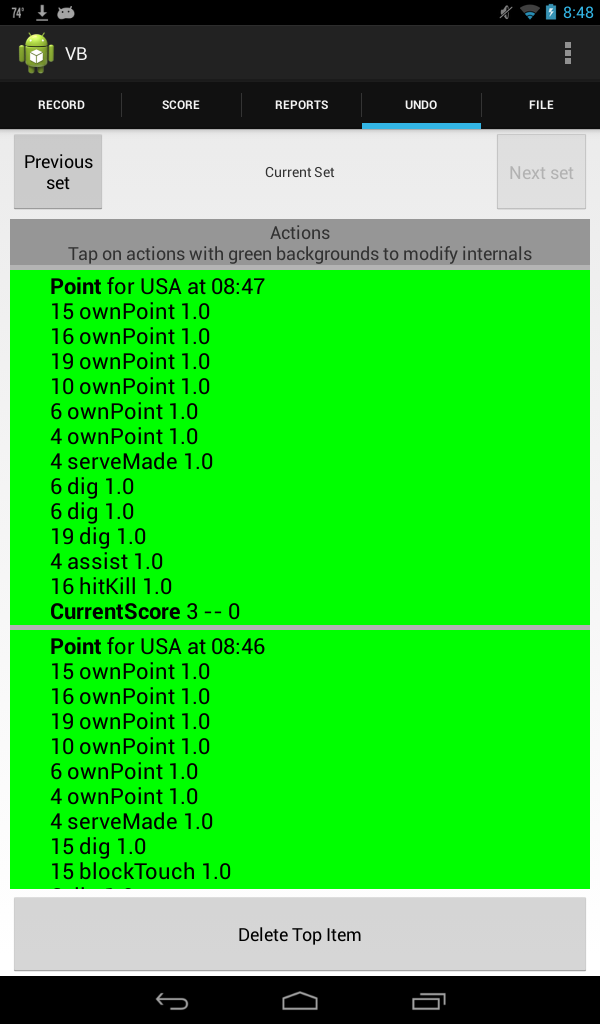
|
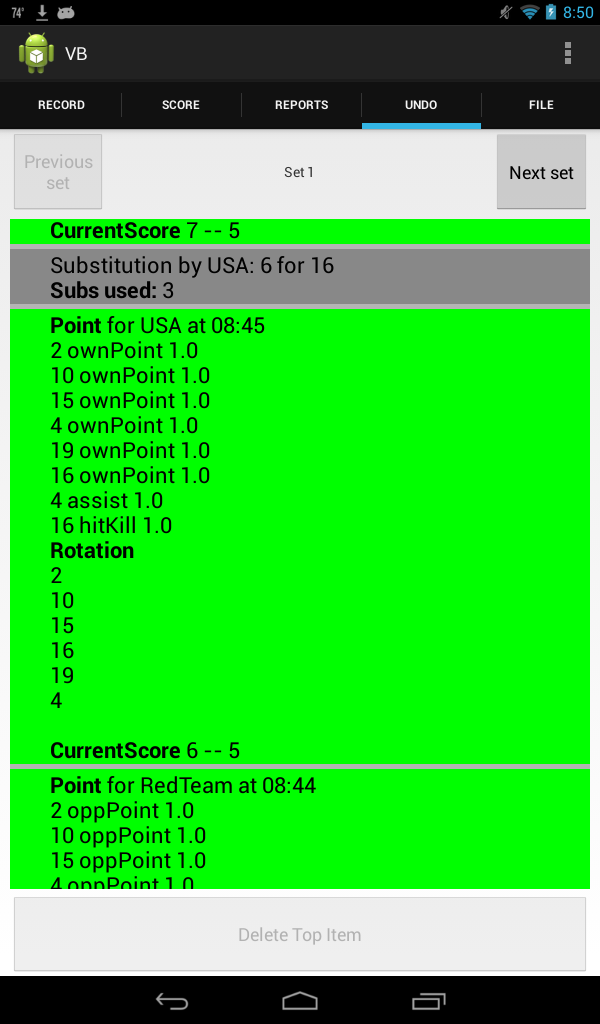
|
This list shows all of the actions recorded for the current set and previous sets. The goal of this display is to make it possible to see and, to a limited extent, adjust the recorded stats. The two above images show this list in two modes: on the left is a listing for the current set, on the right for a completed set. Working from the top down, this view has the following controls:
- Forget a Set -- this button only appears if there are completed sets in active memory. Tapping on this button will raise a popup that allows you to choose to forget a completed set. If the data has not previously been saved, then forgetting a set is permanent.
- Previous Set / Next Set -- when you switch to this screen, the set displayed is always the one most recently played. These two buttons allow you to navigate between sets.
- Listing of actions within a set -- the listing is scrollable and color coded. Grey items have no part that is undoable, green items have undoable parts. To view the undoable parts, tap on a green list item. This will bring up a popup window similar to the one shown below, left. This popup allows you to change some aspects of a point, as described just below.
- Delete Top Item -- This button is only active on the current set. It is exactly equivalent to to hitting UNDO on the record screen.
Editing the action in a point
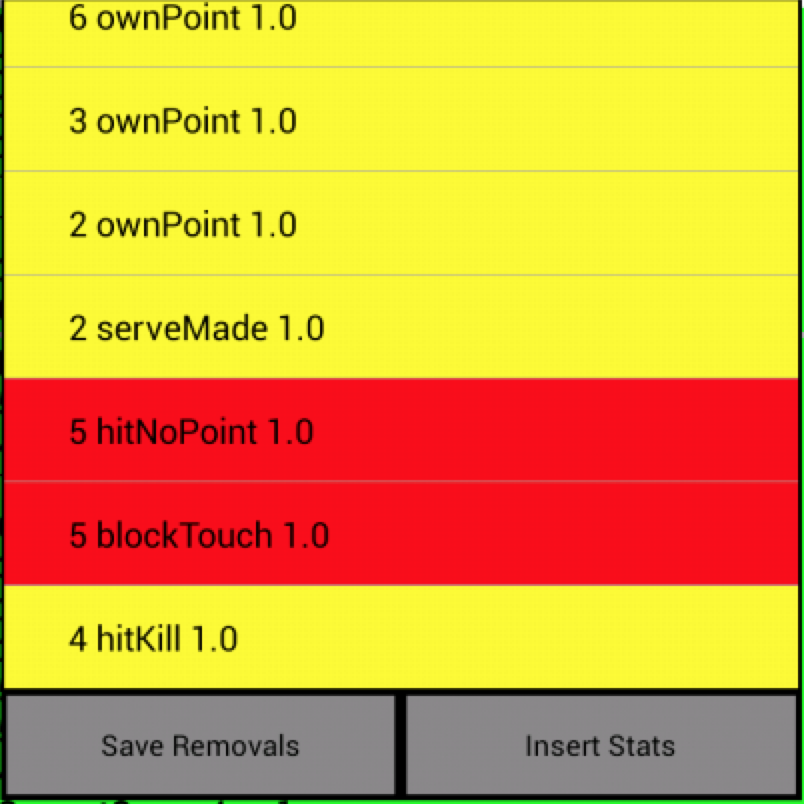
|
|
The left button at the bottom of the window, "Save Removals", does exactly that. It deletes the items in red, then dismisses the popup window.
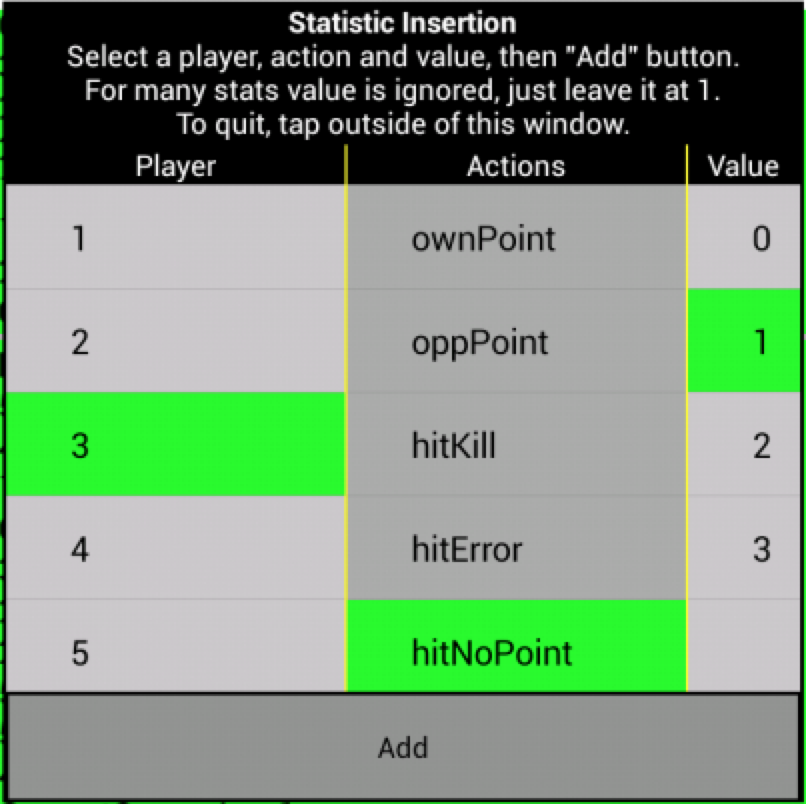
The right button at the bottom of the window, "Insert Stats", does more. In addition to deleting any items in red and dismissing the deletion window, it opens a new window on which you can insert actions into a point. This new window is dominated by three independently scrolling lists: Player, Action and Value. To add activities to a point, select the player, and the action and the appropriate value. Most actions have names that strongly suggest the action. For the value, most actions simply have a value of 1. The actions that have values other than 1 are "rating" statistics, like OpponentServeReceive and serveRcvScore. To understand the correct value for these stats the best thing to do is to study the play by play report (or the listing in the adjust tab) and find a play like the one you want to insert.
At this time the program does not do any checking on inserted stats. As a result, you can put in obviously impossible stats. For instance the app allows you to insert serveRcvScore in the same point with serveMade. (The image of a Volleyball game in which both teams serve simultaneously is, however, amusing.) In addition you are permitted to add stats to players that are not on the playing floor (they have not been subbed in from the bench). This can get the app into a state where team summary reports might not reflect the stats you added. You have a lot of power here; use it wisely.
File and Data Operations
This screen allows you to load old data, save current data, etc. The controls on this screen fall into three general categories:
- Controls that act on existing files. Most of the screen is dedicated to these controls.
- Controls that act on the current data. At the top of the screen "Current Data Actions"
- Controls that import information from outside the app. In the lower right corner of the screen.
Actions on Current Data
There are several actions that you can take on exiting data. All of these actions are accessed by tapping on the large "Current Data Actions" that appears across the top of the screen. Doing so will bring up a popup window offering the following actions:
- Save
- This saves the data in the format understood by this program so that it can be reloaded at a later date. This option saves both the scoring and the roster in a single file. You can save at any time and if there are any changes those changes will be saved. If a score changes, then saving will create a new saved instance. (You can see that in the file listing when a new file appears. If the score does not change, then save will overwrite the old file, retaining the date. That way, if you are only changing people's names, you retain the date of the match.
- Save Roster, ONLY roster
- This saves a copy of the player roster used during this match. As the title suggests, data other than the roster is NOT saved. Repeat: scoring data is NOT saved when you choose this option.
- Clear all, except roster
- This removes all the current data from memory except the people. This can be useful when getting ready for a match if the player roster for the new match is identical to the roster for the match currently in memory. (Note that, discussed below, Load ONLY Roster is exactly equivalent to Load followed by hitting this button.)
- Clear Everything
- This button does exactly what you would expect; both the stats and the roster of the match in memory are erased.
- Forget a set
- This button only appears if there are completed sets in active memory.
If there are completed sets in active memory, then hitting this button raise a new popup on which you can select the set that you want to delete. As always, tap outside of the popup to cancel this operation. Occasionally this is useful, for instance, when you have accidentally recorded stats for a new match on that of an old match. You can also forget sets from the Adjust tab.
Actions on Existing Files
The "actions on existing files" area is dominated by a list which shows all of the data files on your device. Standard data files have three parts to their name which appear in 3 columns. The parts, from right to left (as shown in the column header) are:
- "Green Team". This is the name of the team for which you are recording stats.
- "Red Team". The opposition.
- "Date". The date on which the data was saved.
Tap on the appropriate header to sort the data files by that column. Tap again in the header to reverse the sort order.
Select the data that you want by tapping on it. Then select the action to take on that file from the list that appears. The action are described just below. To take no action, tap anywhere outside of the list.
Left Side Control Buttons
On the left of the listing are three buttons:- "Data" -- the default. Tap on this to show list of whole match data files
- "Backups" -- tap on this to see the list of data files created automatically by the app.
- "Rosters" -- tap on this to see data files that contain only player rosters. Recall that standard data files all have rosters as well.
Right Side Control Buttons
The "Filter / Search", allows you to filter the files that appear in the file listing. Filtering can be done on the name of either team or on the date the match was played. The status of the filter is shown at the bottom of the list. The default is that the files are unfiltered. Filtering is particularly useful if you use the app to track stats for more than one team. In this case, the first step to using the app is often set the filter for the team you are currently working with. To clear filtering: tap the "Filter / Search" button then tap on the topmost button, "No Filtering".Actions on data files
There are several actions you can take on existing files. Tapping on a file brings up a new widow with the available options. To take an action, tap on the option you want. Tap anywhere outside the new window to take no action. The possible actions are:
- Load
- Not an option for roster
Loads a file into memory. Loading will replace all of the data in memory. So, only choose this button when you mean it. files.
- Load only Roster
- This is most useful when getting ready for a match. At that time you would normally need to enter all the player names. By hitting this button you will have exactly what you need to start a match. Namely, all the players and almost nothing else. It is good idea to set player names in this way because it guarantees that names are identical between matches. This is important because player data is summarized by matching jersey numbers. Hence, when you append two matches together if the player names match exactly, then the final summary will make more sense. As with the standard "load" button, this will replace all data in memory. Hitting this button is exactly the same as hitting the "load" button followed tapping on the "Current Data Actions" button then selecting "clear all, except roster"
- Append to Existing Data
- Not an option for backups or roster files
Appends the results of a match to the data that is already in memory. This is mostly useful to get an overview for a tournament (or season) of how players are doing using the stats view. For example, to create a single report for the entire season, you can do the following. First, choose to sort the files using "Ascending Date". Select the first match of the season. Hit the "load" button. Select the next match and hit the "append" button. Continue selecting matches and hitting append until you reach the last match. This will get all the data for the season into memory. Go to the stats screen to review it.
- Append
- Only an option for roster files
Adds players in the roster file to players already in memory. If a player to be added has the same jersey number as a player already in memory, the incoming player has 1000 added to their jersey number
- Change Date and Time
- Not an option for backup files.
Change the date of the file
- Delete
- Not an option for backup files
File deletion is permanent. There is no method for recovering files that you did not mean to delete (unless you emailed them to yourself or saved them to cloud storage, as discussed next).
When you delete, the match will disappear from the file listing.
- Export
- Not an option for backups files
Tapping on this button starts the process for exporting the data for the selected match, either to email or Cloud Storage, for example, dropbox. (To export to a cloud storage service -- e.g., Dropbox, Box, Google Drive -- you must have the app installed and be registered with the service. To email, you must have email configured.). To export:
- Tap on the "Email/Cloud" button
- In the window that appears, select either your email program or a cloud storage server (e.g., Box, Google Drive, etc). If you use Dropbox for cloud storage, it is probably more convenient to tap on the dropbox icon which is just to the right of "Export".
You can use email for sharing data, cloud storage is an alternative that some people find more convenient.
One of the ways in which we use cloud storage is to archive past seasons of data. Import and export is sufficiently quick that getting some of the data files out of the way, without actually deleting them seems worthwhile.
- Dropbox Icon
- Not an option for backups files
Tapping on the dropbox icon will start a process in which all of the selected files will be copied to dropbox. For this to work, the dropbox app must be installed on your device. The files will be put in a folder Apps/VolleyballStat. Once files are in that folder you can move, delete and rename them like any other file in dropbox. However, this app can only work directly with files in the folder "Apps/VolleyballStat". Also, the app tries to use the file name during imports (see below). So changing a name may completely confuse the app.
Working with multiple files
When viewing standard data files, there is a fourth, unlabeled, column on the far right. This column can be used to work on several data files. (The most common usage is to load a full season's worth of data for review.) Initially this column contains only '+' in a pale green background. Tap on a '+' and it changes to '1' and the entire row turns yellow. Tap on the '1' and it changes back to '+' and the row changes back to grey. Tap on multiple '+' and they change to '1', '2', ... in the order of your taps. Finally, tap on any yellow row, and a popup window appear with the following options:- Load then append
- Load the file with a '1' in its row then append other files in order to that file. This is exactly the same as doing a 'load' of the first file and 'append' on subsequent files. We find doing this in one step to be quicker and less error prone.
- Delete
- File deletion is permanent. There is no method for recovering files that you did not mean to delete (unless you emailed them to yourself or saved them to cloud storage, as discussed next).
When you delete, the match will disappear from the file listing.
- Dropbox Icon
- Tapping on the dropbox icon will start a process in which all of the selected files will be copied to dropbox. For this to work, the dropbox app must be installed on your device. The files will be put in a folder Apps/VolleyballStat. Once files are in that folder you can move, delete and rename them like any other file in dropbox. However, this app can only work directly with files in the folder "Apps/VolleyballStat". Also, the app tries to use the file name during imports (see below). So changing a name may completely confuse the app.
Importing Data
Data from this app on iPad v3.1 or later can be imported into the app on Android. Import from email from an iPad requires that the data was sent using the "Send all data formatted for import into VB Stat! (v3.1 or later)". Any data collected on Android can be imported into the app on iPad v3.2 or later. Import of iPad originated data from other cloud storage servers other than Dropbox has not been tested. It may work.Data received as an email attachment
Restrictions:- As of April 2015, we have been unable to import from email using GMail mail reader. Imports do work with the default android email reader.
- Only roster and standard data files can be imported from an email attachment
- If Volleyball stat is running, make sure any data is saved. Import from email will erase data in memory
- Open the standard android email reader and select the message with the attachment to be imported
- Show the attachment
- Tap on "Preview". (You may be presented with a set of choices for viewing the data. Select "Volleyball Stat!".)
- This will import the data into Volleyball Stat and, if needed, start the app.
Data in a cloud storage server
We have, at times, tested cloud storage import from Dropbox, Box and Google Drive. The only one we test regularly in Dropbox. We believe others work.Restrictions:
- Only roster and standard data files can be imported
- The filename may have been changed since it was put into cloud storage, but it must end with ".jgz".
- If Volleyball stat is running, make sure any data is saved. Import from the cloud will erase data in memory
- Open the cloud storage app
- Find the file you want to import and tap on it.
- Depending on your cloud storage app, there may be additional steps.
- This will import the data into Volleyball Stat and, if needed, start the app.
From a URL
In this case, the data is stored somewhere on the internet and you have a URL pointing to that data. Restrictions:- Any file that could have been exported from Volleyball Stat (v3.1 or higher) can be imported
- The filename may have been changed, but the final 3-4 letter must be the same. The only filename extensions understood by the app are "jgz", "bdef" and "xml". The app processes file with each of these extensions differently.
- Make sure any data is saved. Import of data will erase data in memory
- If possible, copy the URL into the clipboard.
- Open Volleyball Stat and go to the File tab.
- Tap on "From URL" in the lower right.
- A popup will appear. If you copied the URL into the clipboard, that URL will be in the grey field in the center of the popup. Otherwise, enter the URL in the grey field.
- Tap on "Import"
- Data and roster imports are not saved. Configuration imports are automatically saved.
From your dropbox in the directory Apps/VolleyballStat
Data would typically get here because you put it there.Restrictions:
- Any file that could have been exported from Volleyball Stat (v3.1 or higher) can be imported
- The filename may have been changed since it was put into cloud storage, but the final 3-4 letter must be the same. The only filename extensions understood by the app are "jgz", "bdef" and "xml".
- Open Volleyball Stat and go to the File tab.
- Make sure any data is saved. Import of data will erase data in memory
- Tap on the dropbox icon in the lower right.
- You may be asked to log into Dropbox. Do so
- You may be asked from permission, generally tapping on "allow" is correct
- A popup window will appear with a list of every file in the directory Apps/VolleyballStat in your dropbox. Tap on the file you wish to import.
- Data and roster imports are not saved. Configuration imports are automatically saved.
- Tap anywhere outside of the popup to cancel the import
Configuring Volleyball Stat!
To configure Volleyball Stat, tap on the "Settings" menu item.The settings tab allows you to customize aspects the following aspects of this app:
- Players This is principally useful in that you can adjust the information while players are on the court. It is also a little easier to see the players in this listing than on the bench.
- Buttons This allows you to configure the stat recording buttons on the "record" tab. For example, most of the buttons accessed by long taps can be promoted to appear independently on the record screen.
- Positions This allows you to configure the number of players on the court, what each player is allowed to do (block or serve) and the rotation order. For example, set up a 4 person game rather than the default 6.
- Summary Reports This allow you set up team summary reports that contain exactly the information you are interested in showing. Minimally, this allow you to change the column headers of a report, thereby allowing non-english users to generate reports in their preferred language.
- Behaviors Allows users to change the behavior of the app in a number of ways. For instance, the bench can be hidden by default. This increases the amount of room available to the main data recording area, allowing for slightly bigger buttons.
- Automatic Backups Configure how often backups are made and how many backup files are retained.
- Colors Configure many of the colors used on the record tab.
- Language Change almost every word on the screen on every tab other than settings.
For several of these options we maintain an archive of settings that we, or other users generated. You might look at the archives before starting your own customization.
- Buttons http://volleyballstat.towell4.us/buttons
- Summary Reports http://volleyballstat.towell4.us/summaryreports
- Colors http://volleyballstat.towell4.us/colors
- Language http://volleyballstat.towell4.us/languages
Players
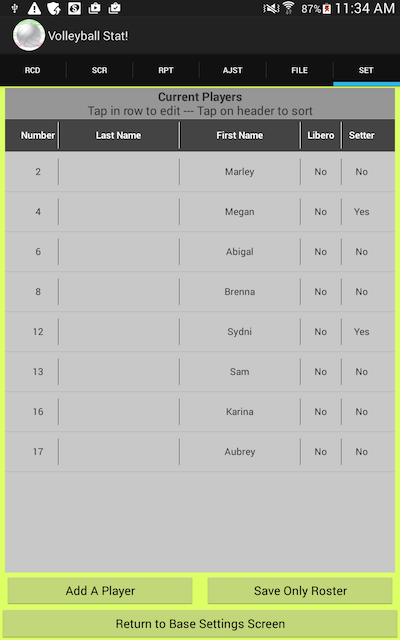
Using this list, you can do all of the player actions that are available from the Bench in the Record tab. In addition, and perhaps of most use, you can edit player attributes while they are on the playing floor.
The base view for players is similar to above screenshot. Tap on a column header to change the sort order of the listing. There are four actions from this screen:
- Add a player
- To add a player, tap the "Add A Player" button at the bottom of the screen. This will bring up a popup window identical to the one obtained by clicking on "Bench" in the Game Play tab.
- Delete a player
- To delete a player, tap on the name in the list of player names. This will bring up a popup window that is usually identical to the one obtained by double clicking on the player's name in the Game Play tab. The only time it differs is when the player is currently on the playing floor. In this case, the player may not be deleted, so the delete button does not appear.
- Change player information
- Tap on the player's name. This will bring up a popup window that is the same as the one obtained by double clicking on the player's name in the Game Play tab.
- Save Only Roster
- This is identical to the "Save Roster" option for current data on the file tab. This creates a file that contain the players shown in the listing, nothing else. The only way to look at a saved roster is from the file tab.
Buttons
We keep a collection of button sets beyond those provided with the app. Some we generated for our own use or amusement, some in response to user questions, and some were submitted by users. They are available at: http://volleyballstat.towell4.us/buttons. If you have a button set that you like and wish to share, save it to your dropbox (described below) then send us a link. We will add it to the archive.We are especially interested in button sets that are identical to one of the standard sets except that all button labels are translated to a language other than English (German, Italian, ...). The first submitter of buttons in a new language will get the ads removed from their app. If you have already paid to remove ad from the app, please submit new languages anyway.
This selection allows you to configure the buttons in the record view. For each button the following can be configured: the label, the row, the column, the relative height (or absolute) of the row, the relative width of the button (with respect to other buttons in the same row) and whether or not the button appears. In addition, if the button has a list of choices underneath it, then those "children" can be similarly configured. Also, children can be configured to appear on their own. Hence, almost all of the detail stats that, by default, require a long tap followed by a selection in the popup window can be configured to be recorded using a single tap. Taking this ability to the illogical extreme, each playing position can be configured to have about 70 buttons. At the other illogical extreme, playing positions can be configured to have no buttons at all.
On selecting this option you will first get a listing of existing button configurations. Tap on the one you want to use or modify. Doing so will bring you to the button configuration view (shown below). This view has a list in the middle with one row for each configurable top-level button (each row contains the button title lots of information about the button). The buttons for "Ace" and "Srv Rtn Err" that, by default, appear as individual buttons in the "record" screen are not in this list. This is because "Ace" is defined as a "child" button of "Opp Serve Rtn" and "Srv Rtn Err" is a child of "Serve Returned". At the top of the view is a representation of the record screen given this button configuration.
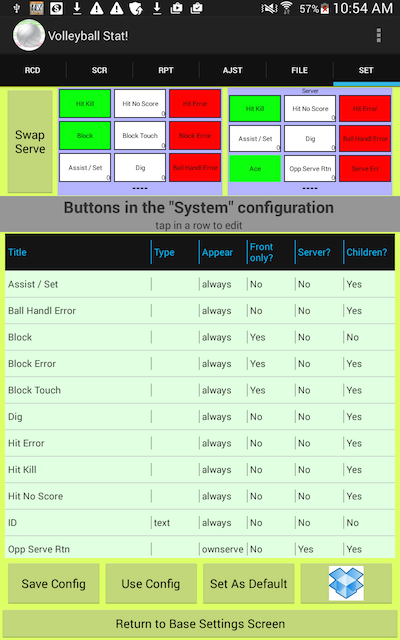
At the bottom of the screen are a set of five choices for what to do with this button configuration. The choices are (from left to right):
- Save Config Save a copy of the current configuration. This opens a popup asking for a name for the configuration. Prior to v4, users could have only one custom button configuration. That configuration was given the name "Buttons".
- Use Config Not active if the configuration has unsaved changes Set this configuration as the one currently in use. This setting is cleared by restarting the app.
- Set as Default Not active if the configuration has unsaved changes Set this configuration as the one currently in use. Also set this as the configuration to use after future restarts of the app.
- Delete Config Delete this configuration
- Dropbox Icon Not active if the configuration has unsaved changes Export this configuration to dropbox. Doing so allows you to share the configuration (perhaps simply with yourself on another device). Import of button configurations is from the file tab. There is no export option for button configurations other than to dropbox. (You can use Dropbox for free, so this is not a significant restriction.)
|
|
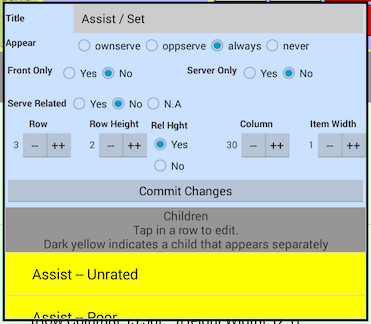
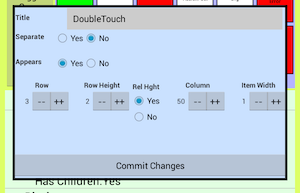
To change the properties of a button, tap in its row. This will raise a popup window similar to the one above, left. Every button has the configuration options shown in this image down to the "Children" area. Buttons that do not have a popup with choices will not have the children section. The configurations options are:
- Title
- The text appearing in the button.
- Appear
- When the button appears, if it is allowed to appear by the "Server only" and "Front only" settings. The values are:
- "never": This button does not appear in the interface.
- "ownserve": This button only appears when the green team is serving.
- "oppserve": This button only appears when the red team is serving.
- "always": this button appears at all times.
- Front only
- Whether or not this button should only appear in front row positions. In the Player Alignment configuration this is given by the "May Block" settings. The values are:
- "Yes": this button will only appear in the the front row.
- "No": this button will appear in every position
- Server only
- Whether or not this button should only appear in the server position. In the Player Alignment configuration this is given by the "Is Server" setting. The values are:
- "Yes": this button will only appear in the the server position.
- "No": this button will appear in every position.
- Serve Related
- How this button is affected by two of the behavior options: "At start of point show only service related buttons" and "After service return ...". The values are:
- "Yes": This item is service related. Therefore it should appear at the start of points when the first behavior is on. Similarly, it should NOT appear after service return if the second behavior is on.
- "No": This item is NOT service related. Therefore it should NOT appear at the start of points when the first behavior is on. Similarly, it should appear after service return if the second behavior is on.
- "N.A.": The item should always appear, irregardless of the the settings of the two behaviors.
- Row
- This is a number in the range 1-10 indicating where, vertically, the button should appear. These values give a relative position only. That is, a button defined to be in row 8 will appear below a button in row 7 and above a button in row 9 (and in the same row as other row 8 buttons). Rows that have no buttons are skipped when the buttons are put in place. So, if there are no buttons defined to be in rows 6, 7, 8, and 9 then putting a button in row 10 will have exactly the same effect as putting it in row 6.
- Row Height
- Set the height of the row containing the button. Except as specified by "Rel Hght", the height of a row is relative to the height of other rows. So, if row A has a height of 5 row B has a height of 1, then row A will appear 5 times taller than row B.
If there are multiple buttons in a row, then the height of the row will be the height of the tallest button in the row.
- Rel Hght
- This value is "Yes" for everything except the name. When set to "No", the height of the row is set to the number of pixels in the "row height". This allows you to reserve a fixed amount of space on the screen for some element.
Usually setting to "No" is a bad idea because it prevents the app from adjusting things so that they fit. Indeed, using the "No" setting you can construct situations in which the buttons cannot fit in the space they have.
If there are multiple buttons in a row, then "Yes" wins and the height of the row will be determined by the relative height rules.
- Column
- Column is a number in the range 1-100 indicating where, horizontally, a button should be placed. Lower numbers are to the left of higher numbers. Column numbers are used to define the relative positions of buttons in a row. So, a button in column 1 will appear to the left of a button in column 30. If there are no buttons with column numbers between 1 and 30, then these buttons will be side-by-side. Column numbers are only used within a row, so column 34 in row 3 should not be taken to imply that the button will line up directly beneath column 34 in row 2.
- Item Width
- Set the width of a button with respect to the other buttons in the same row. For instance if button X has a width of 10 and button Y has a width of 2, then button X will be 5 times wider than button Y.
The "Children" area of a button (if it exists) contains a list of the choices that appear in a popup when you long-press on the button. This list scrolls if there are more than 2 children. The list is color coded. A a slightly darker color indicates that the child appears as a top-level button (this is changed using the "separate" option which is described below). Children have their own set of configuration options which are accessed by tapping on the row containing the name. This will bring up a popup window shown above right. The options are:
- Label
- The text appearing in the button
- Separate
- Should this child button appear as its own button in the interface.
- Appears
- Should this child appear at all. (If "no", then the button will not appear, regardless of the "Separate" setting.)
- Row
- If the child is defined to appear separately, this defines the row in which the button will appear. Row is used exactly as above. If the child is not "separate", then this setting is not used.
- Column
- If the child is defined to appear separately, this defines the column in which the button will appear. Column is used exactly as above. If the child is not "separate", then this setting is not used.
v3.6.0 introduces new configurable elements to the screen: "picture" and "text". For example, in previous versions the player ID and the word "server" had fixed positions and content. Both can be moved and changed as both are defined as text objects.
Text and Picture objects appear in the button configuration screen exactly as buttons except that their type is "Text" or "Picture". The are positioned exactly as buttons. The only difference is that they simply put down a piece of text (or a picture) rather than a button.
Pictures are set in the popup that defines players. You can change pictures at any time.
In addition, text objects have special handling on the basis of their title. The following titles are treated specially (case insensitive):
- "BLANK" -- a totally empty item into the position. (You can also just put nothing into the title. We find nothing more confusing than "BLANK".)
- "ID" -- an ID string for the player into the position. Usually the ID is of the form "# -- LastName". Follows coloring conventions described elsewhere.
- "NUMBER" -- the jersey number of the player. Follows coloring conventions described elsewhere.
- "FIRST" -- the first name of the player. Follows coloring conventions described elsewhere.
- "LAST" -- the last name of the player. Follows coloring conventions described elsewhere.
- anything else -- simply copies the text of the title into the defined position. There are several unused text objects for you to put into positions as you see fit.
For example, you can you set up a playing position to look like the following image. (This button configuration is included with the app as "pictures".)
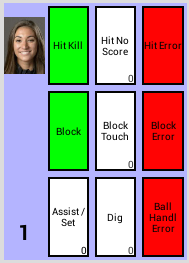
|
Positions
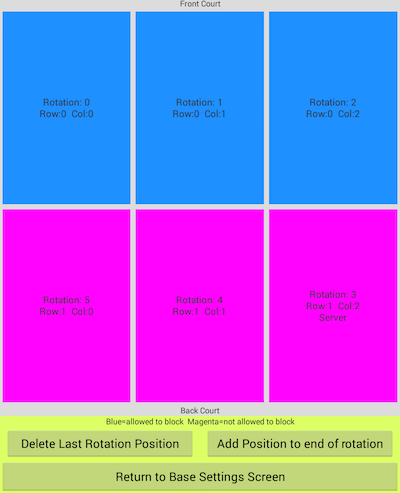
|
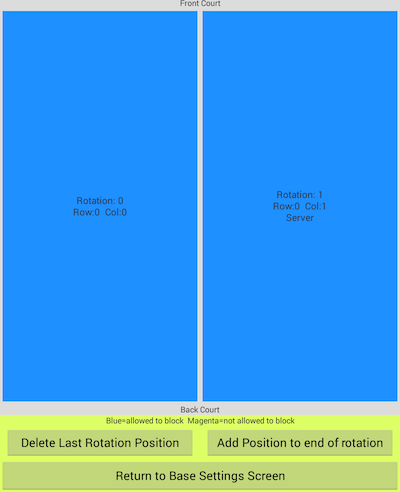
|
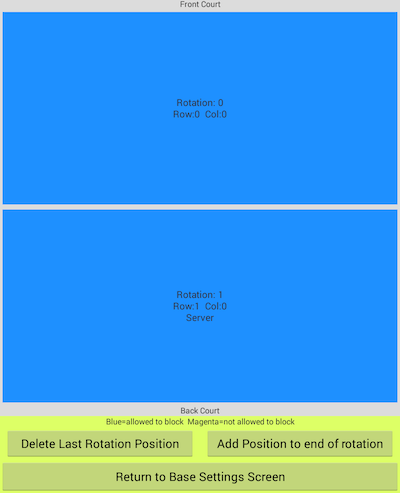
|
This screen allows you to configure the number and distribution of players in the match. By default, the app is configured to track a standard six person volleyball team. Using this screen, you can set the number of players (the must be at least one player) and you can define whatever rotation pattern you desire. For instance, the above images show a standard 6v6 indoor alignment and 2 possible 2 person beach alignments. The beach alignments are completely equivalent except in how the positions appear on the screen.
Rotation order is shown on the screen by "Rotation: #". Rotation is in numeric order from lowest to highest. When there is no higher number, go to the lowest number.
Row and column are used in much the same way as row and column are used in the the bottom alignment. Specifically, lower row numbers appear closer to the net. Higher number are towards the back. Row numbers that do not appear are skipped, so row 1 may be immediately in front of row 10 if there are no playing positions defined in rows 2-9. Columns define left to right position within a row. Columns are only relative positions within a row. So, column 4 in row 1 has no necessary relation to column 4 in row 2.
To add a playing position tap the "Add position at end of list" button. This will bring up a popup window similar to the one shown below. "May Block" controls whether buttons for blocking appear in the playing position and how the background is colored for the libero. Any position may be defined to be the server, but there can be only one server. So if you define a new position as the server, then the position that was previously defined to the the server will no longer be the server.
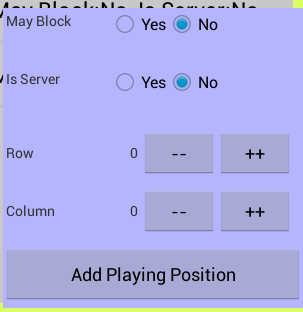 |
The easiest way to use this facility is to start by deleting all but one position. Then add positions in rotation order; so each position being added is the one you would rotate to if you were in the previously added position.
There is no way to save player alignments. If you want to use anything other than 6v6, you will have to change the alignment each time the app restarts.
Summary Reports
We keep a collection of summary reports formats beyond the five provided with the app. These are reports we generated for our own use, in response to user questions, or were submitted by users. They are available at: http://volleyballstat.towell4.us/summaryreports. If you have a report format that you like and wish to share, save it to your dropbox (described below) then send us a link. We will add it to the archive.This selection allows you to create and edit "Summary" reports (both individual and team). Using this system you can create reports that show exactly the information that you want in exactly the way you want it. At a minimum you can change the column headers in report. Taken together with the ability to change button labels, this simple feature allows non-english users to customize the data recording and data presentation into their language of choice. Going farther, you can create formulas that express the collected data in ways that are not provided in the standard reports.
When you select this option you will initially see a listing of the current set of team summary reports. Bright yellow indicates a report provided by the app, darker yellow indicates on you created previously. To begin creating a custom report, select a report that is similar to the one you want to create. (If there is nothing close, we usually start from "Effectiveness".)
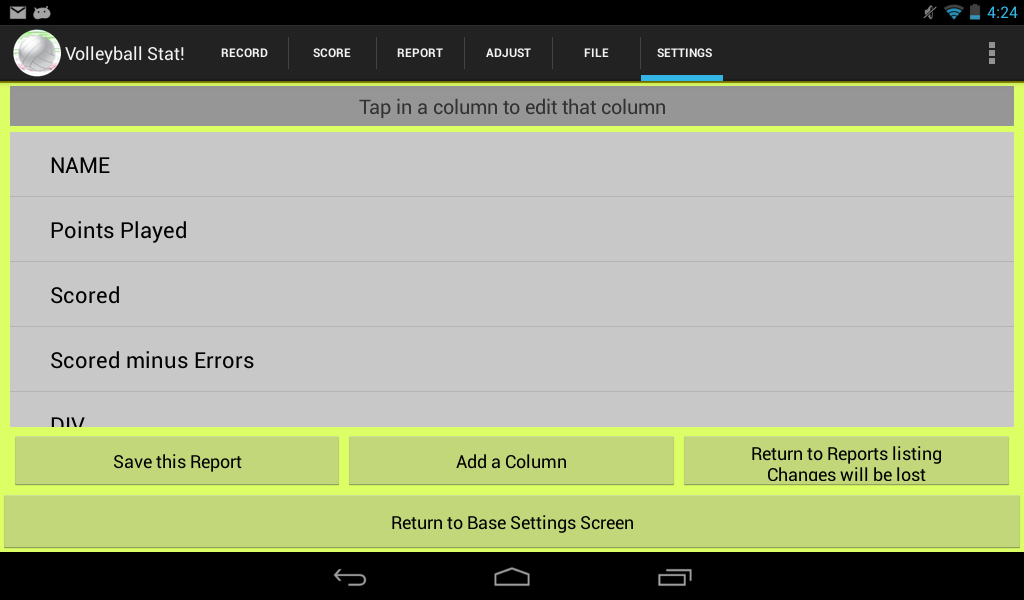
|
Tap on the row containing the name of the report that you want to start from. The screen will update to something like the above screen which lists all of the columns in the selected report. The listing above is from "Effectiveness". Top to bottom in this listing is left to right in the actual report.
From this screen you have two main options, do something to the report as a whole or do something to a column in the report. The actions on the report as a whole are provided by buttons towards the bottom of the screen. They are:
- Save
- This is only active if the report format has been changed. Tapping on this button brings up a small window in which you will be asked to name the report format.
- Delete
- This button only appears for user-created report formats. You cannot delete the report formats provided with the app..
- Add a column
- This will create new column that appears at the bottom of the listing. Created columns are always initialized with a copy of the leftmost (top) column. This is rarely what you want, but it is a starting point.
- Return to reports listing
- Does what you expect. Unsaved changes to a report will be lost.
- Dropbox icon
- Put a copy of this report format into the Apps/VolleyballStat folder in your Dropbox.
Editing a Column in a report
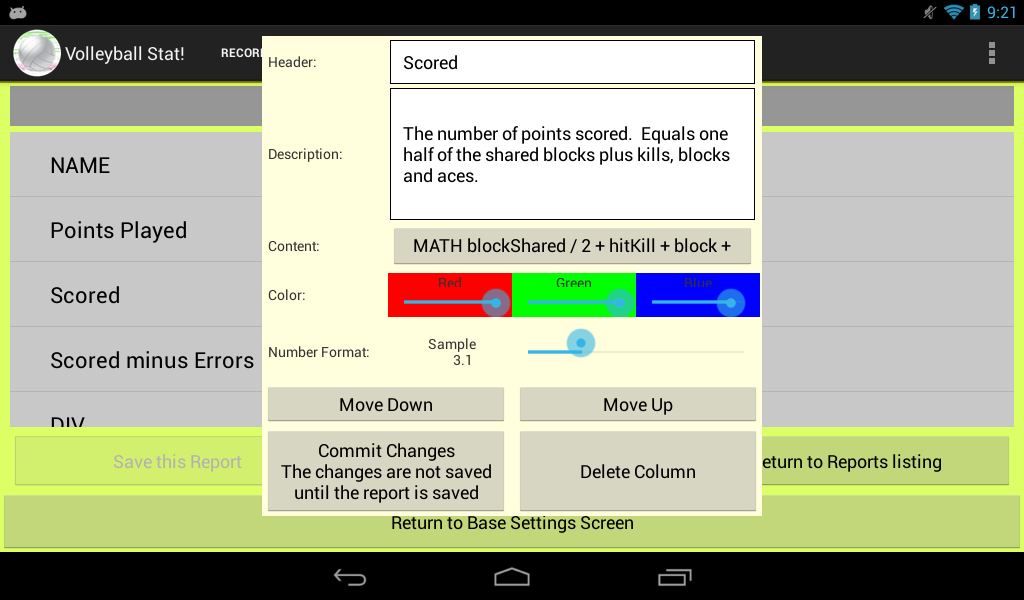
|
To edit a column, tap on the column you want to edit. This will bring up a window like the one above. There is a lot you can do on this screen. From top to bottom:
- Header
- Tap in the boxed area to enter the text you want as a column header in the report. (May be blank.)
- Description
- Tap in the boxed area to enter the text you want in the explanatory table at the end of the report. (May be blank.) In some of the reports that come with the app, the description will look like "def:xxxxx". This tells the app to use a definition from the term definitions. At this time this option is not available for user created columns.
- Content
- Tapping on this button commits any changes made in this popup and then opens a new popup window in which you can create the contents of a column. Content creation is discussed below.
- Color
- Set the background color of the column using the red, green and blue sliders. The background color of the popup window will show the color. For instance, above we have set the color to a pale yellow by slightly moving the blue slider.
- Move Down
- Move the column one down in the set of columns. This is equivalent to moving the the column to the right in the report. Tapping on this button commits any other changes made in the popup and closes the popup.
- Move Up
- Move the column one up in the set of columns. This is equivalent to moving the the column to the left in the report. Tapping on this button commits any other changes made in the popup and closes the popup.
- Commit changes ..
- Commits the changes made in the window. As stated on the button, commit is not "save". Commit simply moves the changes into the column listing view.
- Delete Column
- Does exactly what you would expect.
Changing the content of a column
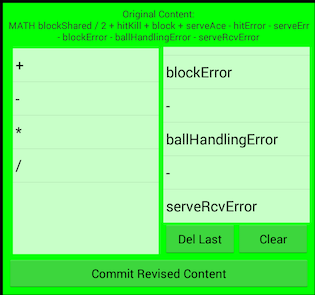
|
When you tap on the button to the right of "Content" in the column editor popup, that popup is replaced by a popup that looks very much like the one above. At the top of the popup is the old content. To the left are options for new content. To the right is the old content, step by step. Both lists will change as you build/edit the content. Just below the list at right are two buttons: "Del last" removes the bottommost item from the right list; "Clear" completely empties the right list. Finally at the bottom is a button allowing you to commit the new content. This button is only active when the content is valid. To exit the content editor without changing the content, tap anywhere outside the window.
When the right list is empty the content options (in the left list) are as follows:
- MATH -- begin a mathematical expression. This will insert "MATH 0 +" into the right column; change the contents of the left column and disable the commit button. What happens next is described below.
- JERSEY_NUMBER -- Display the jersey number of the player. This will: insert JERSEY_NUMBER into the right column and clear the left column. All you can do from here is hit the commit button or tap outside the window to cancel.
- LAST_NAME -- Display the last name of the player. This will: insert LAST_NAME into the right column and clear the left column. All you can do from here is hit the commit button or tap outside the window to cancel.
- NAME -- Display the name of the player. This will: insert NAME into the right column and clear the left column. All you can do from here is hit the commit button or tap outside the window to cancel.
- FIRST_NAME -- Display the first name of the player. This will: insert FIRST_NAME into the right column and clear the left column. All you can do from here is hit the commit button or tap outside the window to cancel.
- SETS_PLAYED -- Display the number of sets in which the player actually played. This will: insert SETS_PLAYED into the right column and clear the left column. All you can do from here is hit the commit button or tap outside the window to cancel.
- DIV -- Display a narrow vertical black line in the table. This will: insert DIV into the right column and clear the left column. All you can do from here is hit the commit button or tap outside the window to cancel.
- assist -- Display the number of assists the player made as recorded on the record tab. This will: insert assist into the right column and clear the left column. All you can do from here is hit the commit button or tap outside the window to cancel.
- The remainder of the stats follow along with assist.
If you chose MATH, you have entered in to the formula editor. Math formulas in this app do not know anything about "order of operations". You might recall that you were taught in school that 4+5*9 is equal to 49 because you are supposed to do multiplication before addition. This app has no such concept; rather operations are done strictly left to right. So, 4+5*9 is equal to 81. The app does include parentheses which work as you were taught in school. Hence if you really want 49 you can put in the formula 4+(5*9), or 5*9+4.
After first tapping on MATH you will be presented with options of what to do next. This includes the numbers 1-9 , an open parenthesis and all the collectable stats. (If you need a bigger number than 9, build it using math. For instance is you really want 23*assist, then you could put in 3*7+2*assist. (We cannot image why you would want 23*assist, but you can can do it.) Choose what you want from the left column. Depending on your choice the options in the left column will change. The most interesting choices are the data items. For most data items, tapping on it will simply copy the name into the right column. But for rating items (like serve receive) things get interesting. When you choose one of these, the next set of options are: count and sum. Count is the number of times the start was recorded and sum is the total of the value of the ratings. Choose the one you want. Then you are asked which value you care about. Choose that.
For example, you can use this system to build a formula for the average serve receive rating. The formula for this would be
| MATH 0 + _sum@serveRcvScore - _count@serveRcvScore / _count@serveRcvScore |
Note the apparently extra and erroneous "- _count@serveRcvScore" in this formula. This is here because serve receive scores are stored internally with values of 1-4 rather than the expected 0-3. So, to show the score in the expected range we subtract 1 from each recorded score. An alternate, and probably more understandable, formula for this calculation is
| MATH 0 + _sum@serveRcvScore / _count@serveRcvScore - 1 |
Slightly more complex is to calculate the percentage of serve receptions that were rated either good or excellent. The formula for this is
| MATH 0 + _count@value=4@serveRcvScore + _count@value=3@serveRcvScore * 5 * 5 * 4 / _count@serveRcvScore |
Note the use of "5 * 5 * 4" to get to 100, since 100 is not available directly. Also, as mentioned just above, "excellent" is scored as "4" and "good" is scored as "3". For the other rating stats, excellent has a score of 3.
Suppose that you wanted to get the count of the number of serve receive overpasses. This is something of a challenge because an overpass receives a score of 1 as does a serve receive error. But an overpass is not an error, so you can subtract the number of errors from the receptions that got a score of 1.
| MATH 0 + _count@value=1@serveRcvScore - serveRcvError |
Putting together several of the above formulas you can create your own scoring system for serve reception. For instance, suppose you wanted to better separate excellent from poor. To do this you want to might replace the standard scores of 1,2,3,4 and 1 for error with a part of the fibonacci series (say 2,3,5,8) with 0 for errors. The following formula would do exactly this.
| MATH 0 + ( _count@value=4@serveRcvScore * 8 ) + ( _count@value=3@serveRcvScore * 5 ) + ( _count@value=2@serveRcvScore * 3 ) + ( ( _count@value=1@serveRcvScore - serveRcvError ) * 2 ) / _count@serveRcvScore |
We do not know of anyone who actually does anything like this, but you could.
It takes some time to get used to building mathematical expressions, especially when the expressions include rating statistics. Also, the expressions you can build using this tool are not quite identical to those that are identical to those in the provided tables. For instance, the two formulas above are in the effectiveness table. The formulas shown are those that the equation builder would create.
Finally, if you are having troubles with creating equations please send email.
Behaviors
Tap on "Behaviors" to change some aspects of the look and feel of the app. Most of the changes affect the Record screen, which makes sense since that is where you spend the most time. Behaviors with a reddish background are disabled, greenish are enabled. To enable (or disable) a behavior just tap in its row. The default setting of the behaviors is such that the app looks and behaves much as did prior to v3.5.0We have tried to make the behaviors self documenting, but add some comments here for clarification. The behaviors are (the order here may not match that in the app):
- • At the start of each point, show only service related buttons
- Default: No
This allows making serve receive buttons large and easy to hit. We usually also make the serve ratings appear as separate buttons rather than in a popup. This makes it much quicker to enter the rating. For example, below is the record screen when each team is serving if this rule is enabled and the button suggestion just made is followed.
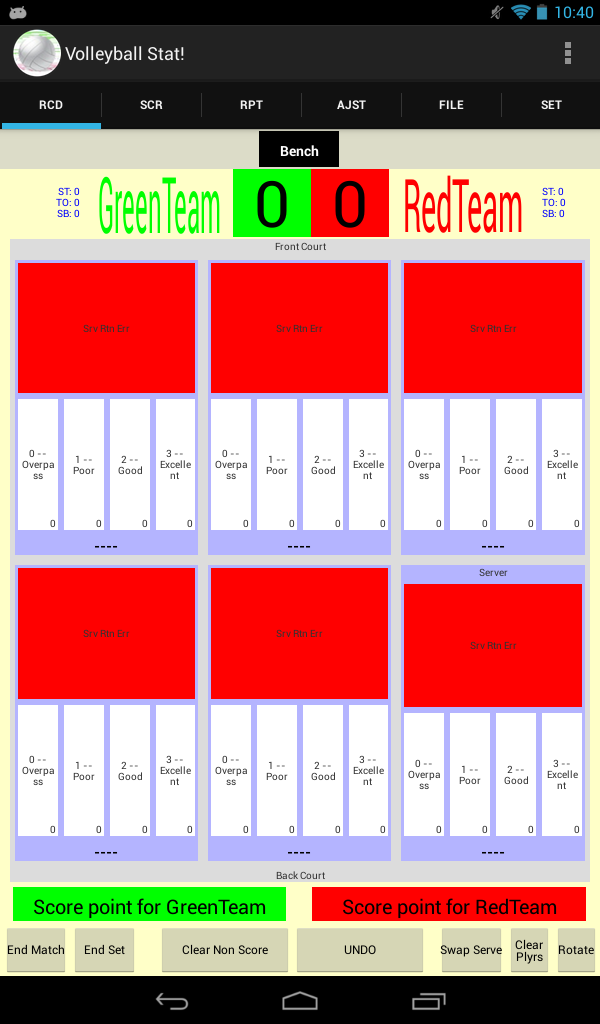
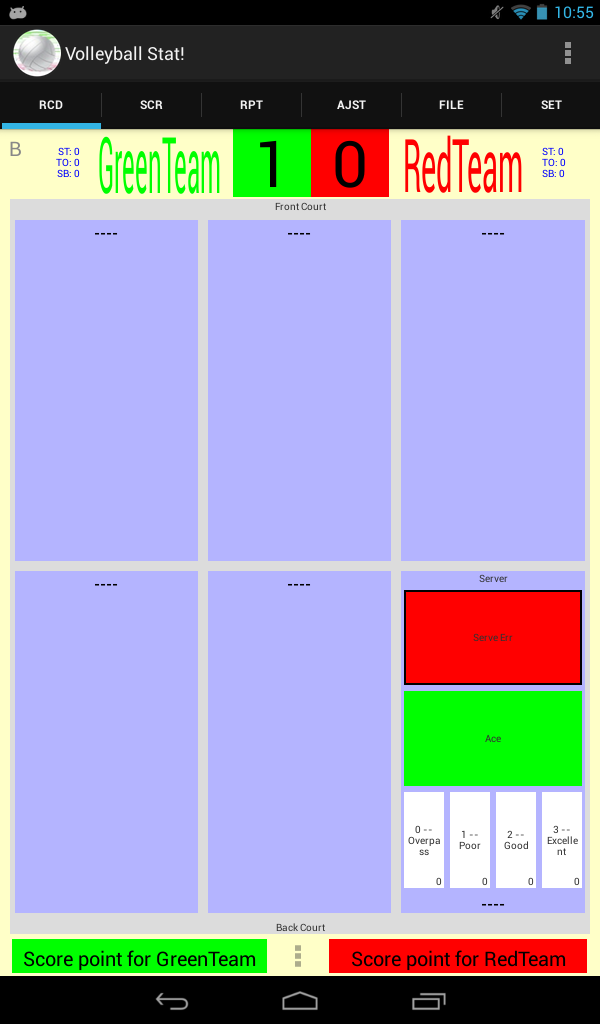
Red team serving Green team serving - • After the service return, do not show service related buttons
- Default: No
Since there is only one serve per point, once the serve is entered, hide the buttons. This allows the remaining buttons to be larger. For example, below is the screen after serve return when this rule is enabled.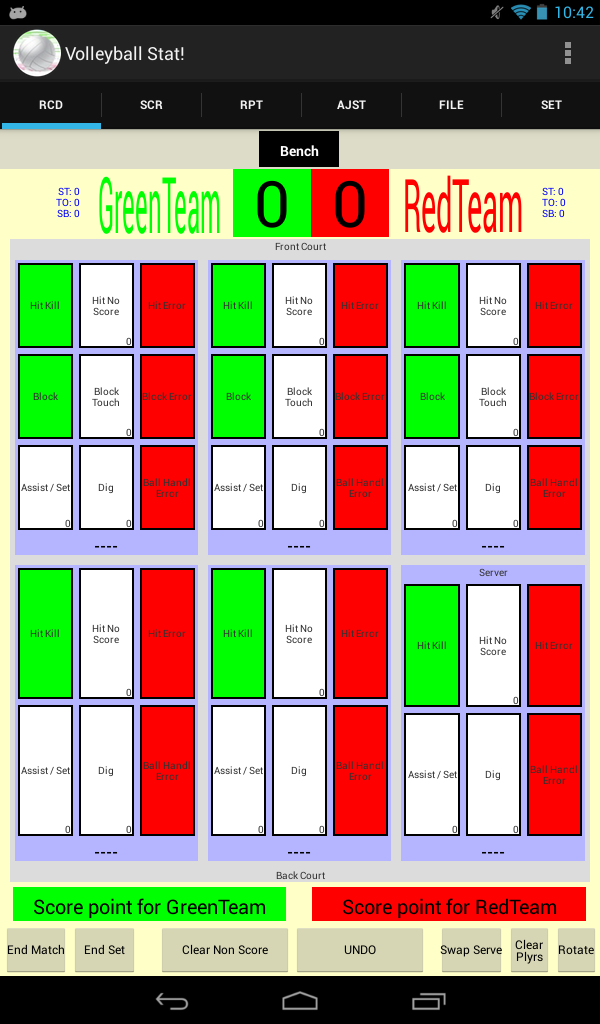
- • Record at most one service return per point
- Default: No
Once a serve receive button has been hit, ignore subsequent hits. This is unnecessary if you enable to behavior that hides the serve receive buttons. - • When there are multiple hits of the set/assist button, only the final hit is counted as an assist, and then only if the point ended with a kill
- Default: No
During a point there may be many sets, but there will be at most one assist. If all you care about is recording the attempt (without a rating), then this setting can increase you speed a lot. The idea is that you just tap on the "assist / Set" button for every time a ball is set for an attack. The app keeps track and changes all but the final one to a "set". This final one is also changed to "set" if the point did not end in a kill. This setting has helped up keep much better track of the number of sets made and the rate at which sets result in kills. - • When all players have defined positions and those positions are unique in the front or back row, players move to those positions after the serve.
- Default: Yes
If you do not like having the players move, you can permanently disallow this behavior. - • On the record tab, replace the buttons across the bottom of the screen with a single button between the "score on opponent action" buttons. That button raises a popup with the controls.
- Default: No
The goal here is to save some space, and possibly to avoid some accidental button hits. See the image after the next rule for how this appears. In future releases this will likely become the default behavior.We encourage users to switch this form of controls. We find the space saving a benefit, but even more, we now never accidentally hit a control button (e.g., "Swap serve") when we meant to hit a scoring button. As an incentive to use this feature, we added a new control that is only available after switching. That control is "swap players". This allows you to reposition players on the floor without first moving them to the bench. This might save you some time.
- • On the record tab, hide the bench. To show (or re-hide) the bench, hit the gray "B" in the upper left corner of the screen.
- Default: No
Again, the goal is to save space for the stats recording buttons. You might think this a good thing to do if your team rarely makes substitutions. The image below shows the record screen when both this behavior and the hide bench behavior are active.
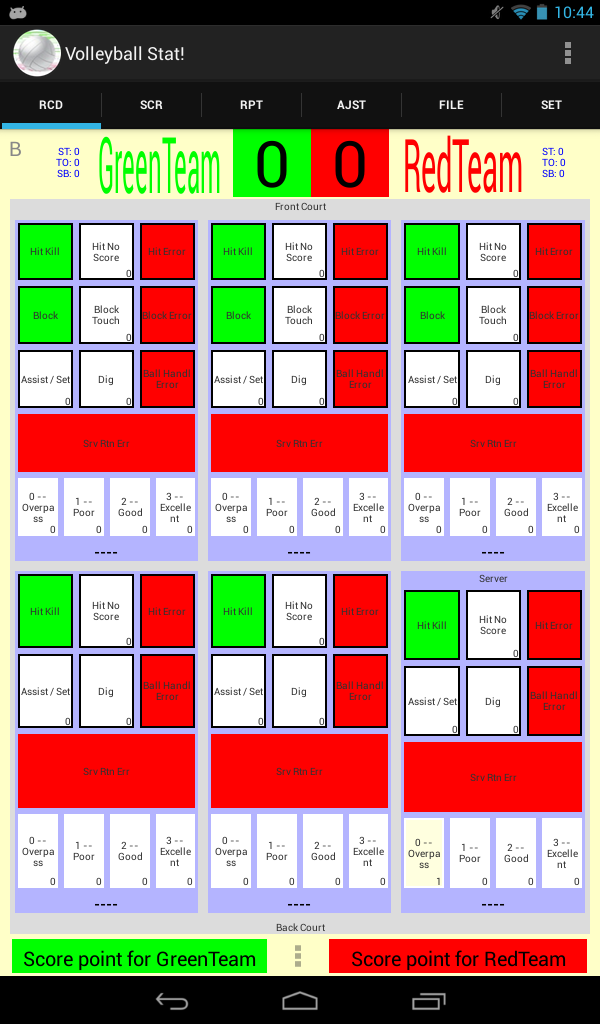
- • When displaying either the team summary or individual summary tables include a table with explanations of each column
- Default: Yes
This is a minor change on the team summary report. - • Players rotate around the court in the order specified by the position alignment. Rotation occurs when the green team wins the serve back from the red team.
- Default: Yes
Turning off rotation can be helpful in practice situations. In actual matches it is rarely a good idea. - • Show Buttons for direct upload to, and download from, dropbox.
- Default: Yes
If you do not and will never use dropbox, getting rid of dropbox specific buttons reduces some screen clutter. - • Mark a configurable string with an asterisk. Changing this setting will not affect the labels in the tabs at the top of the screen.
- Default: No
This can be useful if you are translating the app to another language. The asterisk makes it easy to see strings that are changeable. - • When there is a designated setter on the floor, give the setter a default assist at the start of each point.
- Default: Yes
Some people find the default assist behavior confusing and / or useless. If you are one of those people, you can turn it off.
Automatic Backups
This screen allows you to configure some aspects of the creation of automatic backup files. Backup files are created at the following times:- the end of sets
- when you leave the record tab to go to another tab within the app
- when you leave the record tab to go to a different app.
There are two configurable aspects of backups:
- The number of backup files retained. Default=21. You can retain as few as 5 backups or as many as 377. Backup files typically are less than 10K bytes, so even if you choose to keep 377 the total storage space used for backups would be less than 4M. (this is less than 1 typical picture). So, space used on your device is probably not a major consideration in choosing how many files to keep.
- Within set backup frequency. Default=Never. Backups are always created at the times described above. In addition, you can configure the app to create backups every N points within each set. The extreme would be to create a backup after every point. You might want to do this if you are recording data on a very buggy device. (This app is, of course, bug free so it would only die because of some outside force.) It is probably more useful to schedule a backup after every 3 or 5 points. Otherwise the number of files generated per match is rather large. This is only a problem in that your older backups might get deleted before you use them (according to the first rule). Also, finding the backup you really want can be hard if there are a whole lot of them.
Colors
Tap on "Colors" to change the most of the color choices on the record screen. Initially you will see a list of color sets. Choose the one you want to use or modify. Doing so will bring you to a list of modifiable colors. Adjust the positions of the red, green or blue sliders to change a color.Changes made to colors will be lost without warning on exiting this screen unless they are saved. The buttons towards the bottom of the screen provide controls for saving and using color sets. The controls are. They are:
- Save
- Tapping on this button brings up a small window in which you will be asked to name the color set.
- Use This
- Only active if there are no unsaved changes. Tapping on this button sets the color set as one in use. The setting will NOT be applied on restarting the app
- Set as default
- Same as "use this" except that the color set WILL be applied on restarting the app.
- Delete
- This button only appears for user-created color sets. You cannot delete the color sets provided with the app..
- Dropbox icon
- Put a copy of this color set into the Apps/VolleyballStat folder in your Dropbox.
Language
Tap on Languages to change almost all of the strings in the Record, Score, Report, Adjust and File tabs. The Language setting does not affect the Settings tab nor does it change the help. Also, language does not affect the labels on the stat recording buttons on the record tab. Those labels are changed using "Settings / Buttons". Similarly language does not affect the individual or team summary reports. Those are configured from "Settings / Summary Reports".To edit/change the interface language, tap on the language you want to use as a basis for change. This will bring you to a screen with an alphabetical listing of every string that can be changed. Tap on the string to start making a change. Doing so will popup a window with the string itself and a brief description of the string.
Realistically, it would be a lot of work to translate the entire interface into another language. Before doing so, we would recommend configuring the buttons on the Record tab to be in a different language. This configuration is done in the "Settings / Buttons" section.
Changes made to a language will be lost without warning on exiting this screen unless they are saved.
The buttons towards the bottom of the screen provide controls for saving and using color sets. The controls are. They are:
- Save
- Tapping on this button brings up a small window in which you will be asked to name the language set.
- Use This Language
- Only active if there are no unsaved changes. Tapping on this button sets this language as one in use. The setting will NOT be applied on restarting the app
- Set as default
- Same as "use this" except that the language WILL be applied on restarting the app.
- Delete
- This button only appears for user-created languages. You cannot delete the languages provided with the app..
- Dropbox icon
- Put a copy of this language into the Apps/VolleyballStat folder in your Dropbox.
If you do translate all (or many) of the strings to another language, please send it to us by saving your effort to dropbox then sending us a link. We will put up on http://volleyballstat.towell4.us/languages. If you are the first person to translate to a language, we will get you instructions for turning off ads.
Finally, as you try to translate the strings you might find yourself thinking "This is harder than it should be". We agree. There is a lot that could be done here to make translating easier. But to put in the effort to make translating easier we need to know that the feature is being used. So please let us know if you try. An indication of success, failure or frustration would also be helpful.
In-App purchases
There is only one in-app purchase available. That purchase turns off the add that appear in the app. The ads are turned off permanently, through all updates. Please consider directly supporting this app by choosing to turn off the ads. To do so, just tap on the "BUY" button at the bottom of the Settings tab.We have received a few reports of ads reappearing after turning off ads has been purchased. (This is most likely to happen when the app is restarted after a system upgrade when the device is off-line. There are other ways this can happen.) In this situation try the following - in order:
- On the settings tab, in the in-app purchase section, tap on the "restore" button. This will query Google and should restore information to the app about your in-app purchase. The device must be on-line for the restore to work.
- If you got a failure message using the first technique, try killing and restarting the app. Doing so should, among other things, query Google for information your in-app purchase.
- If nether of the first two techniques works, send email to us asking for help in restoring your purchase. You must send this email by tapping on the "3 dots" icon in the upper right then selecting "Bug Reports, Questions, etc". We will respond with instructions for getting rid of ads. It will help if you can give an approximate date on which you made your in-app purchase.
Differences between this app on iPad and Android
This section last updated for v3.5.2 on Android and v3.6.0 on iPad. The discussion here reflects the default configuration of the app. Customizations can change this quite a bit.There are several differences between the app on iPad and Android. Most of these differences are minor and result from simple organizations changes that reflect the common practices on the two platforms. The discussion here assumes that you have used the the app on iPad and are just starting to use the Android version.
- Record Screen (on iPad is this "Game Play")
-
The "Record" tab on android is almost identical to the "Game Play" tab on iPad. Minor differences:
- Bench button: on iPad requires a double tap to create a player. On android, only a single tap.
- End Match button: on iPad this also immediately takes you to the reports tab.
- Score
- The only difference between the score screen on the two platforms is that iPad also has an "undo" button.
- Reports
The general approach is the same; choose a content type, then choose a format. Finally, if desired, choose how you want to share the report. On iPad, there are a couple of formats that are not yet available on Android. Otherwise, the choices are similar. Finally, on iPad the "All Raw" report format does is equivalent to the "Raw Data" format on Android.
- Adjust
- This is equivalent to the History tab on iPad. The popup screens are somewhat different but the functionality is pretty much the same.
- File
- Almost all of the function available on iPad in the fail tab are also available on Android. However, the functions are often grouped differently. The functions on iPad that are NOT on android are:
- Multiple selection of matches.
- "Show Auto Backups" -- the android app does not make automatic backups.
- "Current data action" on iPad are all on the screen rather then in a popup.
- "Export to Cloud storage" and "send data in email" are both in the popup after tapping on a saved match, the choice is "Email / Cloud"
- Settings
- The choices here are named somewhat differently between iPad and Android, but they have much the same functionality. The only significant difference is that iPad has a configuration option for voice input and an in-app purchase for extending the voice input lexicon. Voice input is not yet available on Android.
- Help
- No Differences.
- History
- The closest equivalent to this tab on Android is is the "Adjust" tab. Most of features of the iPad History tab are replicated here.
- File
- All of the functions available on iPad are available on Android. There are differences in usage and placement.
- Actions on Current Data Most of the functionality here is accessed by tapping on the "Current Data Actions" button. This brings up a popup with buttons largely equivalent to the buttons here. Missing is "Export current data to Dropbox". On android, you cannot export current data, but only save files. So to reproduce this function you would need to: tab on "current data actions", select "save", tap on the newly saved file in the list of save matches, and finally select "email / dropbox".
- Actions on Existing Files
The most obvious difference is that there is no "show auto backups" button. This is because the auto-backup function does not exist for android.
- Help
- No Differences.
Changes to Volleyball Stat!
Version 3.2.0 -- released July 2013
The initial version of Android.
Version 3.2.1 -- released August 2013
This is a bug fix release. The bugs fixed are:
- Various UI elements were improperly sized and could be invisible on high density displays.
- When stating a new set, if the starting lineup was copied from the previous set, the started would appear both in their playing positions an on the bench.
- In team summary reports, players identified by only their jersey number appeared with only a comma in the name column.
- In some circumstances the default assist was not correctly cleared.
Version 3.2.2 -- released late August 2013
This is a bug fix release. The only changes addressed two user reported situation in which the application crashed.
Version 3.2.3 -- released early September 2013
This is a primarily a bug fix release to address two rare user reported bugs that can cause the app to crash. One bug affected only users running OS pre 4.0. The other bug could occur when editing player names.
In addition, this release included two new features. First, drag and drop for positioning players is now supported. Second, a rotation report was added to the set of available reports.
Version 3.2.4 -- released late September 2013
This is a primarily a bug fix release to address three rare user-reported bugs that can cause the app to crash. The situations corrected are:
- When viewing list of players or getting a list of players at the start of generating a report
- While generating a report. This was caused by sorting getting confused
- While moving a player from the bench to the playing floor using drag and drop. Dropping the player in particular places could cause a crash.
Version 3.2.5 -- released mid October 2013
This is a only a bug fix release. It corrects a problem in which the app may crash while entering or correcting player information.
Version 3.2.6 -- released late October 2013
This is a only a bug fix release. The following bugs have been fixed:
- After manually changing the number of substitutions on the stats reporting page, going to the reports page and viewing the substitution report would cause the app to crash.
- Libero substitutions were incorrectly included in the sub counter for the green team on the stats recording page.
- When players moved to positions (right, left, center) some stats recording could become confused because internally not everything was aware of the position movements.
- On the stats recording page, tapping on the "undo" button then deciding not to undo would incorrectly remove an action from the play-by-play listing. While the action would not be undone, this could cause statistics reporting to be incorrect.
- In the team summary reports, columns like "points played" showed the sum of the points player by each player rather than the actual number of points played.
- The app could register itself as the default viewer for almost everything. This would seriously interfere with viewing content in email attachments, for example.
Version 3.2.7 -- released Mid November 2013
This is a only a bug fix release. This release fixes a problem with data imports from email. In some cases, data files emailed from between devices could not be imported on the receiving device. This fix works by changing the way in which outgoing email is generated. As a result, the fix goes forward only; import of email sent prior to v3.2.7 may still not work.Version 3.2.8 -- released Late November 2013
This is a only a bug fix release. On a few devices attempting to send email with almost any form of attachment from within the app will cause the app to crash. this problem also occurs when trying to save data to dropbox. This release eliminates this cause of crashes.Version 3.2.9 -- released Late December 2013
This release contains bug fixes and minor enhancements.Bugs Fixes
- On the record screen, "serve rtn err" could appear to the left of "serve returned". This breaks pattern with all other buttons.
- On some devices, attachments to email did not appear and files uploaded to Cloud Storage servers failed to upload.
- Files exported Google Drive did not show the type of information they contained.
- On devices running Android 4.4, changes to the "Team Summary" report format had to be entered twice.
- Turned on zooming on reports screen.
- Revised team summary and individual reports so that negative numbers appear in red
- Added 3 new columns in effectiveness report: Percent Kill, Percent Excellent Serve Return, Percent Positive serve return.
- Added column definitions at the end of team summary and individual summary reports.
- Changed the labels on some buttons to eliminate app specific names.
Version 3.2.10 -- released February 2014
This release contains bug fixes and minor enhancements.Bugs Fixes
- serveMade can, in some circumstances, be recorded for the wrong person.
- On some devices, attachments to email did not appear and files uploaded to Cloud Storage servers failed to upload.
- In some rare circumstances the program could crash from the adjust screen.
- Changed the name of the UNDO tab to Adjust.
- Added a new tab "Settings" that makes it easier to get to settings that were previously only available from the options menu.
- Added the ability to insert statistics into previously recorded points from the adjust tab.
- Allowed any statistic to be deleted from a point from the adjust tab.
Version 3.5.0 -- released February 2014
This release contains several significant enhancements, principally in the area of customizability.
- Added a "Team Summary Reports" option to the Settings tab. This option allows you to customize existing reports or create whole new reports. Together with the existing ability to customize button labels, this allows non-english users to both record and display statistics in their language of choice.
- Added a "Behaviors" option of the Settings tab. This option allows users to change the look and feel of the app in ways not previously available. For instance, if your team rarely makes substitutions, then always having the bench on the screen for recording stats seems like a waste of space. One of the behavior options allows you to hide the bench and then make it appear only when you need it.
- Added ability to swap the positions of two players without first moving them to the bench.
- Added he ability to manually reset the date / time of a data record. Hence, you can force the date stamp to be correct.
- Added an in-app purchase that allows turning off all ads.
Version 3.5.1 -- released June 2014
Squashes a couple of bugs that can, very rarely, cause the app to crash.Version 3.5.2 -- released August 2014
- Squash a potentially app-crashing bug.
- Updates required by Google.
- Adjusts font colors when for dark team colors
Version 3.5.3 -- released September 2014
- Squash a bug that occasionally caused the app to crash on devices running Android 4.4
Version 3.5.4 -- released September 2014
Address user-reported issues- Fix issues with maxpreps export. "Serve receive success" was not reported at all and dig error was reported with an incorrect header, so maxpreps ignored the value
- Adjusted page layouts to make some buttons appear correctly on some devices.
- Fix a bug in which the app could crash when opening the Adjust tab
- Fix problem specific to Android 4.4. In individual summary tables on the reports tab, the first summary showed correctly, but after that only blank pages.
Version 3.6.0 -- released December 2014
New Features and some minor bug fixes- Backup files: The app will automatically create backup files at the end of sets and when the record screen stops being in front. In addition, the app can be configured to do backups within sets. The frequency of backup creation and number of backups retained can be configured from the Settings tab. Backups can be recovered from the File tab.
- Player positioning after data read from file: when a data file is loaded and there is data in the current set on the first switch to the record tab, users will be asked if they want to position players as they were when the data was recorded. This can be especially helpful in getting you started quickly after a data recovery.
- Team Summary report customization: Added 3 new data options: POINTS_RED, POINTS_GREEN and POINTS_ALL. These can be used in formulas so you can create columns like "Percentage of points scored on Kills".
- Opposition Recording: Tap and hold the "score on opponent actions" buttons (at the bottom of the record screen) to open a popup that allows you to record what the opponent did to score the point. For instance a kill or a service error.
- Pictures! Associate a picture with each player. You can use any picture stored on the device. These pictures can be configured to show up on the record screen in the playing position of each player. Pictures are not available in reports (yet).
- Regrouped the two substitution reports as different formats under the Substitution content type.
- Colors: Buttons on the record screen briefly turn blue when you tap on them. This simply helps you see what button you have hit.
- Notes: record a free text comment about a point. Notes can be taken a three times:
- Note Popup. Select "Notes" from the "3 dots" button between the two "score on opponent action" buttons. This is only available if you have configured the display to show the "3 dots" button.
- On long press on "score for us on opponent action". (The big green button). This allow you to not only record how the opponent scored the point but also who of the opponents.
- On long press on "score for them on opponent action". (The big red button). This allow you to not only record how the opponent scored the point but also who of the opponents.
- New Reports.
- Scoring->Runs: Shows a graph, and optionally a table, of the progression of the score in each set.
- Scoring->Sources: tables showing which team is responsible for the points scored. This table is most effective when used in combination with the new ability to attribute scoring to the opposition.
- Play-by-Play->Notes: Show only notes about points, suppress everything else.
- Configuration: Extended the configuration options for playing positions on the record screen. In addition you can see the effect of your changes without leaving the screen.
- Other lesser changes: rendering improvements, ...
Version 3.7.0 -- released Feb 2015
Bug Fixes and minor updates. The timing of this release was forced by Google policy changes. Bugs- On reports tab, when viewing "Scoring Sources" report, the app got confused during device rotations
- On record tab, player names could be hidden as a result of some behavior selections.
- Changed some defaults to make this problem not appear.
- Added a new customization option (settings / buttons) so that users can better control the appearance of the buttons.
- On score tab, on some devices the numbers did not appear (because they were too large). 3 changes
- Put in a fix for an Android hardware bug.
- Reduced the default size of the numbers, slightly
- Added two almost invisible buttons to right and left of "new set" button that gives users ability to increase / decrease the font size.
- In some circumstances roster changes were not saved.
- A couple of user-reported crashes
- On file tab, sorting was moved inside of the table by tapping on the header of the column to be sorted.
- On settings tab / "players", altered the look to make it a easier to use.
- Created a new type of file "roster", in response to repeated questions about rosters. The addition of roster files resulted in changes on the file tab and on "settings / players".
- Added "Help" as a tab option. Some android devices do not show the expected "3 dots" options menu.
- Replaced "Forget set 1" (on the file tab) with the much more flexible "Forget a set".
Version 4.0.0 -- released May 2015
This version introduces a lot of new features in the area of customization. New features include:- User control over all colors on record tab
- User control over all strings on tabs other than settings.
- Multiple configurations for strings, colors and buttons.
- Export of configurations for strings, colors and buttons.
- Export of summary table designs
- Summary report format now apply to both team and individual reports
- Import of data (or configurations) from Dropbox of from a URL.
- External archives of button, colors, strings, and reports so that the app is even more extensible.